Применимость
| Модель | Двигатель | Год |
|---|---|---|
| S40 (04-) | — | 2004–2008 |
| V50 | — | 2004–2008 |
Preparations
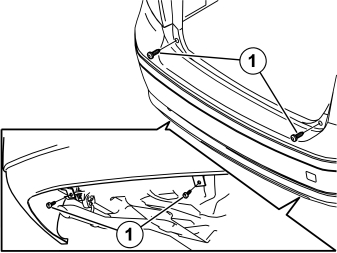
- Remove the four screws (1) for the bumper cover. The screws are underneath/on the sides of the tailgate opening and in the lower edge of the bumper.
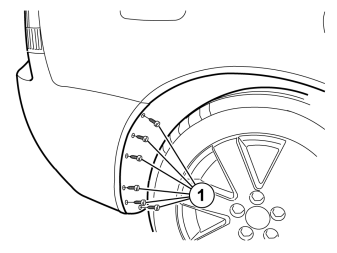
Carry out on both the left and right-hand sides:
- Remove the six screws (1) holding the bumper cover at the rear edge of the wing liner in the rear wheel arch.
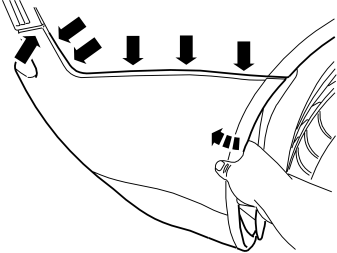
Carry out on both the left and right-hand sides:
- Detach the end of the bumper cover by grasping the bumper cover inside the wing liner and puling carefully to release the catches at the upper edge.
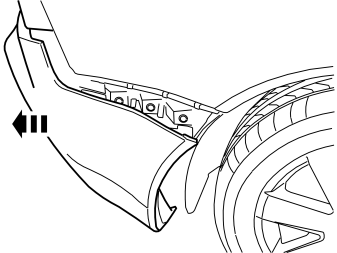
Carry out on both the left and right-hand sides:
- Remove the bumper cover by pulling it straight backwards.
- Disconnect any parking assistance connectors.
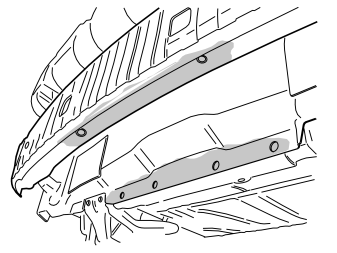
- Clean any underseal and dirt from the inner member of the bumper where the L-profile for the towbar is to be located.
- Clean the metal flange on the inside and outside where the reinforcement stay is to be located.
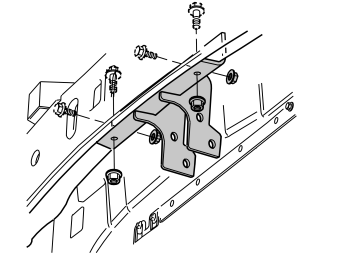
- Install the L profile on the inner member of the bumper with four M10x25 flange screws and corresponding flanged nuts. Do not tighten yet.
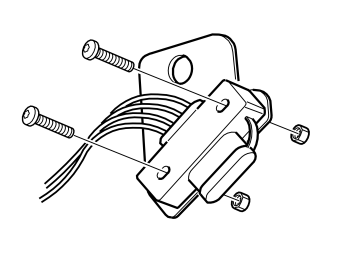
- Assemble the towbar wiring connector according to the separate installation instructions.
- Install the connector on the towbar bracket as illustrated.
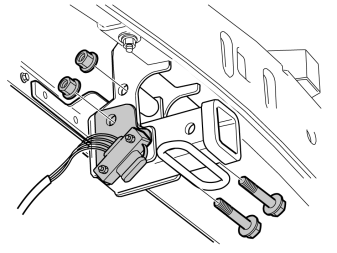
- Take the towbar cradle, two flange screws M14x110 and two flange nuts from the kit. Install the cradle on the L profile together with the bracket and electrical connector. The electrical connector must be positioned on the left-hand side and on the lower screw. Do not tighten yet.
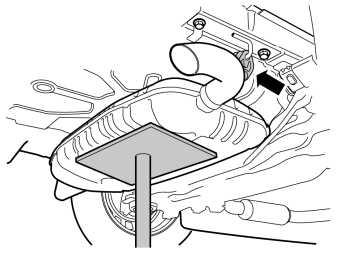
Applies to cars with a 5 cylinder engines
- Place a support under the muffler.
- Detach the silencer's rubber mounting from its brackets on the right and left-hand side.
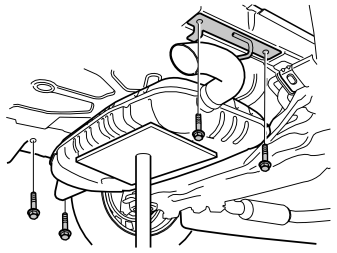
Applies to cars with a 5 cylinder engines
- Remove the screws and brackets of the muffler mount on the right and left side.
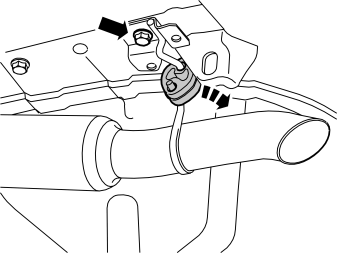
Applies to cars with a 4 cylinder engines
- Detach the rubber mounting for the end pipes from the bracket on the underneath of the left side member.
- Remove the screw and the bracket.
Installation
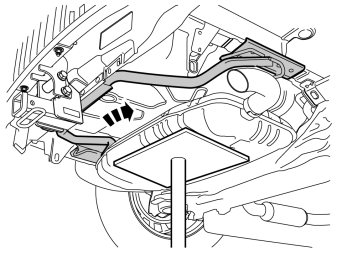
- Prise in the reinforcement stay from the back over the muffler.
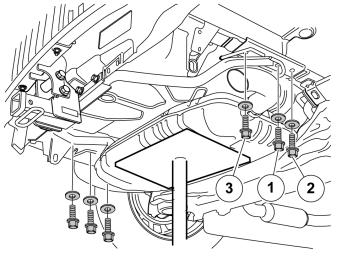
- Install three M8x30 screws with washers on each side of the reinforcement stay. Do not tighten yet. Install in the order illustrated.
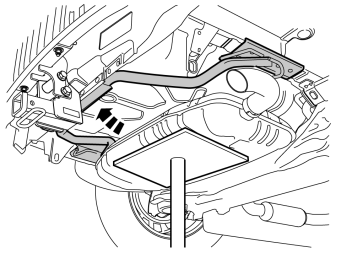
- Press the rear edge of the reinforcement stay upwards.
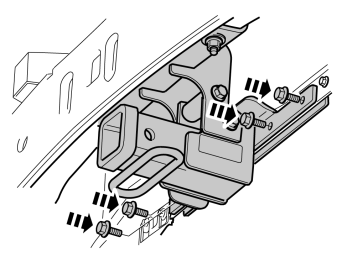
- Install four M10x25 flange screws, which are screwed through the towbar cradle and reinforcement stay in the mounting plate. Do not tighten yet.
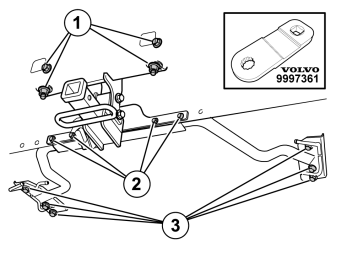
- Tighten the L profile's four M10 screws (1) alternately so that the L profile and the inner member of the bumper lie against each other correctly. Tightening torque: 47 Nm (35 lbf.ft).
- Tighten the four M10 screws (2) of the towbar retainer and reinforcement stay alternatingly. Tightening torque: 47 Nm (35 lbf.ft).
- Tighten the six screws (3) for the reinforcement stay's front attachments in steps. Tightening torque 20 Nm (15 lbf.ft.) and then angle-tighten 90°. There is not a lot of room to torque-tighten the middle screw, use special tool part no. 9997361with a 3/8" socket extension.
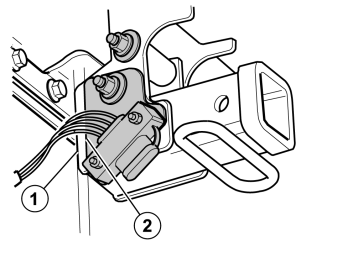
- Check that the bracket's front edge (2) is parallel with the retainer's front edge (1).
- Torque tighten the two M14 screws to 200 Nm (147 lbf.ft).
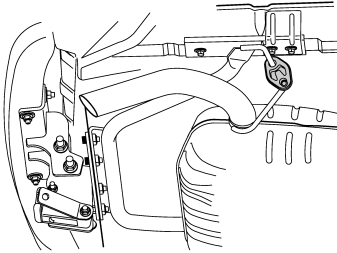
- Reinstall the rubber mounting on the reinforcement stay.
- Remove the support from under the muffler.
- Install the towbar wiring following separate installation instructions.
Image A shows car without body kit
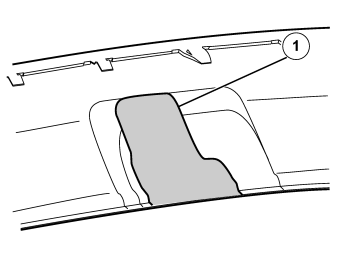
Illustration B shows cars with body kit
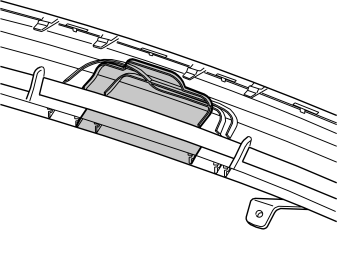
- Apply tape to the outside of the bumper cover, opposite the marking (1) on the inside. This is done to protect the paint from the saw when cutting out the cut-out for the towbar.
- Cut out the cut-out following the existing marking. The marking on the bumper cover is only a thin line.
Примечание: Do not damage the painted surface of the bumper cover.
- Smooth off the sawn edges with a fine toothed file or knife. Remove the tape.
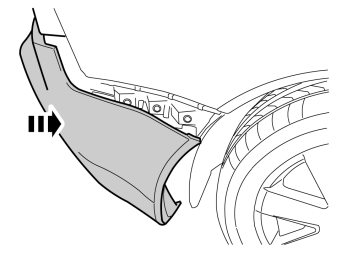
- Reinstall the bumper cover to the body.
- Connect any parking assistance connectors.
- Press the bumper cover ends so that they engage in the body mountings.
- Reinstall the screws in the wheel arches, on the top and at the lower edge of the bumper cover.
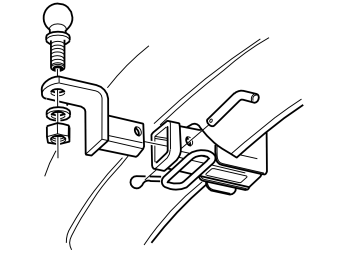
- Remove the cover plug.
- Take the ball holder and insert it into the towbar retainer's square tube until the holes in the ball holder and square tube correspond.
- Insert the lock bolt through the holes and secure it with the locking pin.
- Position the ball in the hole on the ball holder.
- Install washer and nut. Torque tighten to 244 Nm (180 lbf.ft).
- Remove the towbar and reinstall the cover plug in the socket for the towbar.
Storing the towbar
Steps 20-22 apply to cars without spare wheel
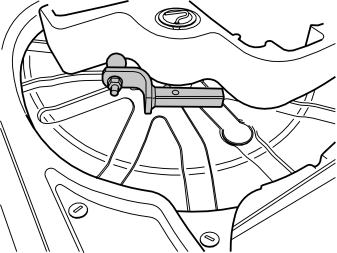
- Position the towbar and test the fitting.
- Clean the surfaces to which the pieces of foam tape shall adhere.
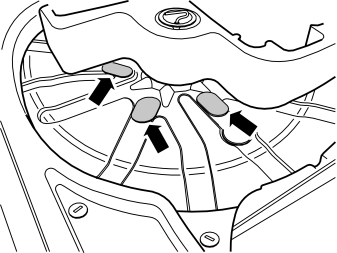
- Take the pieces of foam tape from the kit and apply them as illustrated.
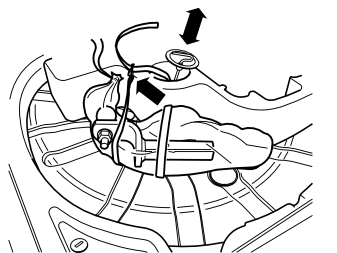
- Unscrew the screw securing the styrofoam box in the bodywork.
- Place the towbar in the bag supplied and locate it so that it is in the position depicted in step 20.
- Insert the strap through the hole for the screw to the styrofoam box. Wrap the strap around the towbar twice, once around the bent towbar bracket and once around the square profile, as illustrated.
- Strap down the bag with the towbar against the styrofoam box.
- Tightly screw in the styrofoam box screw.
Installing the spacer block, applies to all cars with a spare wheel
Applies to the V50 without subwoofer
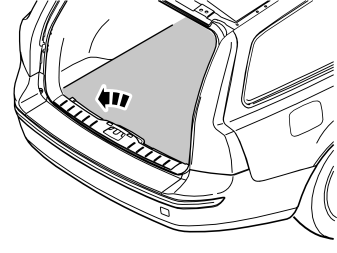
- Lift out the luggage compartment floor.
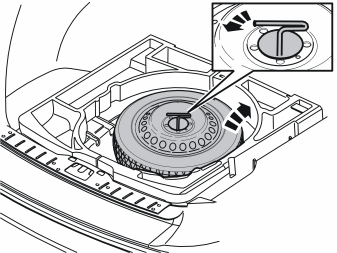
- Unscrew the screw with the plastic cone that holds the spare wheel.
- Lift out the spare wheel.
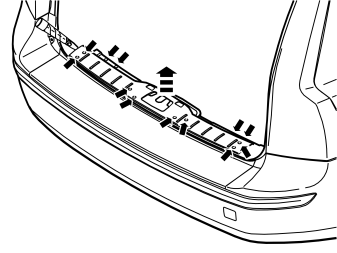
- Prize off the four external clips at the front edge/bottom edge of the sill trim panel on the tailgate.
- Pry up one of the corners of the sill trim panel so that the two clips at that end release. Use a weatherstrip tool.
- Pull up the sill trim panel so the remaining six clips release. Remove the panel.
- Detach the rubber strip where it covers both side panels in the tailgate opening.
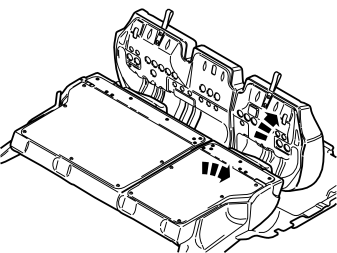
- Fold the seat cushion and backrest forward on both the right and left-hand sides of the rear seat.
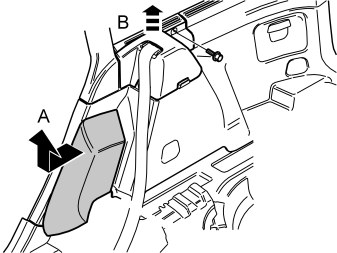
- Grasp the upper edge of the right-hand side cushion. Pull the side cushion forward so that the clip on the reverse releases.
- Slide the side cushion up. Remove the side cushion.
- Remove the screw at the rear edge of the panel at the front/top of the right-hand side panel.
- Pull the panel upwards so that the four clips on the inside release. Remove the panel.
- Repeat the operation for the left-hand side.
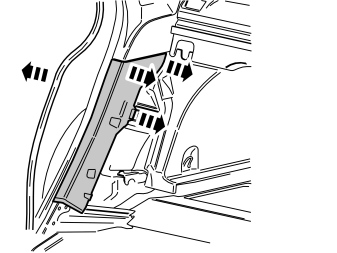
- Pull off the rubber strip at the rear of the opening for the right-hand rear door.
- Pull off the lower C pillar panel at the upper edge to release the three upper clips. This is to facilitate the removal of the side panel later on.
- Repeat the operation for the left-hand side.
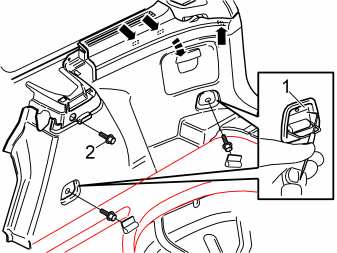
- Fold out the load securing eyelets on the right-hand side panel.
- Insert a scriber with an angled tip into the holes in the top of the covers (1). Turn the scriber so that the tip engages the reverse of the cover. Pull the covers off.
- Remove the screws in the load securing eyelets.
- Remove the screw (2) at the front/top edge of the side panel.
- Pull off the side panel at the top so that the two clips at the rear/bottom of the side window and the clip at the bottom of the D-pillar release.
- Disconnect the connector for the 12V socket, if present.
- Lift out the side panel.
- Repeat the operation for the left-hand side.
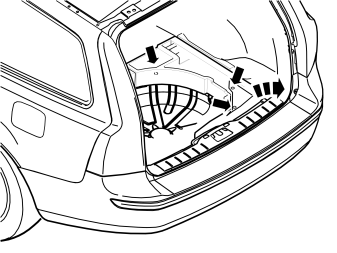
- Remove the right-hand luggage compartment floor support. First remove the three clips at the bottom of the compartment, then lift it up.
- Repeat the operation for the left-hand side.
- Place the luggage compartment floor supports to one side, new are included in the kit.
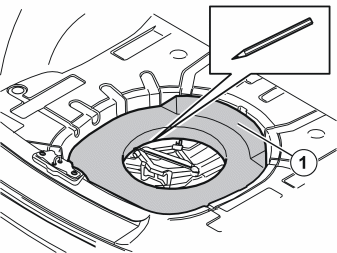
- Place the spacer block with the large hole, from the kit, in the centre on the bottom of the spare wheel well with the angled lug (1) pointing forwards in the car.
- Using a pen, mark the insulation at the bottom of the spare wheel well along the edge of the hole.
- Remove the spacer block.
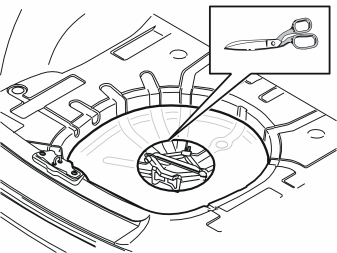
- Cut just inside the marking so that the underneath of the spacer lies flush against the bottom of the spare wheel well, without any part of the insulation in-between.
- Reinstall the spacer block.
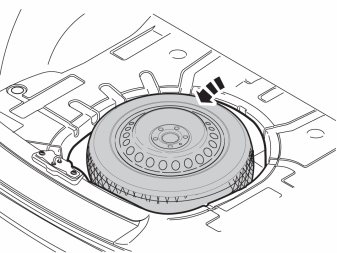
- Put the spare wheel back in place.
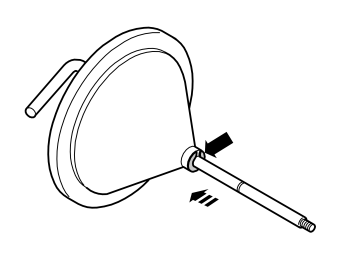
- Remove the locking washer and unscrew the locking screw for the spare wheel mounting from the plastic cone and place the screw to one side.
- Take the new longer screw from the kit and install the plastic cone and lock using the locking washer.
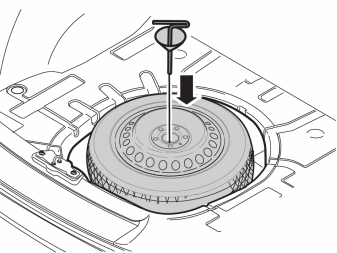
- Tighten the spare wheel with the new screw and plastic cone.
- Insert the new luggage compartment supports from the kit in place of the old ones.
- Reinstall the side panels and torque tighten the screws in the load securing eyelets to 24 Nm (18 lbf.ft.).
- Reinstall the cover panels at the front edge of the side panels.
- Reinstall the tailgate sill trim panel.
- Reinstall the C-post panels.
- Reinstall the rubber strips at the rear edges of the rear doors.
- Reinstall the side cushions.
- Position the backrest and seat cushions back into place.
Applies to the V50 with subwoofer
- Lift out the luggage compartment floor.
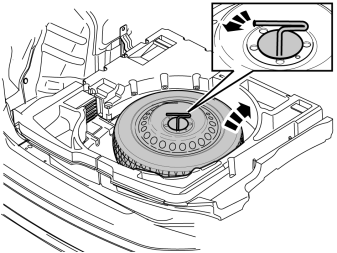
- Unscrew the screw with the plastic cone that holds the spare wheel.
- Lift out the spare wheel.
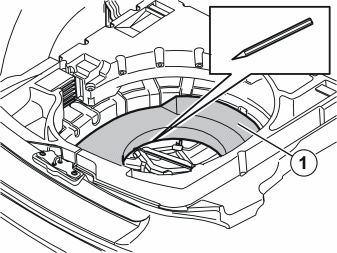
- Place the spacer block with the large hole, from the kit, in the centre on the bottom of the spare wheel well with the angled lug (1) pointing forwards in the car.
- Using a pen, mark the insulation at the bottom of the spare wheel well along the edge of the hole.
- Remove the spacer block.
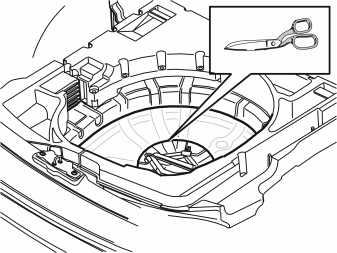
- Cut just inside the marking so that the underneath of the spacer lies flush against the bottom of the spare wheel well, without any part of the insulation in-between.
- Reinstall the spacer block.
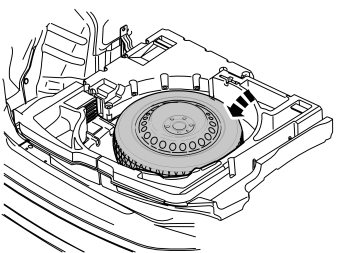
- Put the spare wheel back in place.
- Remove the locking washer and unscrew the locking screw for the spare wheel mounting from the plastic cone and place the screw to one side.
- Take the new longer screw from the kit and install the plastic cone and lock using the locking washer.
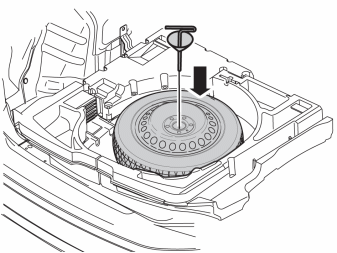
- Tighten the spare wheel with the new screw and plastic cone.
Applies to the S40 without subwoofer
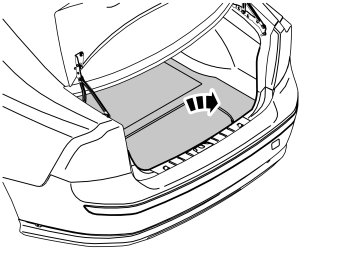
- Lift out the luggage compartment floor and place to one side, it will not be reused.
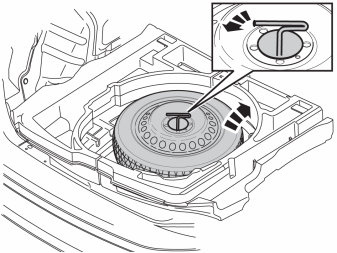
- Unscrew the screw with the plastic cone that holds the spare wheel.
- Lift out the spare wheel.
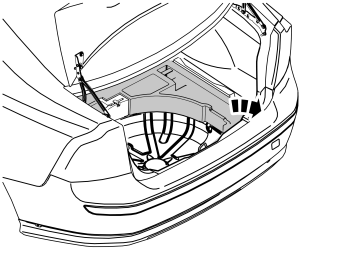
- Remove the upper luggage compartment floor supports on the right and left-hand sides and place to one side. New ones in the kit.
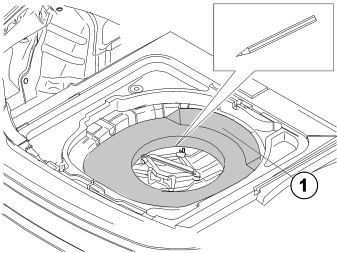
- Place the spacer block with the large hole, from the kit, in the centre on the bottom of the spare wheel well with the angled lug (1) pointing forwards in the car.
- Using a pen, mark the insulation at the bottom of the spare wheel well along the edge of the hole.
- Remove the spacer block.
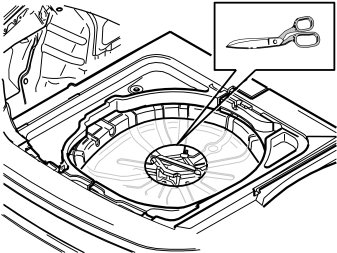
- Cut just inside the marking so that the underneath of the spacer lies flush against the bottom of the spare wheel well, without any part of the insulation in-between.
- Reinstall the spacer block.
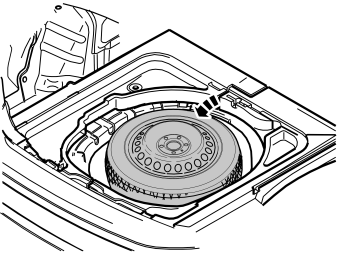
- Put the spare wheel back in place.
- Remove the locking washer and unscrew the locking screw for the spare wheel mounting from the plastic cone and place the screw to one side.
- Take the new longer screw from the kit and install the plastic cone and lock using the locking washer.
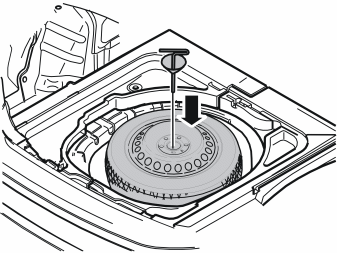
- Tighten the spare wheel with the new screw and plastic cone.
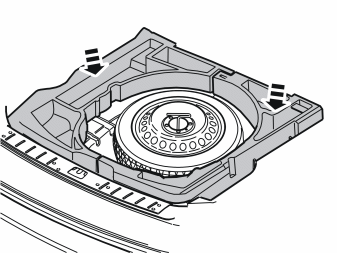
- Insert two new luggage compartment supports from the kit.
Applies to the S40 with subwoofer
- Lift out the luggage compartment floor.
- Unscrew the screw with the plastic cone that holds the spare wheel.
- Lift out the spare wheel.
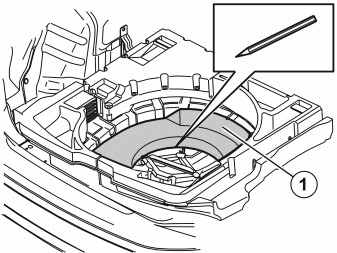
- Place the spacer block with the large hole, from the kit, in the centre on the bottom of the spare wheel well with the angled lug (1) pointing forwards in the car.
- Using a pen, mark the insulation at the bottom of the spare wheel well along the edge of the hole.
- Remove the spacer block.
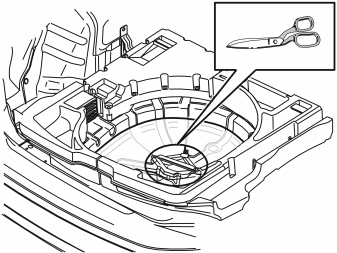
- Cut just inside the marking so that the underneath of the spacer lies flush against the bottom of the spare wheel well, without any part of the insulation in-between.
- Reinstall the spacer block.
- Put the spare wheel back in place.
- Remove the locking washer and unscrew the locking screw for the spare wheel mounting from the plastic cone and place the screw to one side.
- Take the new longer screw from the kit and install the plastic cone and lock using the locking washer.
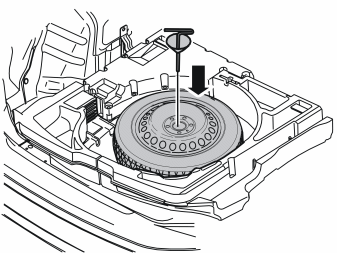
- Tighten the spare wheel with the new screw and plastic cone.
Storing the towbar, applies to cars with a spare wheel
Illustration A
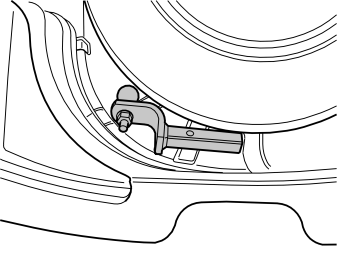
- Position the towbar and test the fitting.
- Clean the surfaces to which the pieces of foam tape shall adhere.
Illustration B
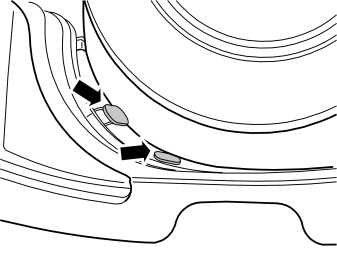
- Take the pieces of foam tape from the kit and apply them as illustrated.
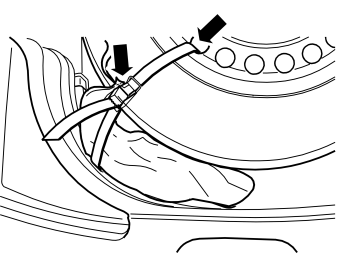
- Place the towbar in the bag supplied and locate it so that it is in the position depicted in illustration 60A.
- Thread the strap in one of the holes in the wheel and strap down the bag with the towbar onto the tyre.
- Reinstall the luggage compartment floor.
Applies to the S40 without subwoofer
- Take a new luggage compartment floor from the kit and install.
Обсуждение и оценка
0Пока нет комментариев. Будьте первым.