Применимость
| Модель | Двигатель | Год |
|---|---|---|
| S60 (-09) | — | 2005–2009 |
| S80 (-06) | — | 2005, 2006 |
| V70 (00-08) | — | 2005–2008 |
| V70 XC (01-) / XC70 (-07) | — | 2005–2007 |
| XC90 | — | 2005–2009 |
Примечание: Some steps in these installation instructions are presented with illustration only.
Preparations
Applies to the S60
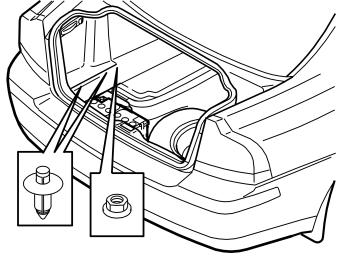
- Fold back the carpet.
- Remove the clips from the lower edge of the folding panel on the left-hand side by pressing in the middle of them until a click is heard.
- Remove the clips.
- Unscrew the front clips.
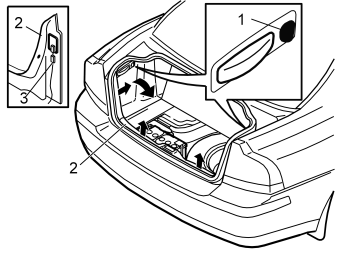
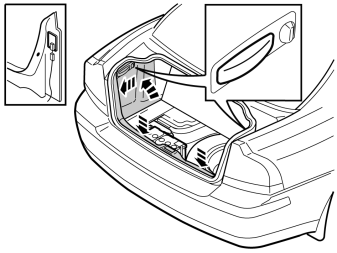
- Turn the knob (1) on the right-hand and left-hand sides a quarter turn.
- Fold the panels inwards. Lift the panels out.
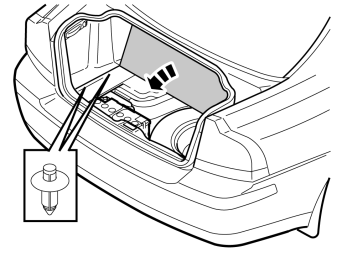
- First, pull the trunk lid sill trim panel (2) forwards until the two clips on the right-hand and left-hand sides release. Pull forcefully but carefully since the panel is fitted tightly. Pull the panel straight up until the four clips in the lower edge release.
- Remove the wiring (3) for the cargo compartment lighting.
- Lift out the sill trim panel.
Applies to the S80
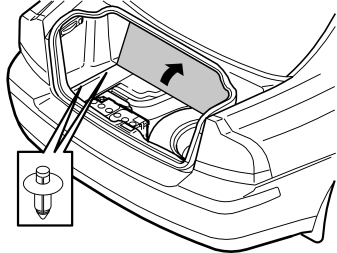
- Fold the carpet to one side.
- Remove the clips from the lower edge of the folding panel on the left-hand side by pressing in the middle of them until a click is heard.
- Remove the clips.
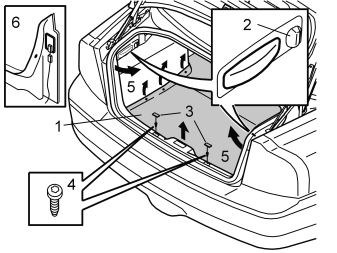
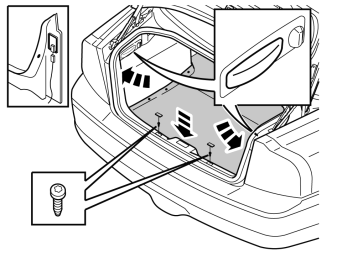
- Place the carpet to one side (1) in the cargo compartment.
- Turn the clips (2) and fold in the side panels on both sides.
- Remove the two covers (3) and the screws (4) underneath. Grasp the panel's outer edges (5) and pull the middle inwards so that the clips release at the sides.
- Disconnect the connectors (6) for the side lights. Remove the panel by pulling it straight upwards, so that the clips release from the rear member.
Applies to the S60 and S80
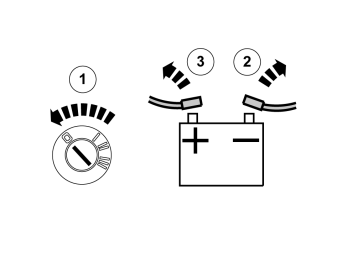
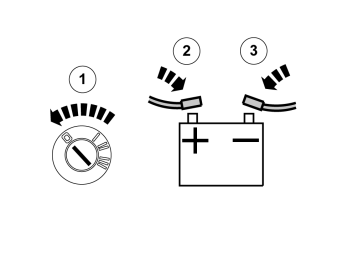
- Turn the ignition key to position 0.
- Disconnect the battery negative lead.
- Disconnect the battery positive lead.
Примечание: Wait at least three minutes before unplugging the connectors or removing other electrical equipment.
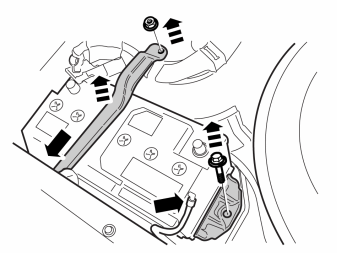
- Remove the nut at the front edge of the battery bracket.
- Remove the screw at the rear edge and remove the bracket.
- Remove the screw and floor mount for the battery.
- Remove the battery's drainage and place to one side.
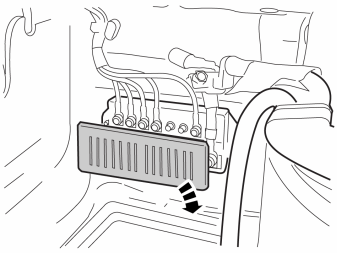
- Remove the cover in the fuse holder for the main fuses.
Installation
Applies to the S60 and S80
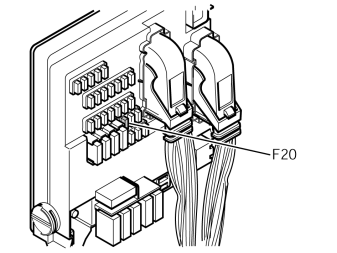
- Remove the 20A fuse in the rear fuse holder in terminal F20. Replace it with the 5A fuse from the kit.
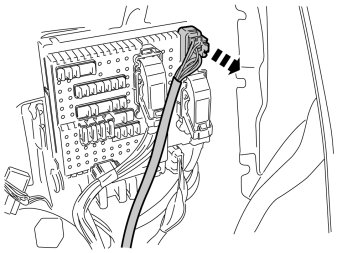
- Disconnect the connector for the cable harness for the towbar.
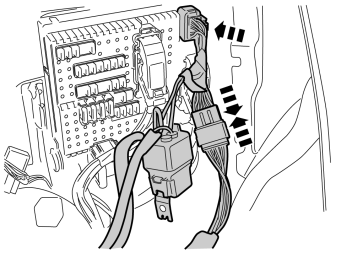
- Take the cable harness from the kit and connect the black female connector to the socket where the connector for the cable for the towbar was removed.
- Plug the remaining black connectors into each other.
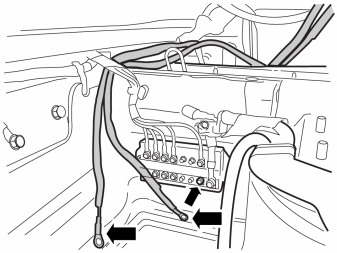
- Route the long cables forward along the existing cable harness along the rear member, up to the earth terminal and fuse holder for the main fuses.
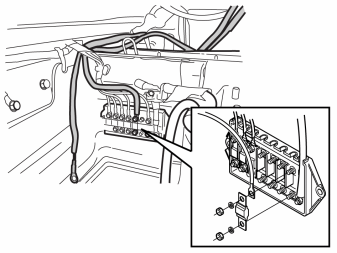
- Take a fuse, two nuts and two washers from the kit. Install the fuse in any free terminal.
- Connect the cable with the small ring cable terminal.
- Install washers and nuts. Torque tighten the nuts to 5 Nm (4 lbf.ft.).
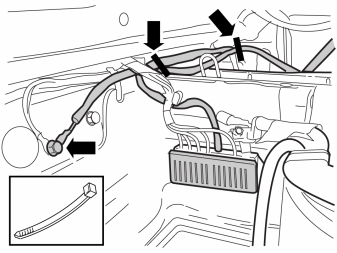
- Connect the ground lead to the existing ground terminal on the left-hand side in the rear member. Torque tighten to 24 Nm (18 lbf.ft.).
- Route all the cable excess into the space under the left tail lamp.
- Secure the wiring using two cable ties from the kit.
- Make sure that the wiring does not chafe against sharp edges.
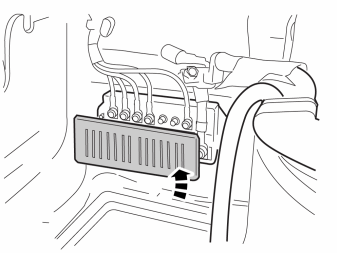
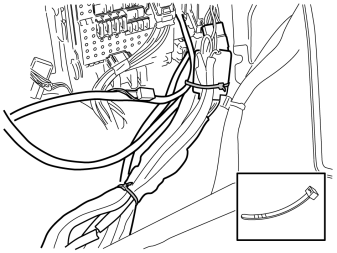
- Secure the relay holder with relay and fuse holder with fuse, at existing cable harnesses.
- Secure the long cables at existing cable harnesses using cable ties.
- Make sure that the wiring does not chafe against sharp edges.
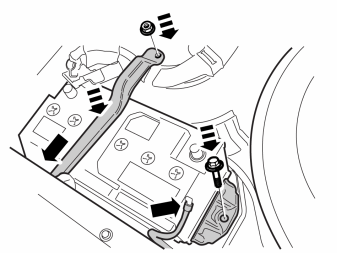
- Reinstall the battery.
- Tighten the mounting with the screw. Torque tighten to 24 Nm (18 lbf.ft.).
- Connect the battery's drainage hose.
- Reinstall the battery bracket and tighten it with the screw and the nut. Torque tighten to 24 Nm (18 lbf.ft.).
Applies to the S80
- Connect the cargo compartment lighting.
- Reinstall the sill panel and the side panels.
Applies to the S60
- Connect the cargo compartment lighting.
- Reinstall the sill panel and the side panels.
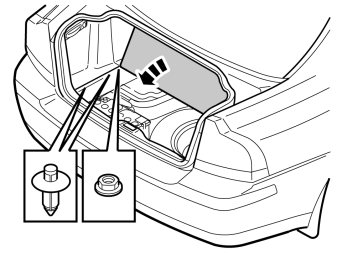
Preparations
Applies to the V70 and the XC70
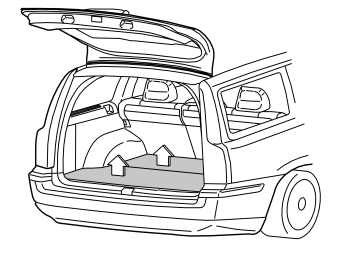
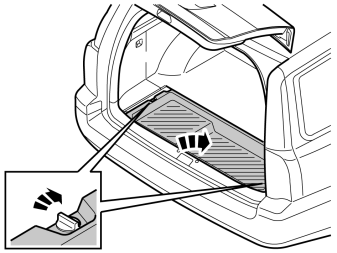
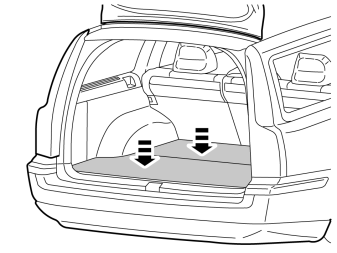
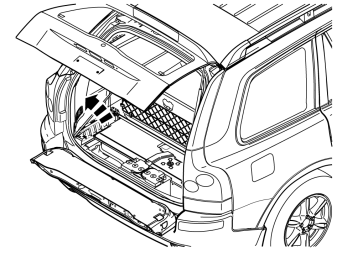
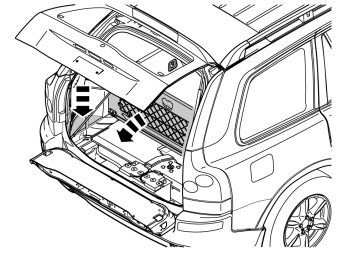
- Remove the two floor hatches in the cargo compartment.
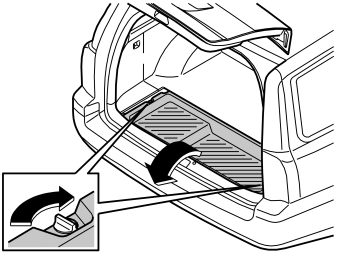
- Detach the storage box under the rear floor hatch by turning the clips on the left and right-hand sides. Turn each clip a 1/4 turn. Lift out the box.
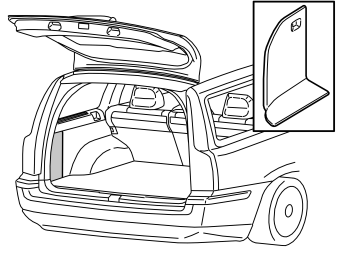
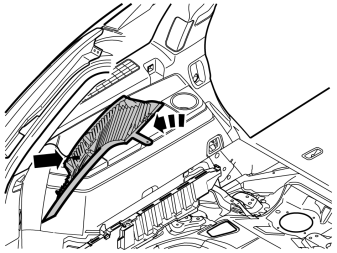
- Remove the left-hand folding side panel in the cargo compartment.
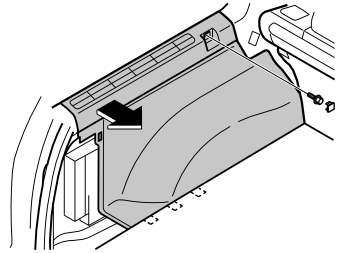
- Remove the left side panel. Remove the cover and the screw from the front edge.
- Pull the top of the panel inwards until the clips release.
- Fold the panel inwards. Lift the panel out.
- Turn the ignition key to position 0.
- Disconnect the battery negative lead.
- Disconnect the battery positive lead.
Примечание: Wait at least three minutes before unplugging the connectors or removing other electrical equipment.
- Remove the nut at the front edge of the battery bracket.
- Remove the screw at the rear edge and remove the bracket.
- Remove the screw and floor mount for the battery.
- Remove the battery's drainage and place to one side.
Installation
Applies to the V70 and the XC70
- Remove the cover in the fuse holder for the main fuses.
- Remove the 20A fuse in the rear fuse holder in terminal F20. Replace it with the 5A fuse from the kit.
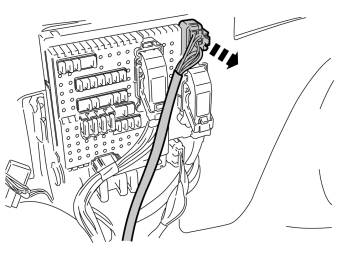
- Disconnect the connector for the cable harness for the towbar.
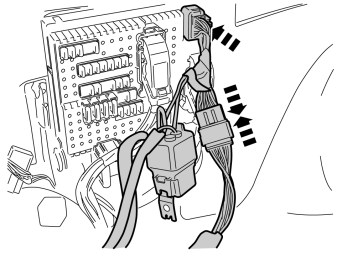
- Take the cable harness from the kit and connect the black female connector to the socket where the connector for the cable for the towbar was removed.
- Plug the remaining black connectors into each other.
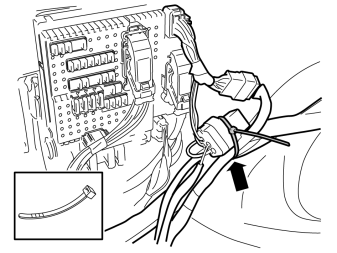
- Secure the relay holder with relay and fuse holder with fuse, to existing cable harness with cable ties from the kit.
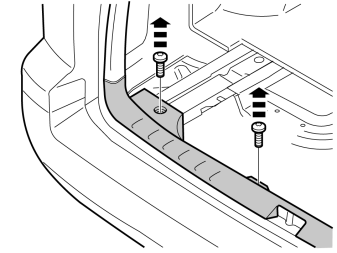
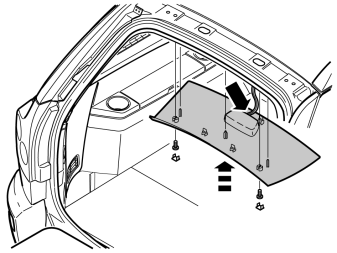
- Remove the outer screws on the left side of the sill panel.
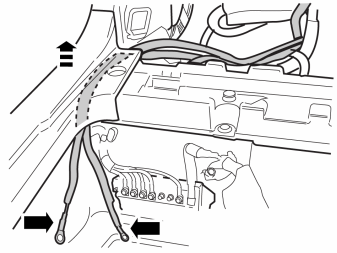
- Pull up the sill panel's left end carefully and insert the two long cables towards the rear member as far as possible.
- Route as much cable as possible so that the cable with the large ring cable terminal can be connected to the ground terminal in the rear member, and the cable with the small ring cable terminal to the holder for the main fuses.Ensure that the cables are positioned so that they cannot be trapped.
- Tighten the sill trim panel securely.
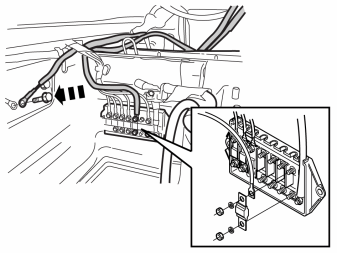
- Connect the larger cable terminal to the ground terminal in the rear member. Torque tighten to 24 Nm (18 lbf.ft.).
- Take a fuse, two nuts and two washers from the kit and install the fuse in any free terminal.
- Connect the cable with the small ring cable terminal.
- Install washers and nuts. Torque tighten the nuts to 5 Nm (4 lbf.ft.).
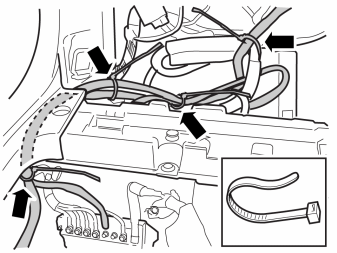
- Place the wiring excess under the fuse holder.
- Secure the cable harness from the larger connectors at the existing cable harness with cable ties from the kit.
- Secure the two cables to ground and main fuses at existing cables using cable ties.
- Make sure that the wiring does not chafe against sharp edges.
- Reinstall the battery with bracket and mounting.
- Tighten screws and nuts to 24 Nm (18 lbf.ft).
- Connect the battery's drainage hose.
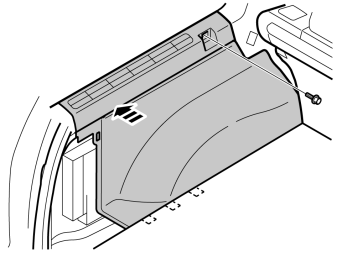
- Reinstall the panel. Torque tighten the screws to 10 Nm (7.5 lbf.ft.).
Preparations
Applies to the XC90
Applies to cars with two rows of seats
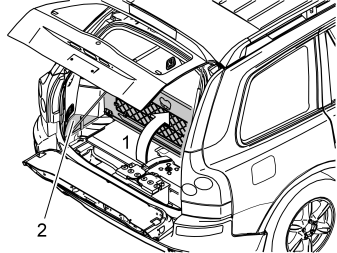
- Fold up the center rear floor hatch (1). If the underside of the floor hatch is equipped with a grocery bag holder, the holder is secured with a strap at each end of the storage compartment. Detach the straps.
- Remove the underlying storage compartment.
- Remove the floor hatch by folding it almost completely closed and pulling it backwards from the mountings until it releases.
Applies to cars with three rows of seats and integrated carrier bag holder on the underside of the center floor hatch
- Fold up the center rear floor hatch (1).
- Detach the two straps on the underlying panel. Lift up the rear edge of the panel, fold the floor hatch back towards the panel and lift out the floor hatch with the panel.
Applies to cars with three rows of seats without an integrated carrier bag holder
- Fold up the center rear floor hatch (1) at the rear edge and lift it out.
Applies to all models
- Remove the left-hand side floor hatch (2).
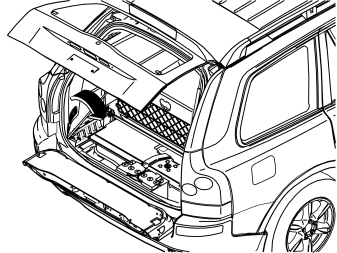
- Remove the folding side panel from the left-hand side in the cargo compartment.
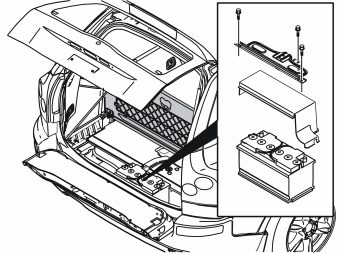
- Remove the two screws and the nut from the holder for the battery cover and lift out.
- Remove the battery cover.
- Turn the ignition key to position 0.
- Disconnect the battery negative lead.
- Disconnect the battery positive lead.
Примечание: Wait at least three minutes before unplugging the connectors or removing other electrical equipment.
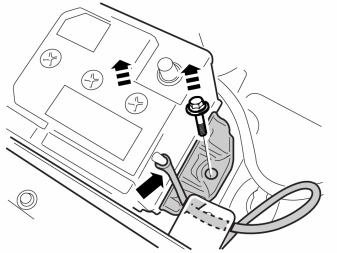
- Remove the screw and floor mount for the battery.
- Remove the battery's drainage and place to one side.
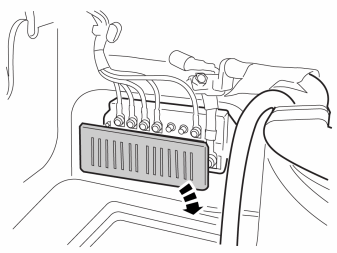
- Remove the cover in the fuse holder for the main fuses.
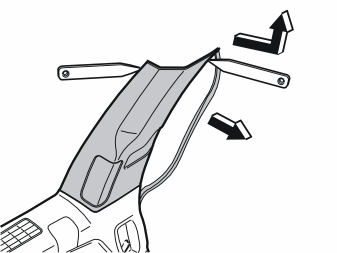
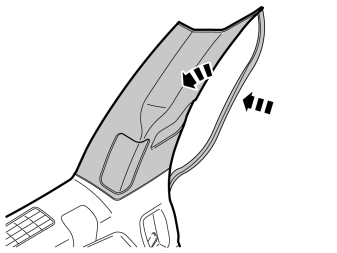
- Pull off the rubber strip at the rear edge of the door opening for the left-hand rear door opposite the left-hand C-post panel.
- Carefully pry off the left-hand C-post panel sides at the top. Use a plastic weatherstrip tool. Then pull until the three clips on the inside release. Do not damage the headlining or the panel.
- Disconnect the connector from any headset sockets.
- Remove the panel by pulling upwards slightly and unhooking it from the side panel.
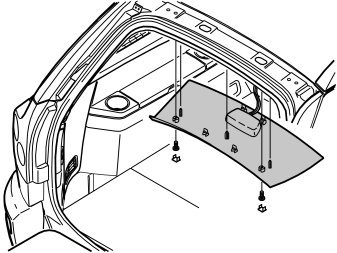
- Remove the rear roof panel covers and the screws beneath them.
- Carefully pry off the panel at the rear edge. Use a plastic weatherstrip tool.
- Pull the rear edge of the panel downwards until the four clips on the top release.
- If the car is equipped with lighting in the panel, unplug the connector from the panel.
- Pull the panel backwards to release it.
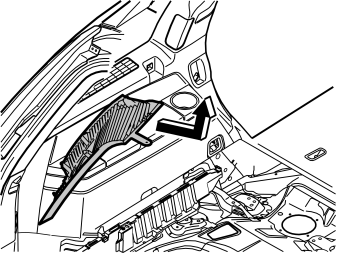
- Carefully pull off the D-post panel. Start at the top edge then pull down until the three clips on the inside release. Do not damage the panel.
- Disconnect the connector on the D-post panel (if the car has a loudspeaker in the D-post, the connector is in the loudspeaker).
- Remove the panel by pulling upwards slightly and unhooking it from the side panel.
Illustration A
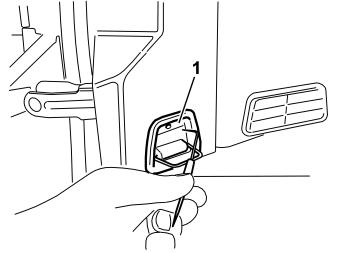
- Fold out the load securing eyelet.
- Insert a scriber with an angled tip into the hole in the top of the cover.
- Turn the scriber so that the angled tip engages in the reverse of the cover (1). Pull the cover off.
Illustration B applies to cars with two rows of seats
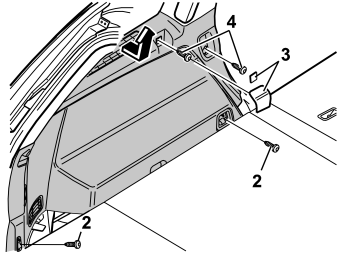
Illustration C applies to cars with three rows of seats
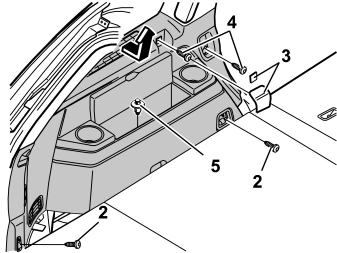
- Fold up the seats in the third row (applies to cars with three rows of seats).
- Remove the screws (2) for the load securing eyelets in the left-hand side panel.
- Remove the covers (3) over the front mountings for the left-hand side panel. Pry the covers off. Use a plastic weatherstrip tool or a small screwdriver.
- Remove the screws (4).
- Remove the clip (5) at the bottom of the storage compartment in the panel (Applies to cars with three rows of seats).
- Remove the panel by pulling out the upper edge slightly so that the clips on the inside release. Pull the panel straight up.
Installation
Applies to the XC90
- Remove the 20A fuse in the rear fuse holder in terminal F20. Replace it with the 5A fuse from the kit.
- Disconnect the connector for the cable harness for the towbar.
- Take the cable harness from the kit and connect the black female connector to the socket where the connector for the cable for the towbar was removed.
- Plug the remaining black connectors into each other.
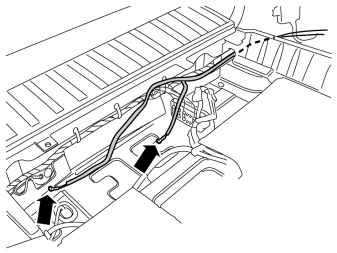
- Route the long cable ends out through the socket at the rear edge of the floor support and up to the ground terminal. Route the longer of the cables on the rear member's right-hand side, and the shorter to the holder for the main fuses.
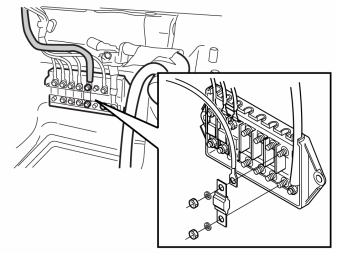
- Take a fuse, two nuts and two washers from the kit and install the fuse in any free terminal.
- Connect the cable with the small ring cable terminal.
- Install washers and nuts. Torque tighten the nuts to 5 Nm (4 lbf.ft.).
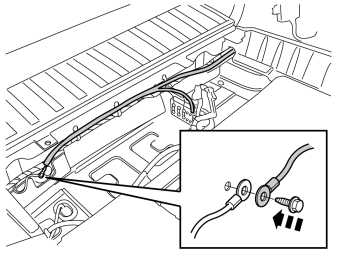
- Connect the larger ring cable terminal to the ground terminal on the right-hand side in the rear member. Torque tighten to 24 Nm (18 lbf.ft.).
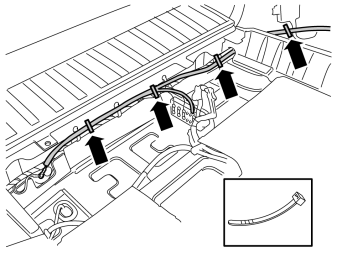
- Route the cable excess to the rear fuse holder.
- Secure the wiring using cable ties from the kit.
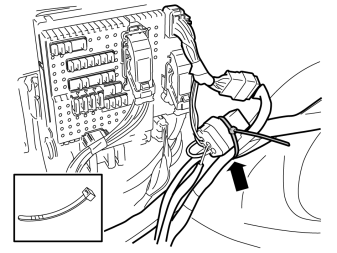
- Secure the relay holder with relay and fuse holder with fuse, at existing cable harnesses with cable ties from the kit.
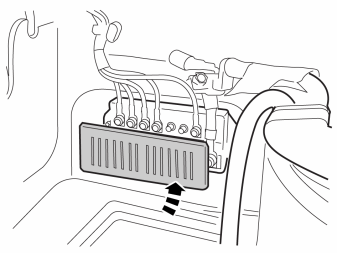
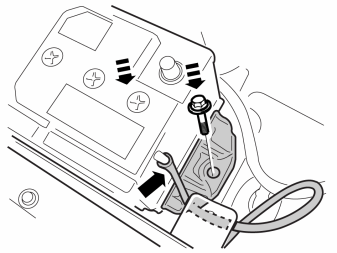
- Reinstall the battery.
- Tighten the mounting with the screw. Torque tighten to 24 Nm (18 lbf.ft.).
- Connect the battery's drainage hose.
- Reinstall the battery cover with holder, screws and nuts.
- Tighten screws and nuts to 24 Nm (18 lbf.ft).
Illustration A
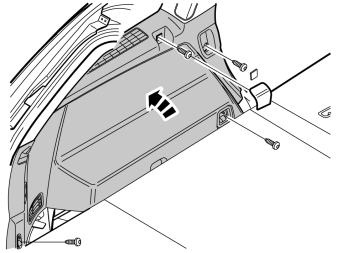
Illustration B
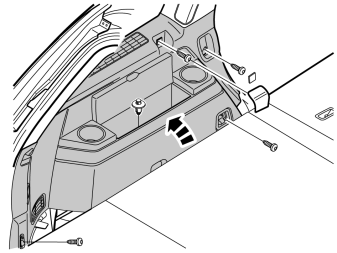
Illustration C
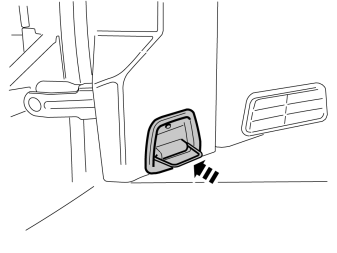
- Reinstall the left-hand side panel with screws and cover. Tighten the screws in the load securing eyelets. Tighten to 24 Nm (18 lbf ft).
Обсуждение и оценка
0Пока нет комментариев. Будьте первым.