Применимость
| Модель | Двигатель | Год |
|---|---|---|
| XC90 | — | 2003 |
Примечание: The relay and fuses are not included in the kit.
Installing the tow hitch connector
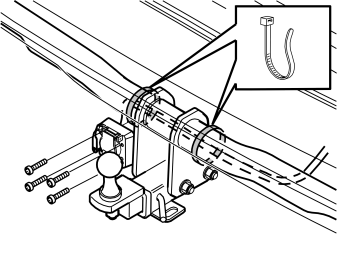
- Install the tow hitch connector using the four screws and nuts. Tighten
- Route the cable harness to the right along the front edge of the tow hitch member The cable harness is routed the same way regardless of the type of tow hitch
- Secure the cable harness using a tie strap on each side of the brackets for the tow hitch member.
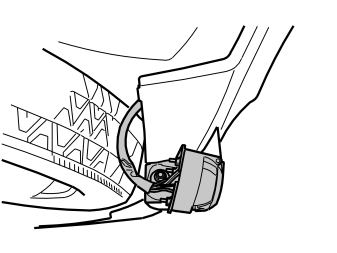
-
Примечание: > If the cable harness is stretched too far it may be worn through by the lower edge of the bumper.
Ensure that the cable harness forms a small loop around the lower edge of the bumper as illustrated in illustration B.
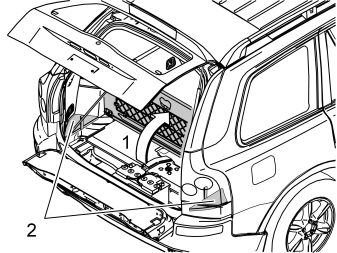
Applies to cars with two rows of seats
- Fold up the centre rear floor hatch (1). If the floor hatch is equipped with a carrier bag holder on its underside, it secured by a strap on each of the shorter sides of the storage box. These must be removed
- Remove the storage box underneath
- Remove the floor hatch completely by folding it almost all the way down and pulling it out backwards from its mountings.
Applies to cars with three rows of seats and integrated carrier bag holder on the underside of the centre floor hatch
- Fold up the centre rear floor hatch (1)
- Detach the two straps from the panel underneath. Lift up the rear edge of the panel. Fold the floor hatch back towards the panel and lift out the floor hatch and the panel.
Applies to cars with three rows of seats without integrated carrier bag holders
- Fold up the centre rear floor hatch (1) at the rear edge and lift it out.
Applies to all models
- Remove the right and left-hand side floor hatches (2).
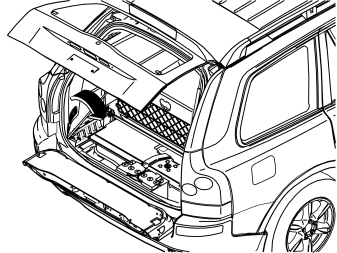
- Remove the folding side panel on the left and right-hand sides of the cargo compartment.
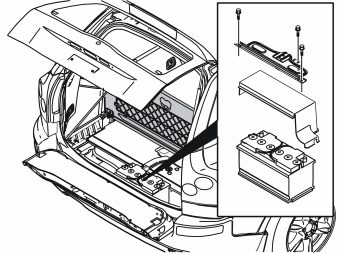
- Remove the three screws in the battery holder. Lift out the battery holder
- Remove the cover from the battery.
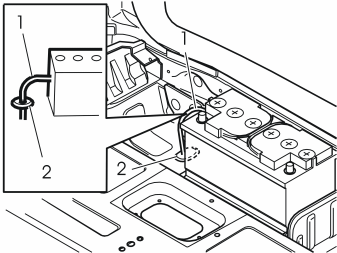
- Remove the drainage hose (1) from the battery
- Remove the rubber seal (2). This will not be used again
- Open up the pre-punched hole for the drain hose in the new rubber bushing
- Thread the old drainage hose through the new rubber bushing. Ensure that the hose is unimpeded and is not kinked.
Cable routing and connection
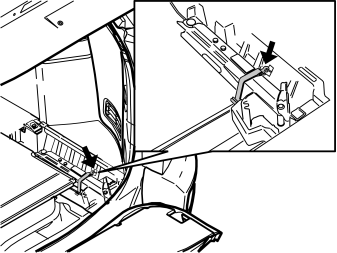
Applies to cars with two rows of seats
- Release the tensioning strap for the jack and lift it out.
Illustration A applies to cars with two rows of seats
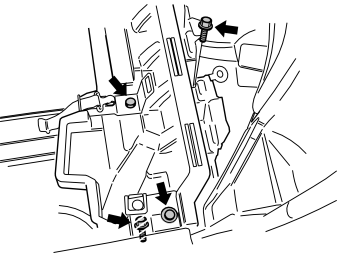
Illustration B applies to cars with three rows of seats
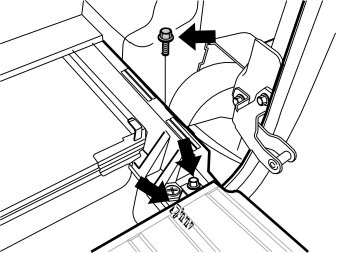
- Remove the screws holding the support for the floor in the cargo compartment at the rear edge.
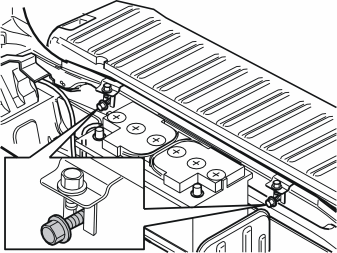
- Slacken off the two screws for the floor extension brackets.
Illustration A
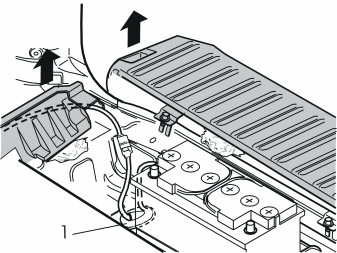
- Route the cable harness from the tow bar socket through the hole in the floor. It may be necessary to remove the spare wheel which partially obstructs the hole in the floor
- Adjust the position of the rubber seal (1) so that there is not too much slack in the cable under the car
- Install the rubber seal in the hole
- Pull up the floor extension on the right-hand side. Position a shim underneath it
- Pull up the rear edge of the support for the floor in the cargo compartment. Push the connector into the space behind the right-hand rear wheel well.
Примечание: Do not damage the support for the floor in the cargo compartment. It is brittle.
- Position the cable in the cut-out at the rear edge of the support for the floor in the cargo compartment. Reinstall the support for the floor and the floor extension in the cargo compartment
- Tighten the support for the floor in the cargo compartment and floor extension. Applies to cars with two rows of seats: Reinstall the jack.
Illustration B
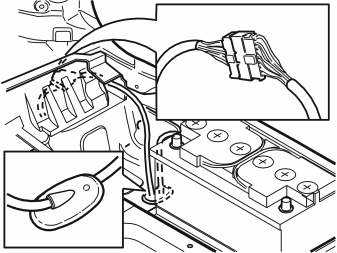
- Connect the routed cable harness to the existing cable harness in the space
- Pull the excess cable into the small space. Secure everything to the existing cable harness using the tie straps from the kit. Ensure that the connectors are secured so that they do not rattle
- Reinstall the drain hose on the battery.
Connecting the positive power supply / charge function
To connect the positive power supply / charge function, remove the side panel on the left-hand side of the cargo compartment in order to access the rear fusebox.
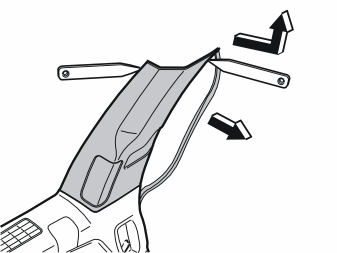
- Pull off the rubber strip at the rear edge of the door opening to the left-hand rear door opposite the left C-post panel
- Carefully pry off the left-hand C-post panel sides at the top using a plastic weatherstrip tool Then pull until the three clips on the inside release.
Примечание: Do not damage the headlining or the panel.
- Remove the panel by pulling upwards slightly and unhooking it from the side panel.
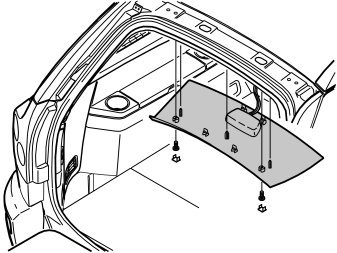
- Remove the panel and the screws for the rear headlining
- Carefully pry off the panel at the rear edge using a plastic weatherstrip tool
- Pull the rear edge of the panel downwards until the four clips on the top have released
- If the car has lighting in the panel, disconnect the connector
- Pull the panel backwards to release it.
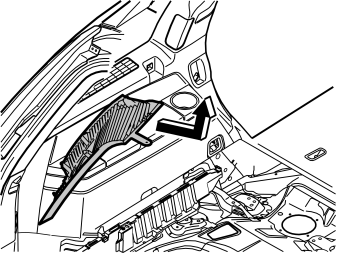
- Carefully detach the D-post panels starting at the top edge. Then pull down until the three clips on the inside release.
Примечание: Do not damage the panel.
- Disconnect the connector for the D-post loudspeaker if applicable
- Remove the panel by pulling upwards slightly and unhooking it from the side panel.
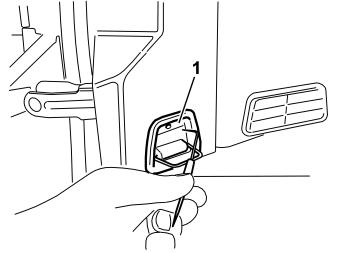
Illustration A shows the removal of the cover for the load securing eyelets
- Fold out the load securing eyelet
- Insert a scriber with an angled tip into the hole in the top of the cover
- Turn the scriber so that the angled tip engages in the reverse of the cover (1). Pull off the cover.
Illustration B shows cars with two rows of seats
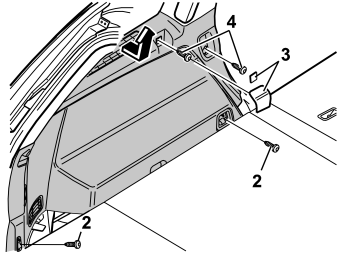
Illustration C shows cars with three rows of seats
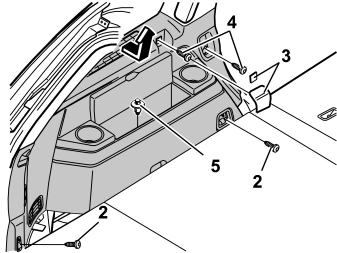
- Applies to cars with three rows of seats: Fold down the third row of seats
- Remove the screws (2) for the load securing eyelets in the left-hand side panel
- Remove the covers (3) over the front mountings for the left-hand side panel. Pry them off using a plastic weatherstrip tool or a small screwdriver
- Remove the screws (4)
- Applies to cars with three rows of seats: Remove the clip (5) at the bottom of the storage compartment in the panel
- Pull out the upper edge of the panel a little to release the clips on the inside. Remove the panel by pulling it straight upwards.
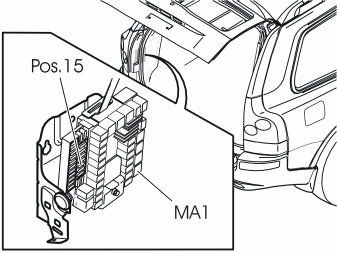
Connecting the positive power supply / charging function (15 I supply)
- Install the relay in the rear electronic module (REM) terminal MA 1.
Примечание: The relay is already installed in MA1 on cars with all wheel drive and cars with reverse warning as an accessory.
- Install a 20A fuse in the rear electronic module (REM) terminal 15.
Finishing work
Reinstall:
- the left-hand side panel using the screws and cover if these were removed. Tighten the load securing eyelet screws. Tighten to 24 Nm (18 lbf. ft.)
- the covers for the load securing eyelets
- the D-post panel and the connector for the D-post loudspeaker (if applicable)
- the rear roof lighting connector (if applicable)
- the rear headlining
- the C-post panel
- the protective cover and the bracket for the battery
- the folding side panels
- the storage compartment and floor hatches.
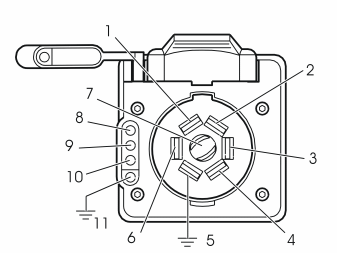
Checking the 7-pin connector
- Parking lamps
- Charging
- Right indicators
- Electrical brake
- Ground
- Left indicators
- Reserve
- Right indicators
- Left indicators
- Parking lamps
- Ground.
Обсуждение и оценка
0Пока нет комментариев. Будьте первым.