Применимость
| Модель | Двигатель | Год |
|---|---|---|
| V70 (08-) | — | 2008–2013 |
| XC70 (08-) | — | 2008–2013 |
Примечание: Some steps in these installation instructions are presented with illustration only.
Preparations
Applies to cars with twin rear silencers
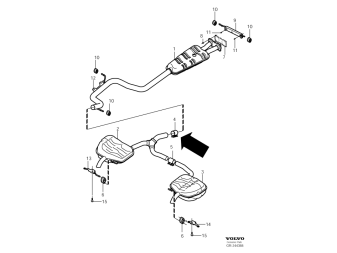
Примечание: To facilitate access when tightening the towbar member, the exhaust system must be cut off at the marking according to points 16 and 18.
It is important to use this method, otherwise there is a risk of damaging the exhaust system if the silencers are forced down for example.
- Establish the engine version of the car. Go to VIDA, under:
- Order the exhaust clamp for joining the exhaust system.
Applies to the V70
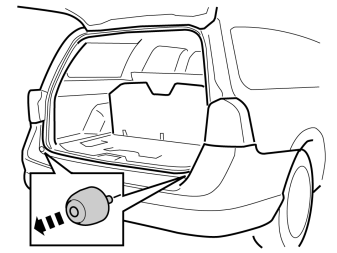
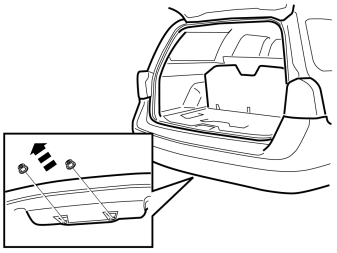
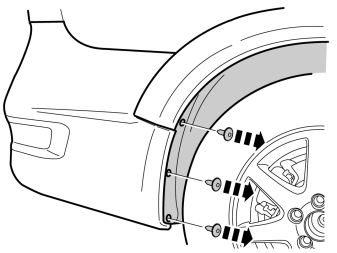
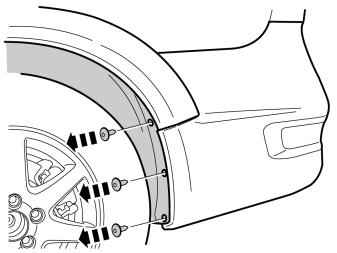
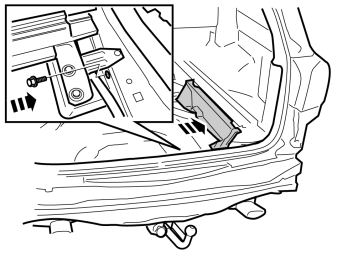
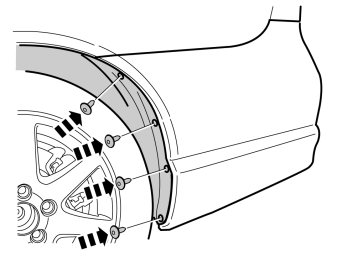
Illustration A
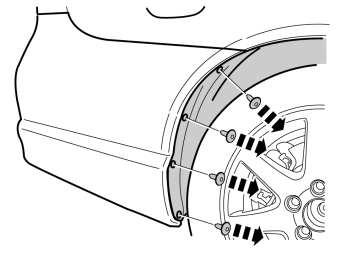
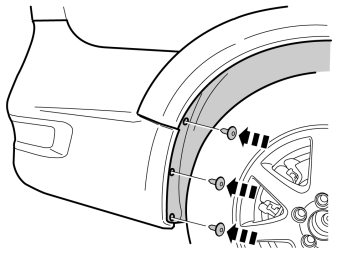
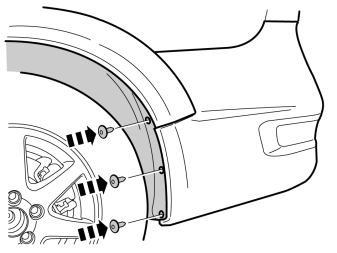
- Remove the four screws on both sides.
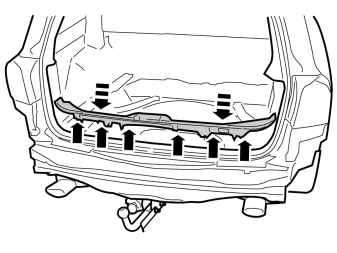
Illustration B
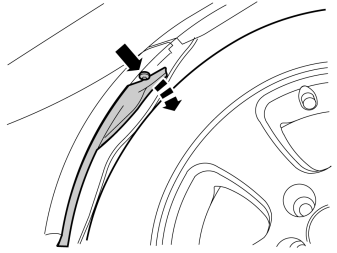
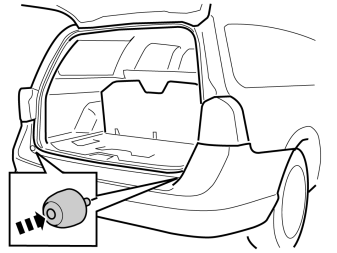
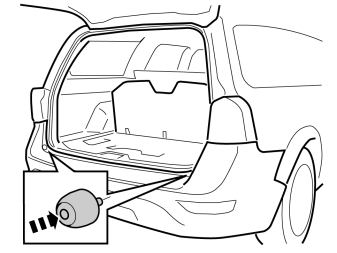
- Place the fender liner to one side. Remove the screw at the upper edge of the cover on both sides.
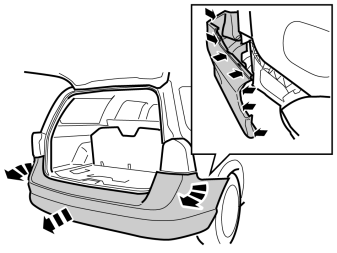
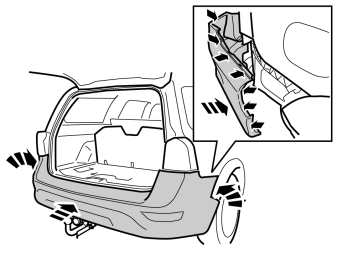
- Carefully pull of the ends of the bumper cover from the body on both sides. They are attached with hooks at the upper edge of the ends and at the lower edge of the tail lights.
- Pull the bumper cover away from the body, it is secured by seven guides at the upper edge of the longer side.If the car is equipped with rear parking assistance, disconnect the connector on the right-hand side of it.
Примечание: To prevent damaging the bumper cover, it is recommended to request the assistance of a colleague during this procedure.
- Place the bumper cover on a suitable surface.
Applies to the XC70
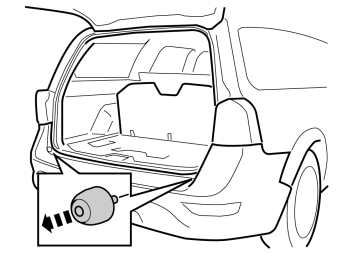
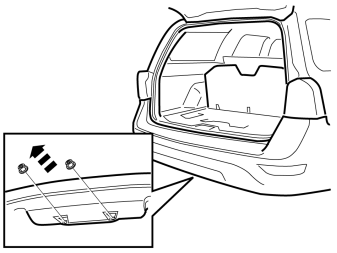
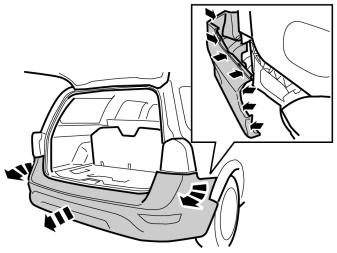
- Carefully pull of the bumper cover ends from the body on both sides. They are attached with hooks at the upper edge and front edge of the ends and at the lower edge of the tail lights.
- Pull the bumper cover away from the body, it is secured by seven guides at the upper edge of the longer side. If the car is equipped with rear parking assistance, disconnect the connector on the right-hand side of it.
Примечание: To prevent damaging the bumper cover, it is recommended to request the assistance of a colleague during this procedure.
Applies to the V70 and the XC70
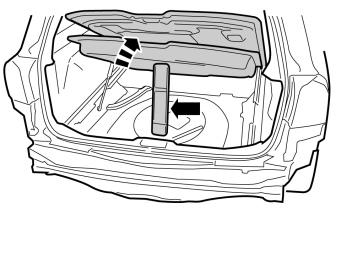
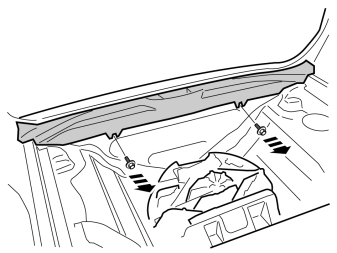
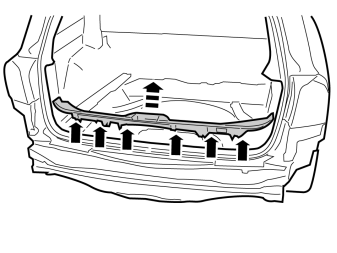
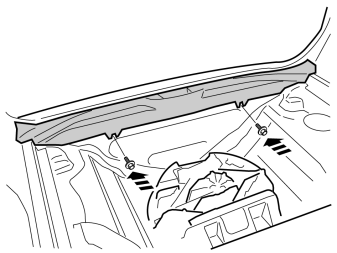
- Carefully pull of the boot lid's sill panel, it is secured with six clips.
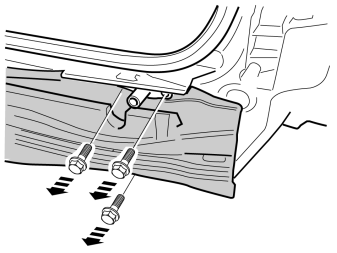
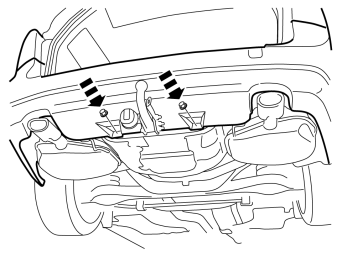
- Remove the screws in the collision member on both sides.
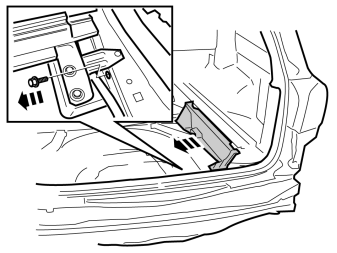
- Remove the panel.
- Slacken off the screw for the towing eyelet's mounting, on the inside of the rear member at the right-hand side. Unscrew it so that the collision member can be released.
Примечание: Do not damage the cable harness.
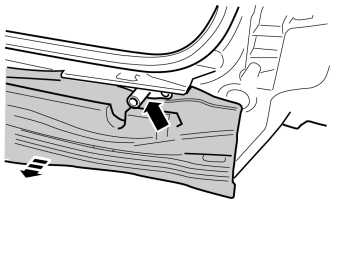
- Remove the collision member.
Applies to cars with twin rear silencers
Примечание: Depending on engine version, the car is equipped with one or two rear silencers.
Steps 16-33 apply to cars with twin rear silencers.
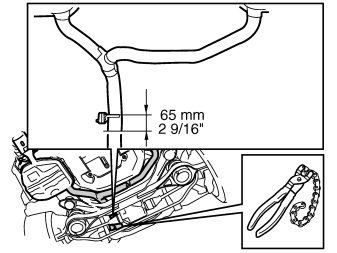
Steps 16-17 apply to cars with AWD
- Cut the exhaust pipe using the pipe cutter as illustrated. The cutting point is also marked by a small indentation underneath the pipe.
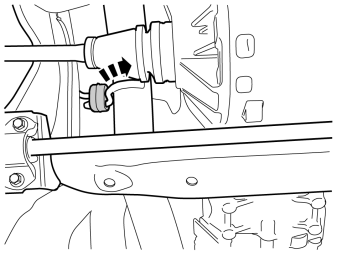
- Remove the rear rubber mounting at the final drive.
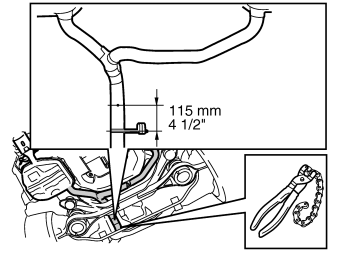
Steps 18 apply to cars with 2WD
- Cut the exhaust pipe using the pipe cutter as illustrated. The cutting point is also marked by a small indentation underneath the pipe.
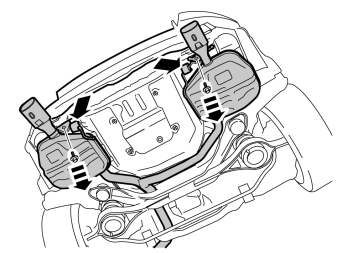
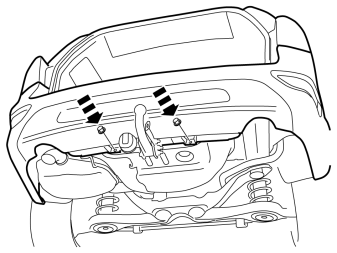
- Remove the screws in the rear mountings of the silencers.
- Remove the silencers from the body.
Подсказка: Get help from a colleague for this procedure.
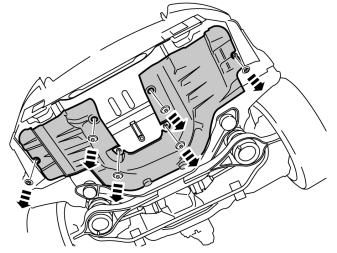
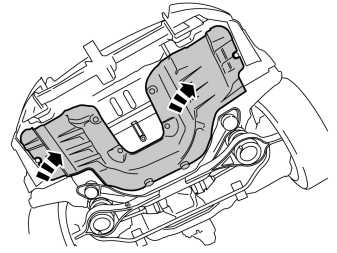
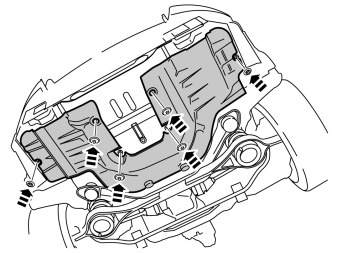
- Remove the six clips from the radiated heat shield.
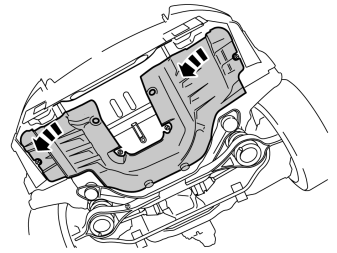
- Fold the radiated heat shield down to access the inside of the side members.
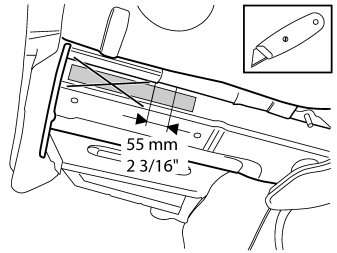
- Remove the last section of the cover on the insides of the side members. Measure from the middle of the embossing and backwards. Cut at that point.
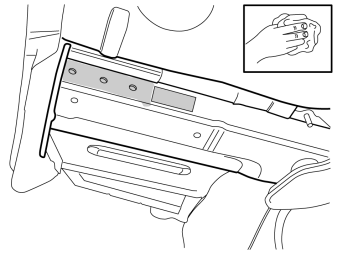
- Thoroughly clean away splashes of underseal, putty or dirt from the plate surfaces on the insides of the side members where the reinforcements shall be located.
Installing the towing member
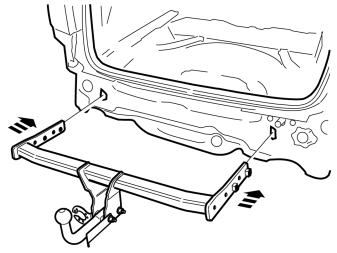
- Check that the contact surfaces inside the side members are clean, if not, clean them opposite where the towing member's side plates shall be tightened.
- Take the towing member from the kit and insert the two side plates in the holes in the rear edge of the side members.
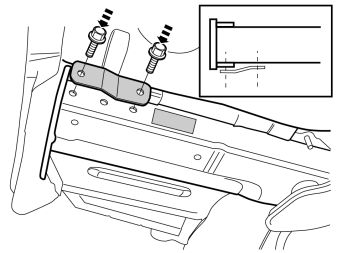
- Take the screws and reinforcement bar from the kit. Request the assistance of a colleague and adjust the position of the tow bar as the screws enter the welded nuts of the tow bar.
Примечание: Ensure that the reinforcement bar is correctly positioned (see small image).
- Tighten the screws alternately on both sides.
Tightening the screw joint
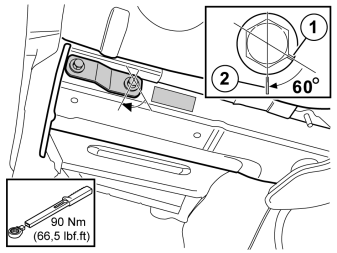
- Torque tighten the screws to 90 Nm (66.5 lbf.ft.) and angle tighten to 60°. When angle-tightening the joint in confined spaces, a protractor applied to a torque wrench cannot be used. Instead, use the Allen screw's head to determine the angle.
Installing the exhaust clamp
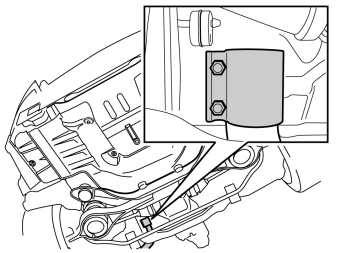
- File down the edges of the exhaust pipes.
- Take a new exhaust clamp and thread it over the exhaust pipe on the car.
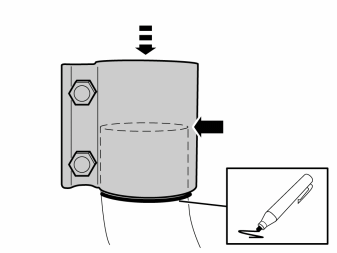
- Position the clamp so that the joint is in the middle. Make a mark at the lower edge using a pen.
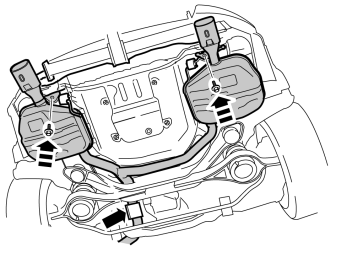
- Request the assistance of a colleague, lift up and reinstall the silencers with exhaust pipe in the exhaust clamp.
- Refit the mountings for the silencers. Torque tighten the screws to 50 Nm (37 lbf. ft.).
Applies to cars with AWD
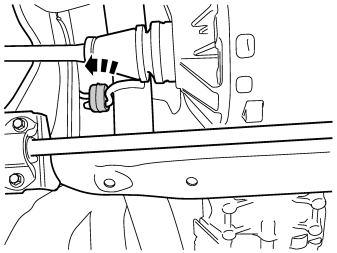
- Reinstall the rear rubber mounting at the final drive.
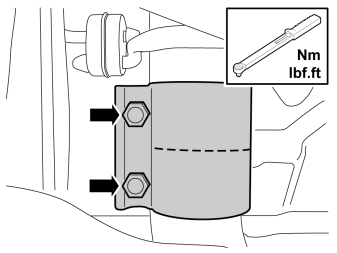
- Position the exhaust clamp as illustrated using the marking made previously.
Примечание: Ensure that the exhaust clamp is positioned so that it does not hit against surrounding parts when the exhaust system is moved.
- Tighten the nuts to 50 Nm (37 lbf.ft.).
Примечание: Check that there is no exhaust gas leakage.
Applies to cars with single rear silencer
Примечание: Depending on engine version, the car is equipped with one or two rear silencers.
Steps 34-50 apply to cars with a single rear silencer.
Steps 34-50 apply to AWD cars
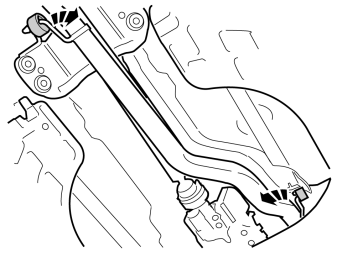
- Remove the exhaust system's rubber mountings.
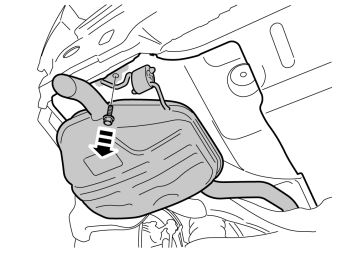
- Remove the screw in the silencer's rear mounting, and lower the silencer to stop.
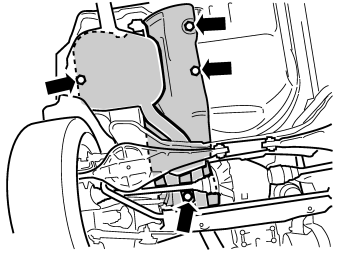
- Remove the four clips for the radiated heat shield.
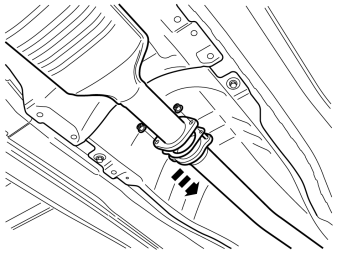
- Remove the nuts in the joint between the catalytic converter and separate the joint.
Примечание: Always use a new gasket and nuts when installing.
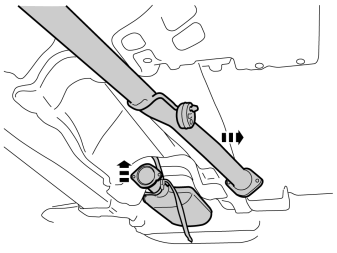
- Tie up the catalytic converter to prevent damaging the boot.
- Turn out the exhaust pipe.
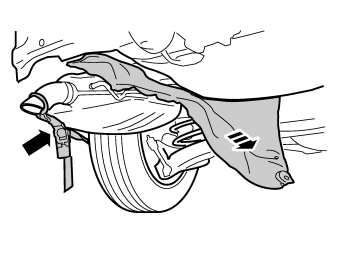
- Secure a retaining strap between the silencer and the wheel. Secure so that the silencer turns to the side, but not so hard that the exhaust system becomes damaged.
- Work out the radiated heat shield by rocking the silencer at the same time.
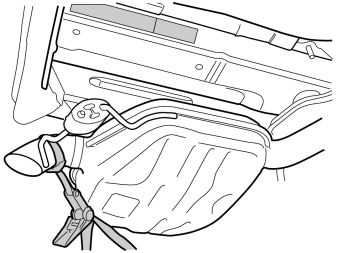
- Move the retaining strap to the optimum position to access the holes for the tow hitch mounting.
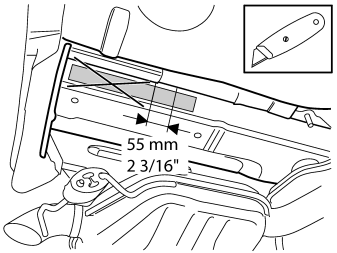
- Remove the last section of the cover on the insides of the side members. Measure from the middle of the embossing and backwards. Cut at that point.
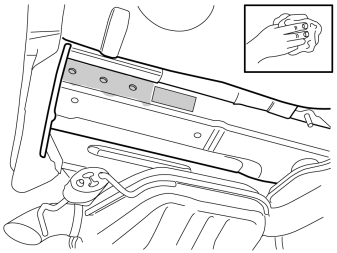
- Thoroughly clean away splashes of underseal, putty or dirt from the plate surfaces on the insides of the side members where the reinforcements shall be located.
Installing the towing member
- Check that the contact surfaces inside the side members are clean, if not, clean them opposite where the towing member's side plates shall be tightened.
- Take the towing member from the kit and insert the two side plates in the holes in the rear edge of the side members.
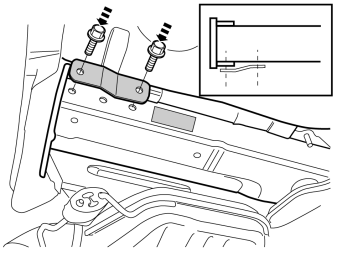
- Take the screws and reinforcement bar from the kit. Request the assistance of a colleague and adjust the position of the tow bar as the screws enter the welded nuts of the tow bar.
Примечание: Ensure that the reinforcement bar is correctly positioned (see small image).
- Tighten the screws alternately on both sides.
Tightening the screw joint
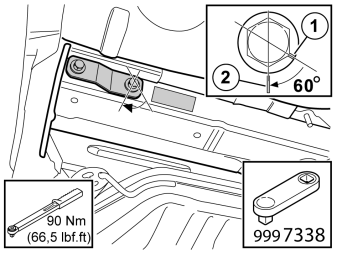
- Torque tighten the screws to 90 Nm (66.5 lbf.ft.) and angle tighten to 60°. When angle-tightening the joint in confined spaces, a protractor applied to a torque wrench cannot be used. Instead, use the Allen screw's head to determine the angle.
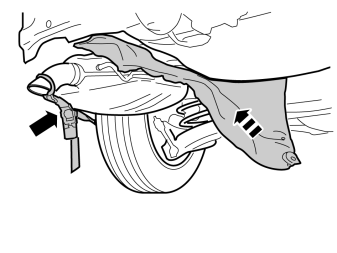
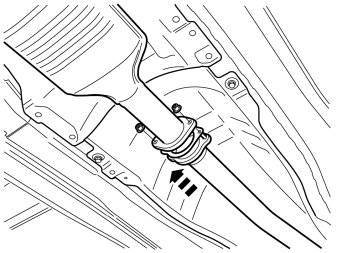
- Check that the mating surfaces in the joint between the exhaust pipes are clean.
- Take a new gasket and new nuts, tighten the exhaust pipes to each other. Tighten the nuts to 24 Nm (18 lbf.ft.).
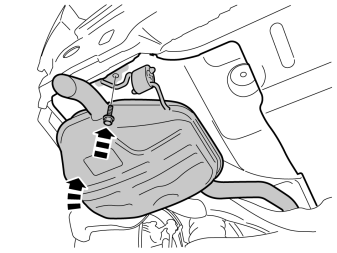
- Reinstall the silencer in the rear mounting. Torque tighten the screw to 50 Nm (37 lbf.ft.).
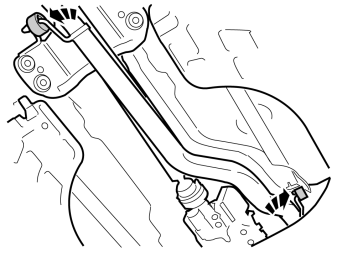
Steps 51-65 apply to cars with 2WD
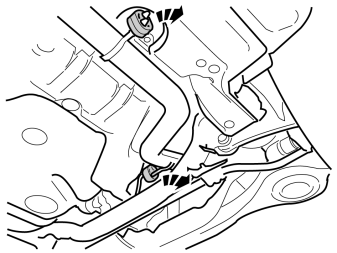
- Remove the exhaust system's rubber mountings above the subframe and on the left-hand side of the fuel tank.
- Remove the screw in the silencer's rear mounting, and lower the silencer to stop.
Image A applies to cars with a 4 cylinder diesel engine
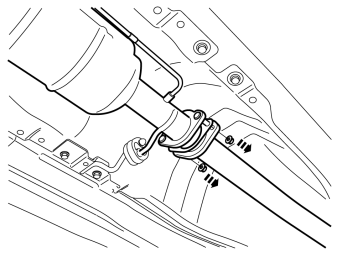
Image B applies to cars with a 4 cylinder petrol engine
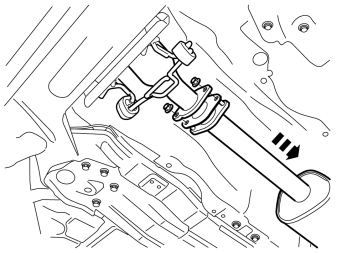
- Remove the nuts in the joint behind/in front of the front silencer, and separate the joint.
Примечание: Always use a new gasket and nuts when installing.
Image C applies to cars with a 5 cylinder diesel engine
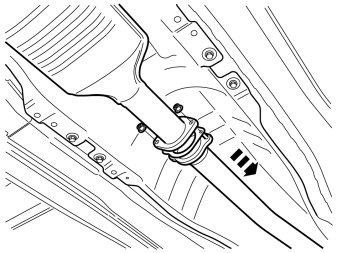
- Remove the nuts in the joint behind/in front of the front silencer, and separate the joint.
Примечание: Always use a new gasket and nuts when installing.
- Secure the silencer to prevent damaging the boot at the catalytic converter.
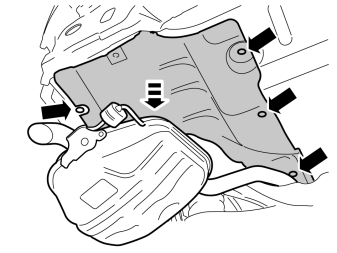
- Remove the four clips for the silencer's radiated heat shield.
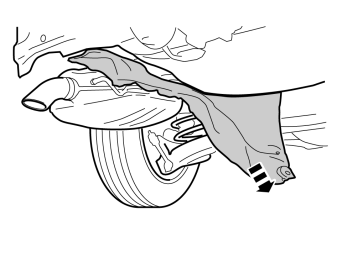
- Work the silencer down as far away from the side member as possible. Do not press the exhaust system too hard.
- Remove the radiated heat shield.
- Remove the last section of the cover on the insides of the side members. Measure from the middle of the embossing and backwards. Cut at that point.
- Thoroughly clean away splashes of underseal, putty or dirt from the plate surfaces on the insides of the side members where the reinforcements shall be located.
Installing the towing member
- Check that the contact surfaces inside the side members are clean, if not, clean them opposite where the towing member's side plates shall be tightened.
- Take the towing member from the kit and insert the two side plates in the holes in the rear edge of the side members.
- Take the screws and reinforcement bar from the kit. Request the assistance of a colleague and adjust the position of the tow bar as the screws enter the welded nuts of the tow bar.
Примечание: Ensure that the reinforcement bar is correctly positioned (see small image).
Подсказка: The silencer must be moved downwards for the screws and reinforcement bar to be installed and tightened correctly.
- Tighten the screws alternately on both sides.
Tightening the screw joint
- Torque tighten the screws to 90 Nm (66.5 lbf.ft.) and angle tighten to 60°. When angle-tightening the joint in confined spaces, a protractor applied to a torque wrench cannot be used. Instead, use the Allen screw's head to determine the angle.
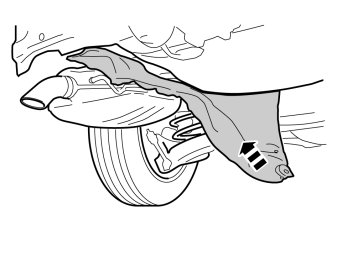
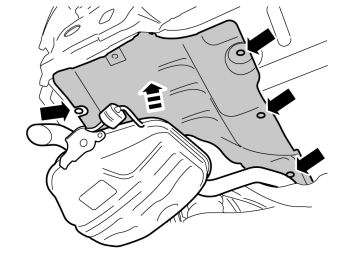
Image A applies to cars with a 4 cylinder diesel engine
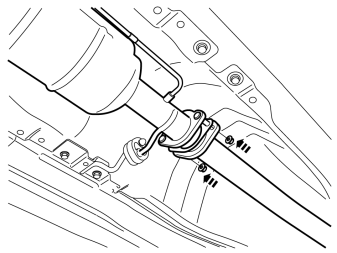
Image B applies to cars with a 4 cylinder petrol engine
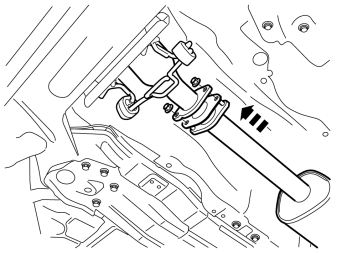
Image C applies to cars with a 5 cylinder diesel engine
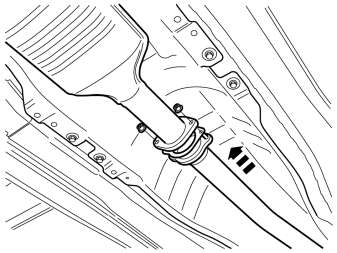
- Check that the mating surfaces in the joint between the exhaust pipes are clean.
- Take a new gasket and new nuts from the kit, tighten the exhaust pipes to each other. Tighten the nuts to 24 Nm (18 lbf.ft.).
- Reinstall the silencer in the rear mounting. Torque tighten the screw to 50 Nm (37 lbf.ft.).
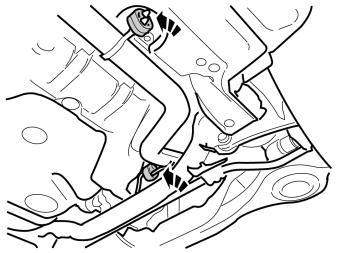
Applies to all models
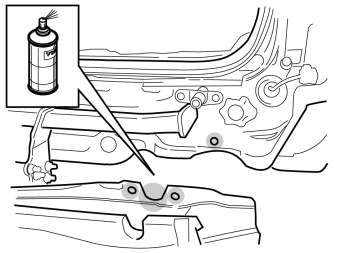
- Rust protect the marked clean panel surfaces on the collision member, mounting eyelets for the bracket for the towing eyelet as well as at the rear edge of the side members on the left and right-hand side.
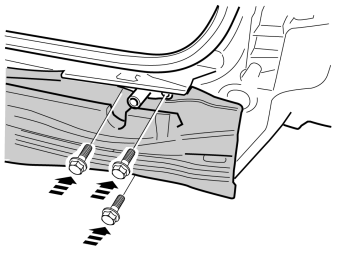
- Reinstall the collision member with bracket to the towing eyelet and tighten the screws on both sides (seven) to 48 Nm ( 35.4 lbf.ft.).
Примечание: Do not damage the cable harness at the inner screw of the towing eyelet.
Cutting out the bumper cover
Illustration A applies to the V70
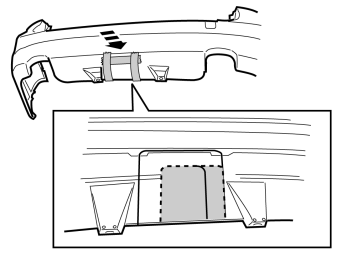
Illustration B applies to the XC70
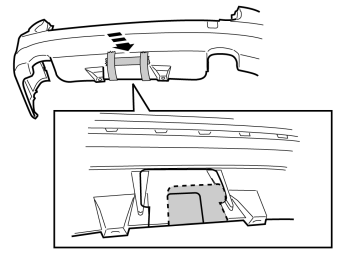
- Apply tape to the outside of the bumper cover, opposite the markings on the inside. This is done to protect the paint from the saw when cutting out the cut-out for the towbar.
- Cut according to the markings.
Примечание: Do not damage the painted surface of the bumper cover. Cut so that the raised edge on the inside remains. The raised edge marks the cut-out.
- Remove the tape.
- Smooth off the sawn edges with a fine toothed file.
- Install the tow hitch connector with cable harness according to the appropriate installation instructions.
Applies to the V70 with R-design
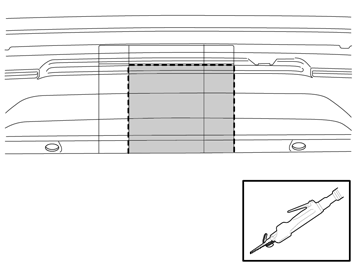
- Saw out the lower section of the bumper casing according to the markings. Remove the shaded area.
- Tape the outside to prevent the saw foot from damaging the paint.
Примечание: Do not damage the paintwork of the bumper cover.
- Smooth off the sawn edges with a fine toothed file.
Applies to the V70
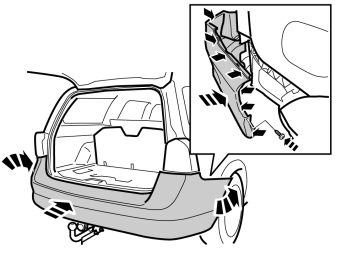
- Connect the connector to the rear park assistance if applicable, and reinstall the bumper cover. Ensure that all hooks and guides engage.
Примечание: To prevent damaging the bumper cover, it is recommended to request the assistance of a colleague during this procedure.
- Tighten the screw at the front edge of the ends.
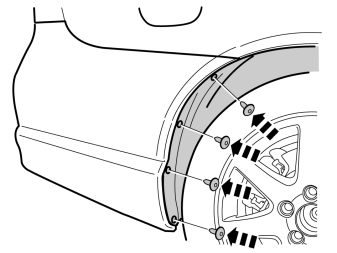
- Check that the end pipes for the silencer(s) are correctly centered in the bumper cover cut-out. If necessary/applicable, make adjustments at the cutting point, mountings at the rear silencer or at the joint between the silencer.
Applies to the XC70
- Connect the connector to the rear park assistance if applicable, and reinstall the bumper cover. Ensure that all hooks and guides engage.
Примечание: To prevent damaging the bumper cover, it is recommended to request the assistance of a colleague during this procedure.
- Check that the end pipes for the silencer(s) are correctly centered in the bumper cover cut-out. If necessary/applicable, make adjustments at the cutting point, mountings at the rear silencer or at the joint between the silencer.
Applies to the V70 and the XC70
Обсуждение и оценка
0Пока нет комментариев. Будьте первым.