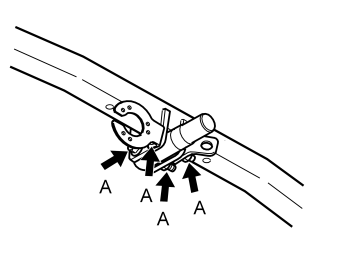
Осторожно: Do not tighten or undo the screwed joint (A) between the towbar and the connection stud under any circumstances. If this happens the screwed joint will be damaged and become a safety hazard. Do not weld the towbar, tow hitch or screwed joint.
These installation instructions are also an official certificate of approval and must be carried in the car at all times.
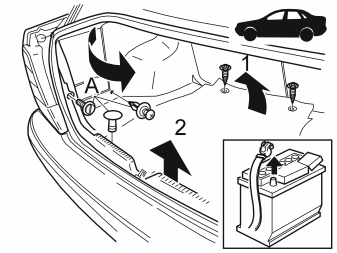
- Note the radio code if an anti-theft coded radio is installed.
- Turn the ignition off.
- Disconnect the negative battery lead.
- Remove the two screws, the cargo compartment carpet and the rear wall panel.
- Remove the clips (A). Twist the rear panels inward on both the left and right side. (For V40 with additional speaker: See points 3, 4 and 5).
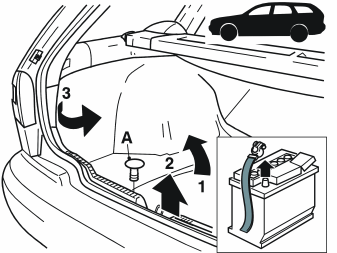
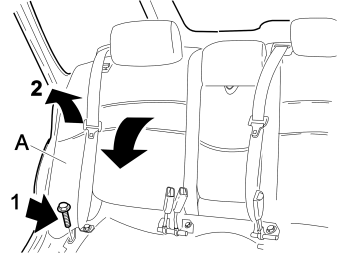
For V40 with additional speaker
- Tilt the rear seat forward. Fold down the right backrest.
- Remove the fixed section (A) of the right backrest.
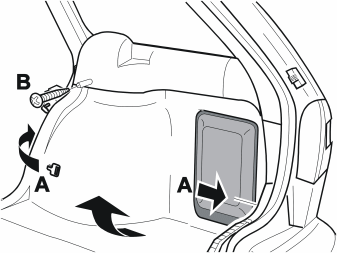
For V40 with additional speaker
- Remove the parcel shelf.
- Press the clips together. Pull the cargo net away from the reverse of the cargo compartment panel.
- Remove the clips (A) and screw (B).
- If applicable: Remove the cargo net mountings.
- Remove the cargo compartment panel from underneath with a twisting movement.
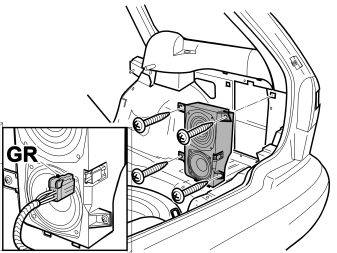
For V40 with additional speaker
- Disconnect the grey (GR) connector(s).
- Remove the four screws.
- Remove the additional speaker.
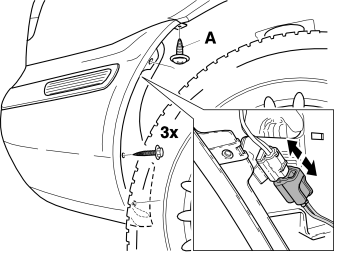
- Remove the three mounting screws for the splash guard.
- Remove the screw (A).
- Push in the lock on the connector for the side marker lamp in the rear bumper. Disconnect the connector.
- Carry out this procedure on both the left and right-hand sides.
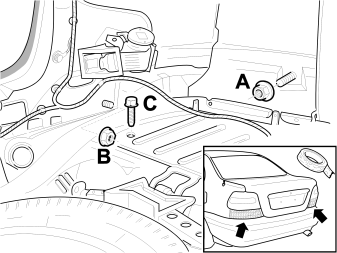
- Remove the nuts (A and B) and the bolt (C).
- Carry out operations A, B and C on both the left and right-hand sides.
- Position tape under the tail lamps. The tape will protect the paintwork when removing the bumper.
- Remove the rear bumper.
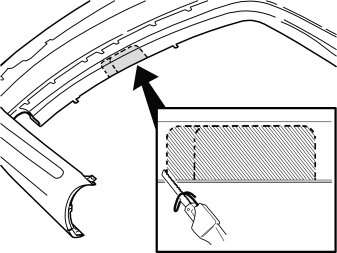
- Cut out a slot for the tow hitch in the bumper as illustrated (the cutting line is marked).
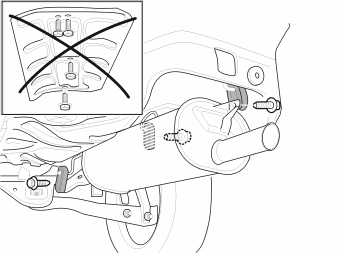
- Remove the three bolts for the rear silencer.
- Remove the heat shield above the rear silencer, (it will no longer be used).
Примечание: There is no heat shield on Diesel engines.
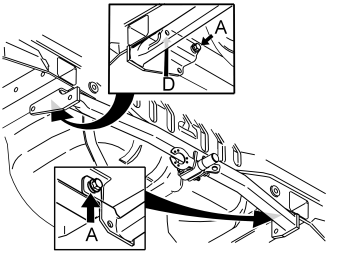
- Remove the detachable tow hitch from the connection stud.
- Position the towbar and install two washers and flanged bolts (A) (M10x30).
- Hand-tighten the flanged bolts (A).
Примечание: The washer and flanged bolt from position (D) will be installed after the rear bumper is positioned (see step 18).
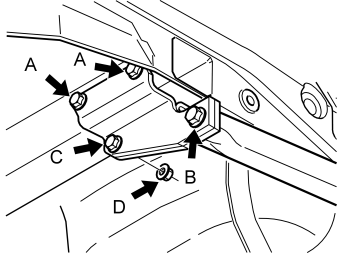
Left side
- Position the left towbar plate. Install two washers and flanged bolts (A) (M10x30).
- Install a flanged bolt (B) (M12x40).
- Install a flanged bolt (C) (M12x40) and a nut (D).
- Hand-tighten the flanged bolts and nut.
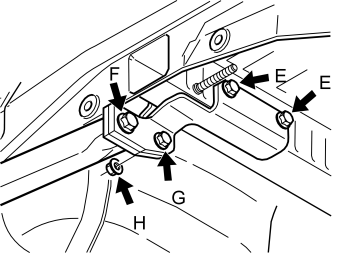
Right side
- Position the right towbar plate. Install two washers and flanged bolts (E) (M10x30).
- Install a flanged bolt (F) (M12x40).
- Install a flanged bolt (G) (M12x40) and a nut (H).
- Hand-tighten the flanged bolts and the nut.
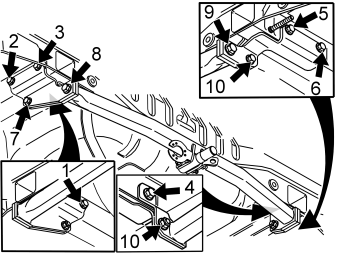
Tighten the bolts and nuts in the specified sequence:
- Tighten bolts 1 through 6 (M10x30) to 55 Nm (40 lbf ft).
- Tighten bolts 7 through 10 (M12x40) to 80 Nm (59 lbf ft).
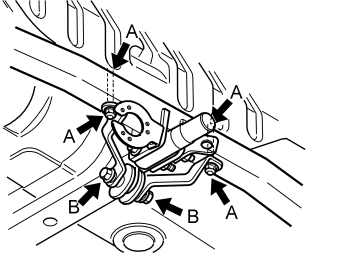
- Install the additional brackets as illustrated. Hand-tighten the bolts and nuts (A) (M10x75).
- Install the bolt and nut (B) (M12x80) as illustrated. Hand-tighten.
- First tighten the bolts and nuts (A). Tighten to 55 Nm (40 lbf ft). Then tighten the bolt and nut (B). Tighten to 80 Nm (59 lbf ft).
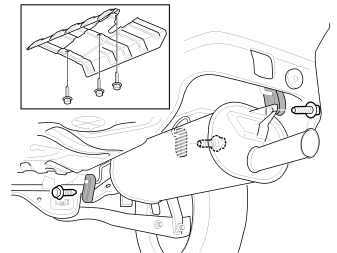
Примечание: There is no heat shield on Diesel engines.
- Install the new heat shield for the rear silencer (use three M6 bolts). Tighten the bolts. Tighten to 10 Nm (7 lbf ft). Cars with a petrol turbocharged engine or a 2.0 L engine have a special heat shield for the rear silencer.
- Reinstall the three bolts on the rear silencer. Tighten to 13 Nm (10 lbf ft).
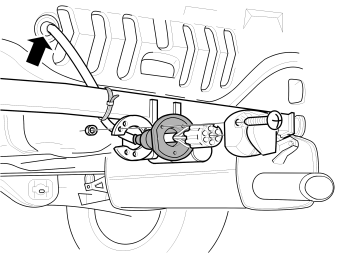
- Route the cable harness through the rear panel.
- Install the connector on the connector socket.
- Install the connector socket as illustrated.
- Tighten the cable harness on the towbar.
- To install cable harness for the towbar, see the separate instructions.
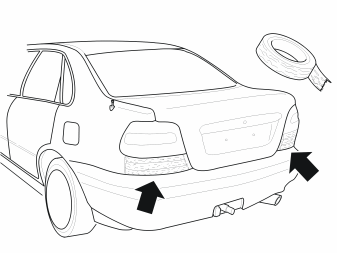
- Check the tape under the tail lamps. Position the tape above the cutting hole for the towbar. The tape will protect the paintwork when installing the bumper.
- Install the rear bumper.
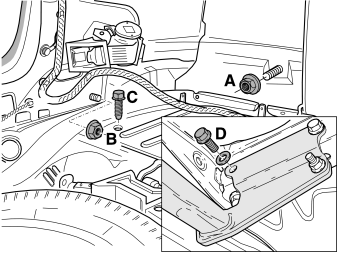
- Install the bolt (C) and nuts (A and B). Hand-tighten.
- Tighten the bolt (C). Tighten to 50 Nm (37 lbf ft). Tighten the nuts (A and B). Tighten to 5 Nm (4 lbf ft) on both the left and right-hand sides.
- Install the towbar bolt and washer (D). Tighten to 55 Nm (40 lbf ft).
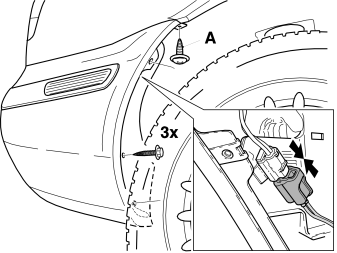
- Connect the connector for the side marker lamp.
- Install the screw (A).
- Install the three mounting screws for the splash guard.
- Carry out this procedure on both the left and right-hand sides.
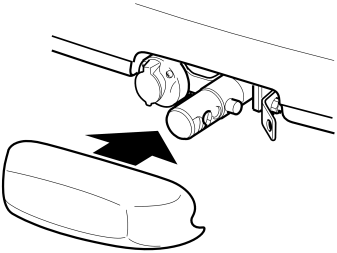
- Remove the tape. Clean the rear bumper.
- Install the protective cover.
- V40 with additional speaker: Install the left and the right rear panel, the rear wall panel and the cargo compartment carpet.
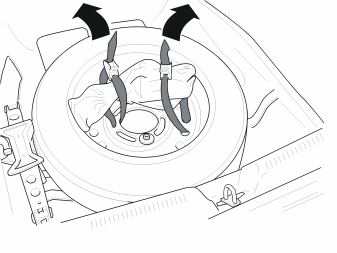
Figure 21A:
- Turn the spare wheel (use the accessory bolt kit for the spare wheel).
- Place the detachable tow hitch in a storage bag. Attach the storage bag to the spare wheel using two straps.
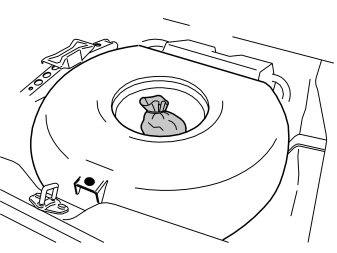
Figure 21B: Bi-fuel cars
- Place the detachable tow hitch in a storage bag. Attach the storage bag to the LPG-tank using a strap.
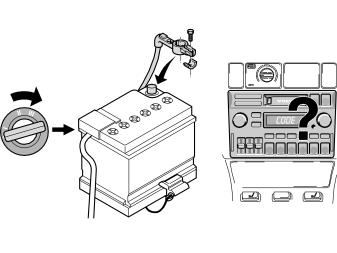
- Turn the ignition to position II.
- Ensure that nobody is in the car.
- Connect the negative battery lead.
- Enter the radio code if an anti-theft coded radio is installed.
- Re-adjust the clock.
- Check the function.
- Read the user instructions on how to install and remove the tow hitch and keep them in the car.
Примечание: It is not possible to remove the locking key if the detachable tow hitch has been removed.
- Check the function of the detachable tow hitch.
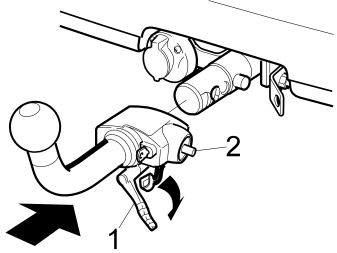
Figure 23A: Installing the tow hitch
- If necessary: turn the handle (1) to the right (clockwise) until a click is heard and the indicator pin (2) is in the out position.
- Press the tow hitch onto the connection stud so that it locks into position.
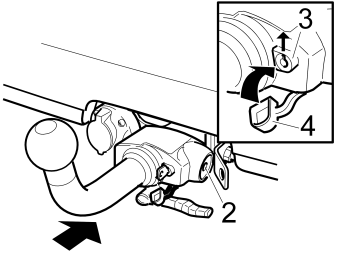
Figure 23B: Locking the tow hitch into place
- The indicator pin (2) should be in and the handle horizontal. To lock, the lock cylinder (3) should be turned to the position shown in the illustration.
- Install the plastic cover (4) to protect the lock cylinder.
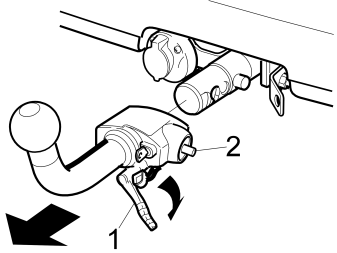
Figure 23C: Removing the tow hitch
- Turn the handle (1) to the right (clockwise) until a click is heard and the indicator pin (2) is in the out position.
- Pull the tow hitch from the connection stud.
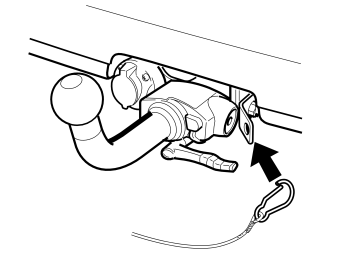
- Some countries allow the towbar security cable to be hooked in the way shown in the illustration.
- Check the relevant national regulations.
Обсуждение и оценка
0Пока нет комментариев. Будьте первым.