Примечание: This space box is only intended for use with V70 (00-) and V70 XC (00-) models equipped with rails.
The box is ready for use but should be painted for a more complete finish.
Installation space box
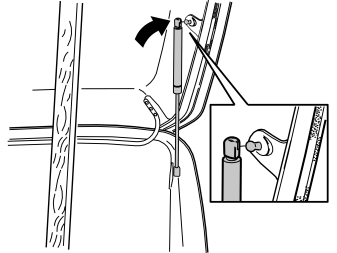
- Lift the lid of the space box. Prop the lid in position using a stick for example
- Press the gas strut into place on the upper mounting on the ball joint in the lid
- Repeat the operation on the other side
- Remove the stick.
Illustration A
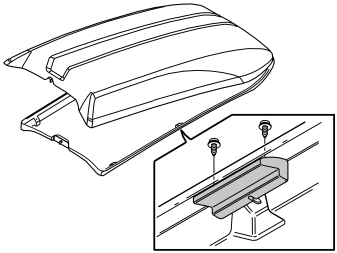
Applies to the V70 (00-)
- Raise the lid of the space box
- Install the six rubber spacers in the mounting points for the space box. Use the Torx screws from the kit.
Примечание: Each rubber spacer is unique and must be positioned on the space box according to the markings on the rubber spacers.
Illustration B
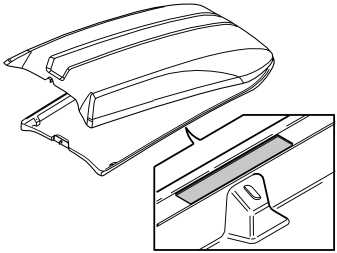
Applies to the V70 XC (00-)
-
Примечание: > Position the two shorter pieces of tape on the rear mounting points.
Raise the lid of the space box
- Clean the surfaces around the six mounting points for the space box. Use isopropanol or similar (windscreen washer fluid)
- Remove the backing from the tape
- Install the two pieces of tape, centred over the two holes as illustrated.
Примечание: The operation must be carried out at temperatures above 15ºC. The adhesive bonds immediately.
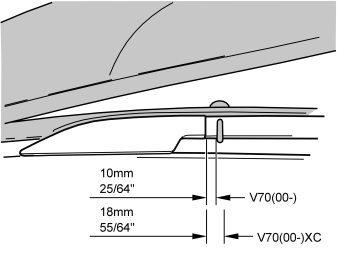
- Lift the space box onto the rails. Position the space box as illustrated and as the dimensions show. Use the two front mounting brackets to align the space box lengthways so that the distance between the front edge of the mounting bracket and the joint between the rail cover and rails is correct. The distance must be 10 mm (25/64") for the V70 (00-) and 18 mm (55/64") for the V70 XC (00-).
Примечание: Before securing the space box, open the tailgate of the car to ensure that the space box does not obstruct the tailgate and spoiler.
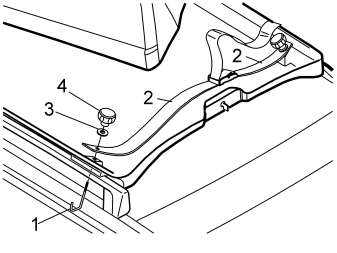
- Install the mounting brackets (1) in the six mounting points on the space box
- Lift the space box up from the rails slightly to facilitate the installation of the mounting brackets
- Secure the straps (2) on the front and rear mounting brackets on the inside of the space box. Pull the straps tight
- Install the washer (3) and the knob (4). Tighten the knob fully.
- Connect the pair of straps between the base and the lid of the space box.
Примечание: · The pair of straps must be connected to ensure the stability of the space box.
- Close the space box. Retighten the six knobs after the space box has been used for a while.
Disassembling the space box before spraying
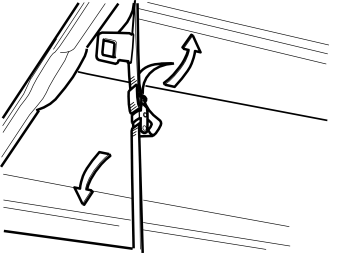
- Open the space box
- Separate the strap.
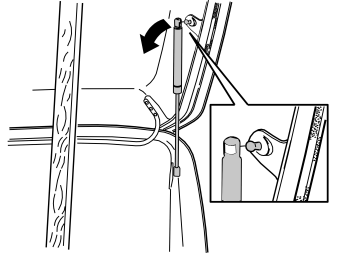
Подсказка: Two people are required at this point to facilitate the operation. One to hold and support the open cover using a stick. The other to remove the gas struts.
- Remove both the gas struts from the upper mounting points. First pry out the catches then pull the gas struts off.
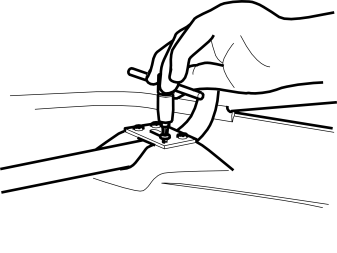
- Remove the plate for the hinge, on both the right and left-hand sides. First remove the four Torx screws on each side
- Lift off the upper section of the space box.
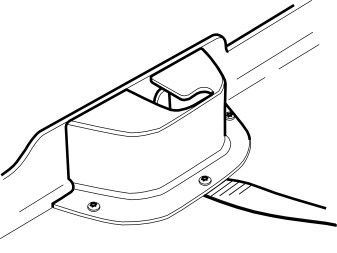
- Remove the cover for the lock protection. First remove the three Torx screws.
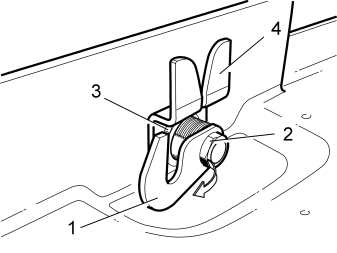
- Remove the lock hook (1). First bend out the lock facing on the lock nut
- Remove the lock nut and lock hook
- Remove the nut (3) for the lock and the lock guide. Then remove the lock guide (4)
- Remove the lock cylinder.
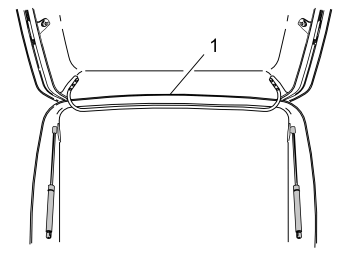
- The front weatherstrip (1) is bonded and is not detachable. The weatherstrip must be masked when spraying.
Осторожно: When painting the space box
The box is made from glass-fibre reinforced polyester with a gel coated surface. During painting, the box must be handled according to the instructions for these materials. The temperature must not exceed 50°C when painting. Also see the paint supplier instructions.
Assembling the space box after painting
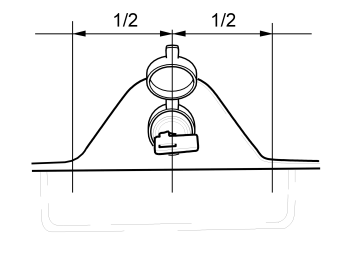
- Reinstall the lock and lock protection with the text "ASSA" turned the right way round in the locked position
- Reinstall the lock guide and the nut. Do not tighten yet
- Install the upper section. Reinstall the plate for the hinge. Tighten to 4 Nm (3 lbf. ft.)
- Laterally align the space box using the lock guide so that the lock is positioned in the centre of the upper section of the cut out
- Tighten the nut for the lock guide. Tighten to a maximum of 4 Nm (3 lbf. ft.)
- Press the gas struts onto the joint bolts
- Reinstall the lock hook, the nut and the lock facing. Finger tighten.
Примечание: Use a screwdriver as a counterhold for the lock hook when tightening the nut to prevent damage to the lock cylinder stop.
- Reinstall the lock protection cover with the strap under the flange for the cover
- Adjust the length of the strap to prevent full opening. The centre opening must be approximately 540-550 mm (21 1/4" - 21 11/16").
Примечание: Lock the load strap. First pull backwards and through the eyelet on the strap lock.
Обсуждение и оценка
0Пока нет комментариев. Будьте первым.