Применимость
| Модель | Двигатель | Год |
|---|---|---|
| S60 (-09) | B5254T4 | 2004 |
| S60 (-09) | — | 2004–2009 |
| V70 (00-08) | B5254T4 | 2004 |
| V70 (00-08) | — | 2004–2008 |
Подсказка: Spend some time on a provisional installation. Remember that it will be cold, wet and possibly dark when you actually need the chains.
Safety regulations
- The chains should be provisionally installed and the number of links adjusted before using for the first time. The provisional installation should take place in a light, warm environment.
- Do not use the chains if the wheel stud head is rounded or damaged.
- Drive with care when the snow chains are installed. The maximum permitted speed is 50 km/h.
- The snow chains provide increased grip on snow and ice, although on dry roads road holding is diminished and the chains become worn unnecessarily quickly. Only use the snow chains when they are needed.
Preparations
Примечание: Carry out all the following operations on both the front driving wheels.
- Remove the wheel trim covers, or wheel nut covers, from the driving wheels.
Applies to cars with locking wheel nuts
- Replace the locking wheel nuts with normal wheel nuts.
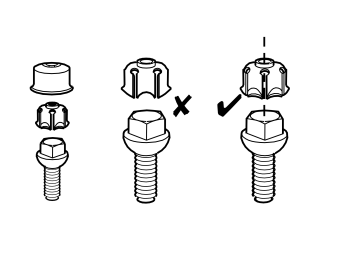
- Install the crimping sleeves (from the kit) on the wheel nuts.
Примечание: Ensure that the sharp corners on the nuts go into the grooves in the crimping sleeves.
- Install the covers (from the kit) on the crimping sleeves.
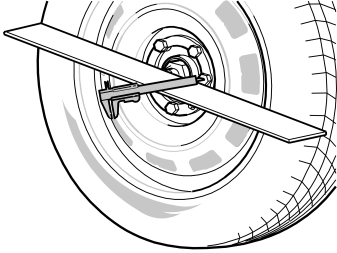
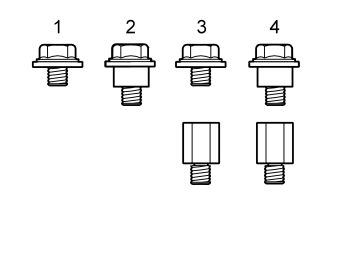
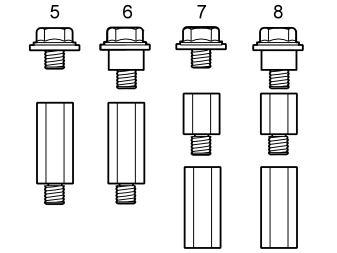
- Measure the distance from the surface of the tyres to the covers (illustration A) to determine what spacers/screws are required (illustrations B and C).
If the distance is between two intervals, use the larger spacer/screw.
Примечание: Five bolts mean that groove 5 must be used. Four bolts mean that groove 4 must be used.
If the distance is 3 mm or less:
- Take the short screws that will be used from the kit.
- Screw the mounting plate against the cover.
If the distance is 4-11 mm:
- Take the nylon spacers and the long screws that will be used from the kit.
- Thread the screws into the holes in the mounting plate. Thread the nylon spacers onto the screw threads from the rear. The nylon spacers are held in place until the screws have been screwed into the cover.
If the distance is more than 11 mm:
- Take the steel spacers that will be used, and nylon spacers if applicable, from the kit.
- Screw the steel spacers into the cover. Tighten the steel spacers according to point 6.
- Screw the mounting plate to the steel spacers. Tighten the mounting plate.
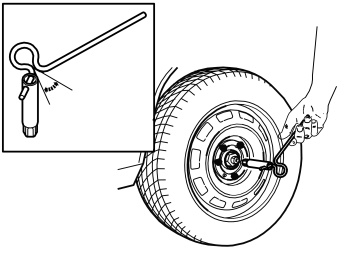
- Secure the mounting plate to the wheel using the spacers/screws.
- Tighten the spacers/screws using the handle and socket supplied. Tighten until the opposite surfaces of the eyelet are pressed against each other. Tighten a little extra to ensure correct mounting.
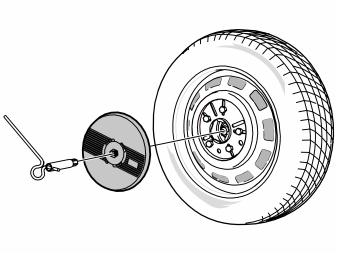
- Position the decorative cover for the snow chains over the mounting plate and screw clockwise. Ensure that the cover is securely installed. (Use the handle and socket if necessary).
Installing the snow chains
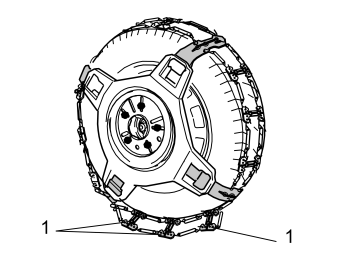
- Remove the decorative cover from the snow chains.
- Position the chains over the tyre with the two green segments (1) at the bottom.
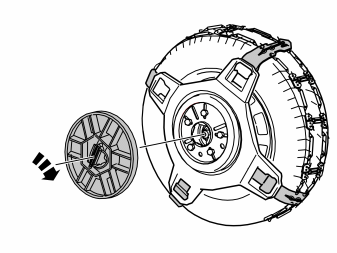
- Take the locking disc from the kit.
- Press the frame of the chains against the mounting plate.
- Position the locking disc against the mounting plate. Press in the locking disc.
- Pull out the red catch in the locking disc. Turn the catch clockwise until it clicks into place in the mounting plate.
- Drive off slowly. The green part of the chain must be pulled up the tyre. If the chain is not pulled up automatically, it has been tensioned too much and must be adjusted according to point 12.
The chains must have a play of approximately 25 mm (1”) from the surface of the tyre.
- Check the chain tension. Lift the chain section above the tyre and press your fingers between the chains and the tyre. If there is just enough room for your fingers, the distance is correct. Otherwise the distance must be adjusted according to point 12.
Примечание: If the chains are too loose, it can damage the wheel arch.
Adjusting the chain tension
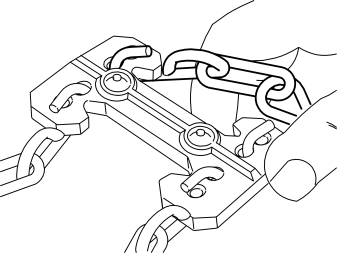
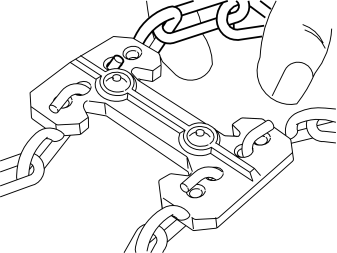
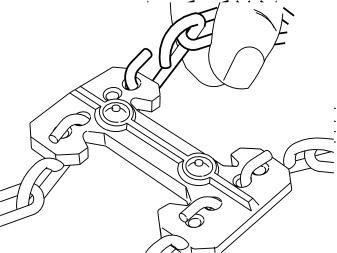
- The plastic segment of the chain has two holes on either side where the chain can be secured. In order to lengthen or shorten the chain, the chain links are moved in pairs between these holes.
Carried out on both chain links as a pair:
- Turn the chain link in towards the long surface (illustration A) of the plastic segment. Pry it upwards (illustration B) and then press down so that it releases from the plastic segment.
- Install the link in the other hole (illustration C). Repeat the above procedure in reverse order.
Removing snow chains
- Pull out the red catch in the locking disc. Turn the red catch anti-clockwise.
- Pull the chains off the top and sides of the tyre.
- Repeat the operation on the other side.
- Drive a short distance and stop to pick up the chains.
- Place the chains in the bag.
- Reinstall the decorative covers.
Обсуждение и оценка
0Пока нет комментариев. Будьте первым.