Примечание: Install the side panel in the same way on both sides of the car.
Preparatory work
- Wash and degrease the car.
Примечание: It is important that the surfaces on which the side panels will be mounted are completely free of tar and other road dirt.
Illustration A
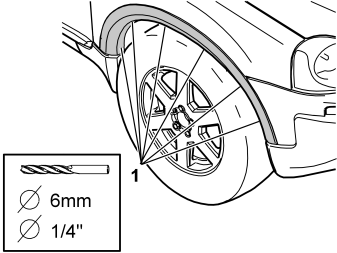
- Drill out the six rivets (1) holding the front wheel arch extension to the edge of the wheel arch. Use a 6 mm (1/4”) diameter drill bit
- Remove the remains of the rivets.
Illustration B
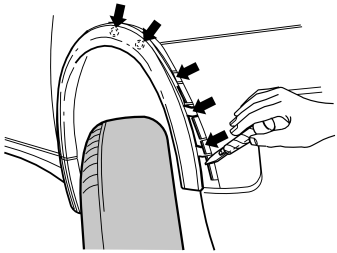
- Carefully pry off the front lower edge of the wheel arch extension. Use a plastic weatherstrip tool.
Примечание: Do not damage the paint work.
- Fold out the front lower edge of the wheel arch extension to expose the mounting clip
- Insert the weatherstrip tool at the side of the clip, between the panel and the wheel arch extension. Twist the weatherstrip tool to pull the clip away from the edge of the wheel arch or so that it breaks
- Then continue in the same way until all five clips have released
- Remove the wheel arch extension. Place the wheel arch extension to one side. It will not reused.
Remove the front wheel arch extension (secured by three hooks at the bottom, tape at the top, five clips and six rivets):
Removing the lower trim strip on the front door:
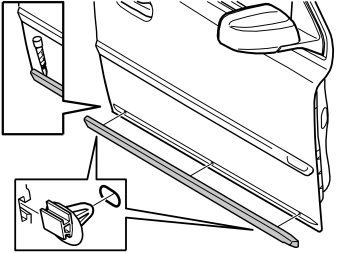
- Use the weatherstrip tool to pry the rear edge of the trim strip until the tape comes away on the bottom and top edges.
Примечание: Do not damage the paint work.
- Push the trim strip to one side to expose the first clip
- Remove the clip in the same way as for the clips on the wheel arch extension
- Pry the trim strip off working forwards. Remove the last clip in the same way as previously
- Put the trim strip to one side. It will not be reused.
Illustration A
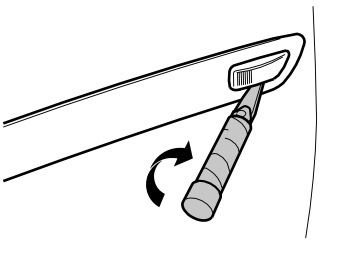
- Remove the parking lamp by carefully prying it off from its underside. The parking lamp has a cut out on its lower edge to make prying it off easier
- Disconnect the connector from the parking lamp.
Примечание: Ensure that the connector does not fall into the door.
Illustration B
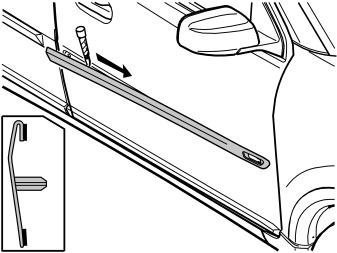
- Use the weatherstrip tool to pry the rear edge of the trim strip until the tape comes away on the bottom and top edges.
Примечание: Do not damage the paint work.
- Continue to pry off the trim strip working forwards until it has detached completely
- Put the trim strip to one side. It will not be reused.
Remove the upper trim strip on the front door:
Remove the lower trim strip on the rear door:
- Carry out the same procedure as for the front door (step 3), but start at the front of the trim strip and work backwards
- Put the trim strip to one side. It will not be reused.
Removing the upper trim strip on the rear door:
- Carry out the same procedure as for the front door (step 4), but start at the front of the trim strip and work backwards
- Put the trim strip to one side. It will not be reused.
Illustration A
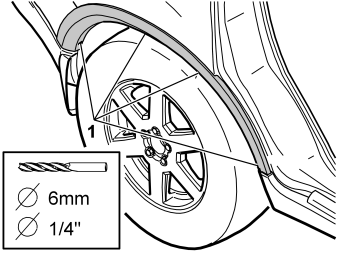
- Drill out the four rivets (1) holding the wheel arch extension to the edge of the wheel arch. Use a 6 mm (1/4”) diameter drill bit
- Remove the remains of the rivets.
Illustration B
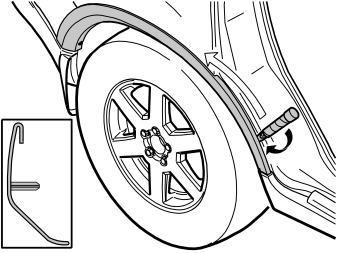
- Carefully pry off the front lower edge of the wheel arch extension. Use a plastic weatherstrip tool.
Примечание: Do not damage the paint work.
- Fold out the front lower edge of the wheel arch extension to expose the mounting clip
- Insert the weatherstrip tool at the side of the clip, between the panel and the wheel arch extension. Twist the weatherstrip tool to pull the clip away from the edge of the wheel arch or so that it breaks
- Then continue in the same way until all six clips have released
- Pull off the two wheel arch extension mounting hooks at the rear edge from their mountings
- Remove the wheel arch extension. Place the wheel arch extension to one side. It will not reused.
Removing the rear wheel arch extension (secured by two hooks at the rear bottom edge, tape at the top, six clips and four rivets):
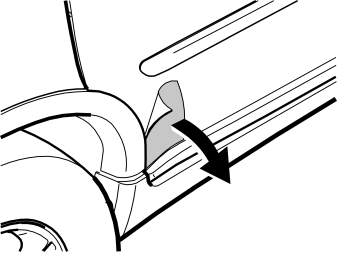
- Remove the stone-chip protection at the rear edge of the rear door.
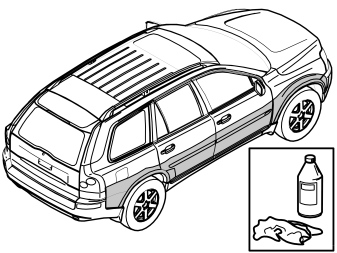
- Remove all tape residue left by the trim strips and wheel arch extensions
- Wash the entire area where the new trim panels and wheel arch extensions will be mounted. Use a mixture of 30% windscreen washer fluid and 70% water
- Wipe dry.
Marking the primer surface on the bodywork
Примечание: Two people must help each other to mark the primer surface on the bodywork.
- Remove the side panel components from their packaging
- Check how the mounting tape is positioned on the components. This determines where the primer must be applied and where the markings must be made
- clean the masking tape with a moist cloth. Use a mixture of 30% windscreen washer fluid and 70% water.
Примечание: There must not be any dirt or grease on the masking tape on the panel.
- Wipe dry.
Marking the outer contours on the panels
- Test install the panels, see steps 15-18, and mark their outer contours with a Whiteboard pen.
Примечание: Do not remove the backing tape from the mounting tape.
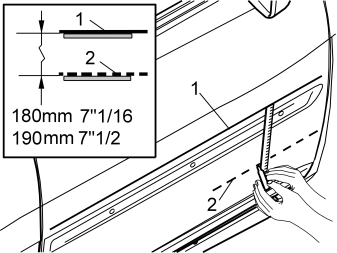
Marking the centre panel tape
- Measure from the upper marking (1) and mark out a line (2) for the centre panel tape. On the front door, the distance between the lower limits of the markings must be 180 mm (7 1/16”). On the rear door, the corresponding distance must be 190 mm (7 1/2”).
Installing the side panel
Примечание: The temperature of the car must be at least 20ºC (68ºF) when installing the side panels.
Примечание: Two people must help each other to align and secure the side panels.
Applying primer to the bodywork
Осторожно: The side panels must be installed at the earliest 15 minutes and at the latest 3 hours after applying the primer.
- Take the primer and cotton buds from the kit.
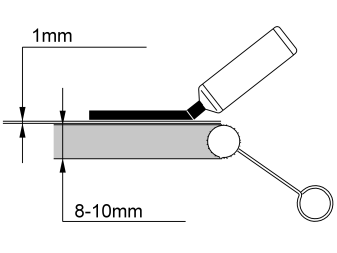
Примечание: The primer must be applied to the whole car in one operation. Any spillage must be wiped up immediately.
- Apply the primer inside the outer contours of the panels. It is important that nothing goes outside the markings, particularly on the upper sides of the panels, where there should be a space of approximately 1 mm between the primer and the marking
- Apply the primer immediately below the markings for the central mounting tape for the panel
- Allow the primer to harden for 15 minutes.
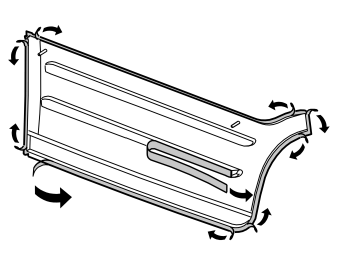
Applies to all components
- Remove the backing tape in each corner of the panel.
Applies to the door panels
- Remove the backing tape from the middle of the panel.
Securing the side panel for the rear door
Illustration A
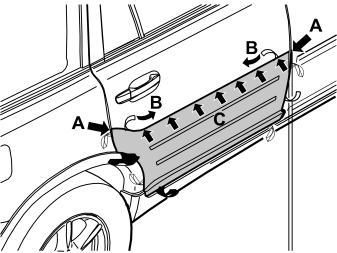
Carried out by two people, one at the front and one at the rear of the side panel:
- Carefully insert the panel locating pins in the holes in the door
- Move the panel as close to the door as possible without the tape on the corners securing. Ensure that the front edge of the panel is parallel with the front edge of the door (there is a little clearance between the locating pins and the holes in the door)
- Press the panel into place at the upper corners (A) and carefully remove the upper backing tape (B) by pulling it off from both sides at the same time.
Примечание: Ensure that the backing tape does not come off on the reverse of the panel as the panel may be firmly attached to the door.
- Press the upper section of the panel (C) into place on the door so that it is firmly secure.
Illustration B
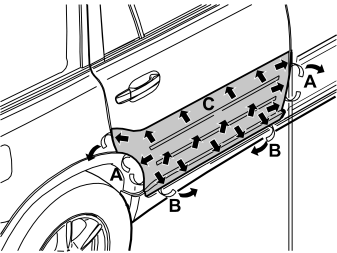
- Remove the backing tape on the sides (A) and lower edge (B) of the panel.
Примечание: Ensure that the backing tape does not come off on the reverse of the panel.
- Press the panel into place on the door at every point that there is tape (C)
- Press with a pressure of 1-2 kg/cm2 (14-28 lbf/in2) around the entire panel so that the tape sticks firmly.
Securing the front door side panel
Illustration A
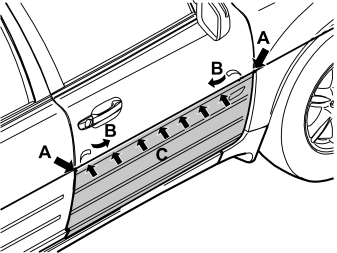
Illustration B
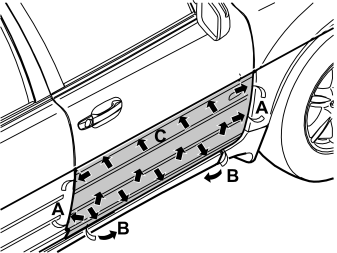
- Carry out the same procedure as for the rear door, but ensure that the rear edge of the panel is parallel with the rear edge of the door. In addition, adjust the height of the panel so that the top is in line with the rear door panel.
Securing the front wing side panel
Illustration A
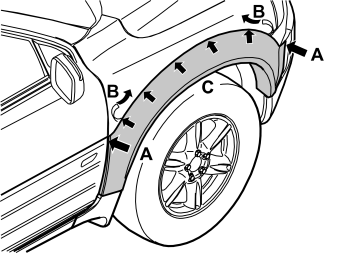
Carried out by two people, one at the front and one at the rear of the side panel:
- Carefully insert the panel locating pins in the holes in the edges of the wing
- Move the panel as close to the wing as possible without the tape on the corners securing. Adjust the height so that the rear/upper edges of the panel are in line with the front door panel (there is a little clearance between the locating pins and the holes in the edge of the wing)
- Press the panel into place at the upper corners (A) and carefully remove the upper backing tape (B) by pulling it off from both sides at the same time.
Примечание: Ensure that the backing tape does not come off the reverse of the panel as the panel may be firmly attached to the front wing.
- Press the upper section of the side panel (C) into place on the front wing so that it is firmly secure.
Illustration B
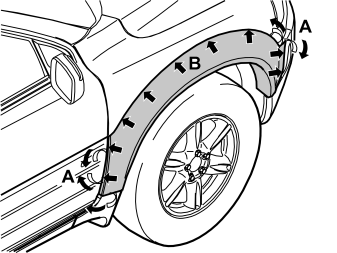
- Remove the backing tape on the sides (A) of the panel.
Примечание: Ensure that the backing tape does not come off on the reverse of the panel.
- Press the panel into place on the front wing at every point that there is tape (C)
- Press with a pressure of 1-2 kg/cm2 (14-28 lbf/in2) around the entire panel so that the tape sticks firmly.
Securing the rear wing side panel
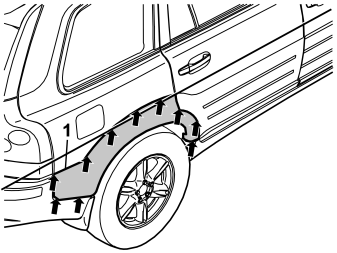
- Carry out the same procedure as for the front wing but adjust the height of the panel so that its front/upper edges are in line with the rear door panel
- Check that the tape is properly secured at the joint (1) between the rear bumper and the wing.
Finishing work
- Remove the Whiteboard ink from the car.
- Reconnect the connector to the lamp
- Press the parking lamp into the hole in the side panel. Ensure that it clips into place properly.
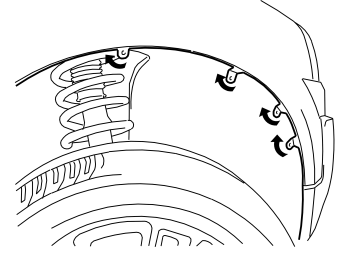
- Fold in the mounting lugs on the front wing side panel so that the holes in it align with the holes in the wing liner.
Illustration A shows the rear wheel
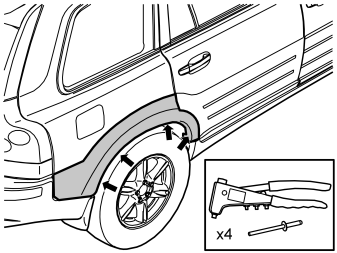
Illustration B shows the front wheel
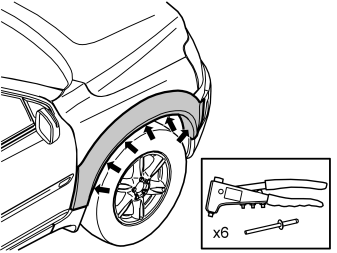
- Rivet the edges of the wheel arch extensions to the wing liner along the edges of the wheel arches. Do this on both the front and rear wheels. Use the rivets from the kit.
Illustration A shows the front edge of the rear door
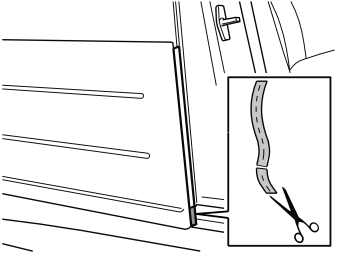
Illustration B shows the rear edge of the front door
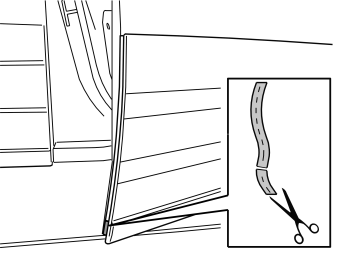
- If there is a visible gap between the black painted lower section of the side panel and the front edge of the rear door or the rear edge of the front door: cut the supplied tape to the same length as the lower gap and apply it.
- The car must be kept at a temperature of at least 15ºC (59ºF) for 2 hours
- Do not wash the car for 72 hours after installing the side panel.