Внимание: From chassis number 600 000: The telephone cable must not be routed over the inflatable curtain as this would jeopardise the function of the inflatable curtain in the event of a collision.
Preparations
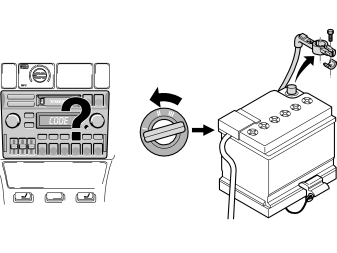
- Note the radio code if an anti-theft coded radio is installed.
- Turn the ignition key to position 0.
- Disconnect the negative battery lead.
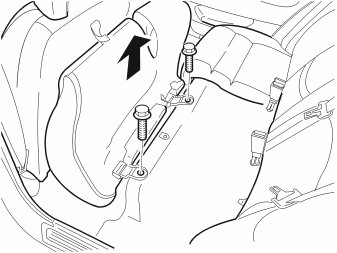
- Fold the rear seat forward and remove the securing bolts.
- Remove the rear seat.
- Remove the sill trim panel on the left side.
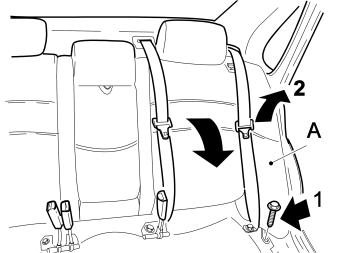
- Fold down the backrest on the left side.
- Remove the fixed section (A) of the backrest on the left side.
Applies only to S40
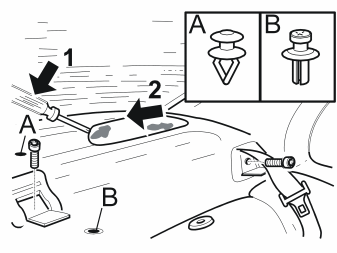
- Remove the rear loudspeakers as illustrated.
- Remove the seat belt mounting cover plates and slacken off screws.
- Remove the parcel shelf. (There is a clip in the middle of the parcel shelf.)
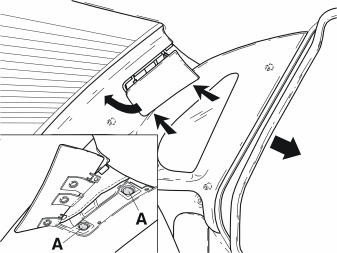
Applies only to S40
- Pull off the rubber strip from the panel.
- Push the locking lips in and turn the cover open. Remove the two clips (A).
- Pull out the panel with the clips carefully.
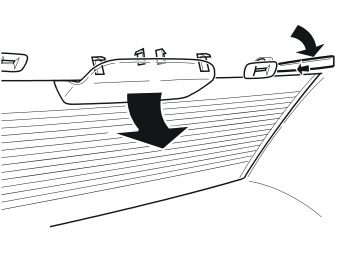
Applies only to S40
- Remove the two clips (they will no longer be used).
- If present: Remove the cover from the high-mounted brake lamp. Take care of the retaining clips.
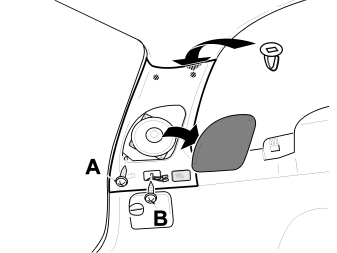
Applies only to V40
- Remove the parcel shelf.
- Remove the loudspeaker grille and screw (A).
- Remove the cargo compartment lighting and release the wiring.
- Remove screw (B) and carefully take the panel off.
- The same procedure applies on the right side.
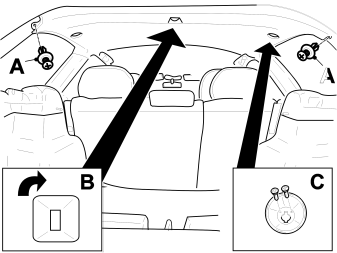
Applies only to V40
- Remove the two clips (A).
- Remove clamp (B) by turning it ¼ of a turn.
- If present: Remove cover (C) from the protection net on the left and right side.
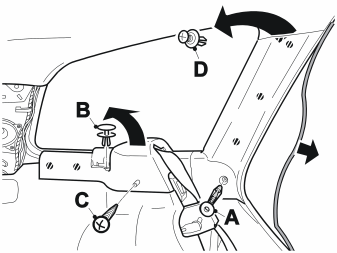
Applies only to V40
- Remove clips (A and B) and screw (C).
- Pull off the rubber strip and remove the panel.
- Remove clip (D) from the headlining.
- The same procedure applies on the right side.
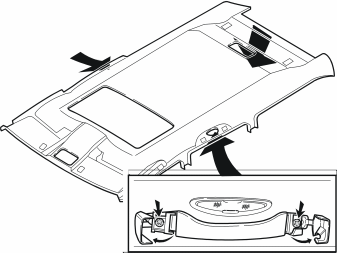
- If present: Remove the grab handles from the headlining on the left and right side.
- Carefully fold down the rear edge of the headlining. Take care so that the headlining is not damaged.
- Place a protective plate between the roof plate and the headlining so that the headlining is not damaged when drilling the roof plate.
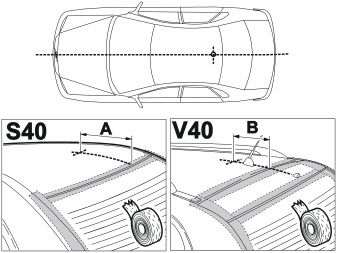
- Measure out the appropriate distance from the rear roof edge to where the hole is to be drilled along the center line of the car. S40: A=150 mm (5 29/32”), V40: B=225 mm (8 7/8“)
- Apply tape to the car as illustrated.
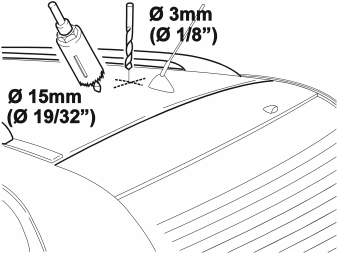
- Slightly lubricate the point where the hole is to be drilled.
- Center the hole.
- First drill a Ø3 mm (1/8”) hole, then expand the hole with a saw bit to Ø15 mm (19/32”). Do not press too hard when drilling through the roof and thus dent it, and make sure that the headlining is not damaged.
- Scrape away the insulation on the inside of the roof around the hole so that it is possible to treat the hole edges with rustproofing agent.
- Vacuum-clean to remove swarfs and metal chips.
- Treat the hole edges with rustproofing agent.
Installation
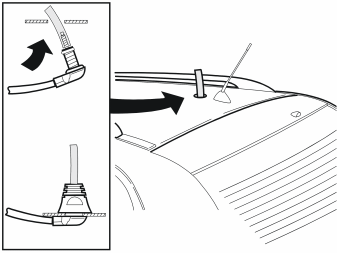
- Apply a protective tube over the threads and position the antenna in the roof.
- Install the nut and tighten to 3 Nm (2lbf ft).
- Install the antenna rod.
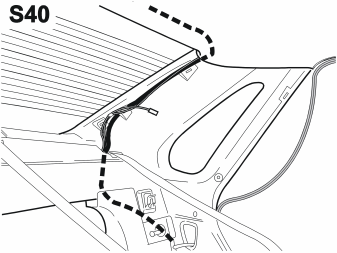
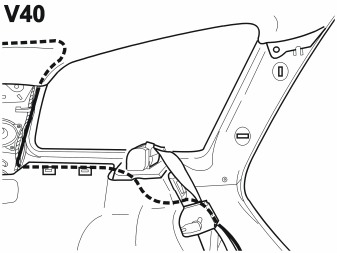
Внимание: Make sure that the telephone cable is not routed over the the inflatable curtain.
- Pull the telephone cable along the existing harness via the rear seat.
- Secure the telephone cable with tie straps.
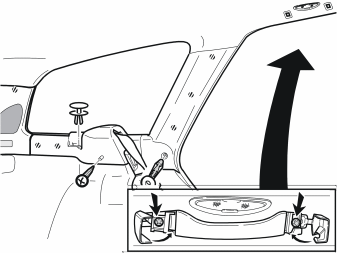
- Carefully reposition the headlining and secure it with the clips. (Use new clips on S40.)
- If present: Reinstall the grab handles onto the headlining on the left and right side.
- Reinstall the panels.
- Reinstall the fixed backrest section and fold up the backrest.
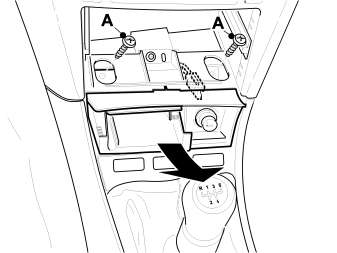
S40/V40, up to chassis number 600 000
- Remove the radio.
- Remove the connectors and the antenna cable.
- If present: Remove the center console storage compartment.
- Remove the ashtray.
- Remove the two screws (A) and remove the holder.
- Disconnect the cigarette lighter connector.
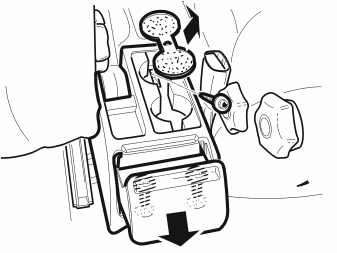
S40/V40, up to chassis number 600 000
- Remove the litter bin and the rubber mat from the cup holder.
- Remove the three screws.
- Remove the rear part of the center console.
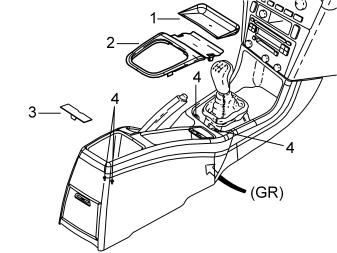
S40/V40, from chassis number 600 000
- Remove the rubber pad (1).
- Remove the gear lever panel (2) by pressing in the locking lips and taking it out. (Manual gearbox: Press the locking lips in and remove the sleeve.)
- Apply the parking brake.
- Remove the cover (3) and the screws (4).
- Pull up at the front of the rear center console and remove the grey (GR) connector.
- Remove the rear center console completely.
- Remove the radio.
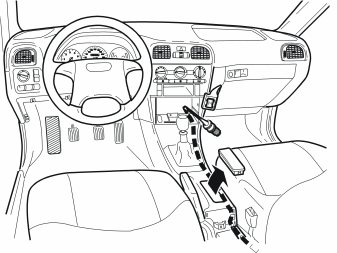
- Pull the telephone cable under the floor carpet along the tunnel/center console as illustrated.
- Secure the telephone cable with tie straps and ensure that it is free of the handbrake.
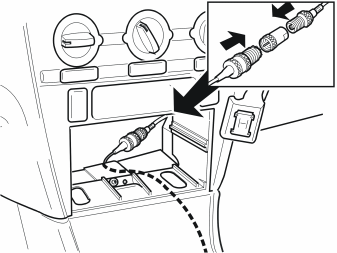
- Connect the telephone cable to the telephone holder. (Use an adapter if needed.)
- Secure the telephone cable so that it is not too tightly clamped, too slack or interfering with other wires.
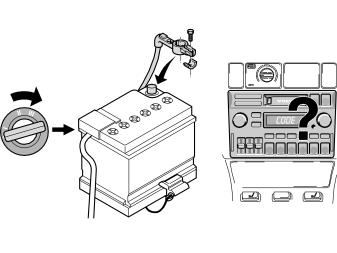
- Reinstall all remaining parts removed.
- Turn the ignition key to position II.
- Ensure that nobody is in the car. Reconnect the negative battery lead.
- If applicable: Reenter the radio code.
- Readjust the clock.
- Verify the function.
Осторожно: The antenna rod must be removed if the car is to be washed in an automatic carwash.
Обсуждение и оценка
0Пока нет комментариев. Будьте первым.