Примечание: This accessory is connected to the electrical system of the car. It requires software unique to the car.
Installing sensors

- Turn the ignition key to position 0
- Disconnect the battery negative lead.
Примечание: Wait at least five minutes before disconnecting the connectors or removing other electrical equipment.
- Check that the rear bumper is clean.
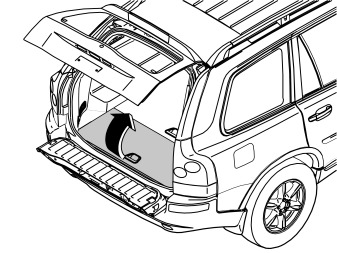
Applies to cars with two rows of seats
- Fold up the rear centre floor hatch. If the floor hatch has a carrier bag holder on the underneath, it is secured by a strap on each of the shorter sides of the storage box. These straps must be undone
- Remove the storage box underneath and lift it out
- On two-wheel drive cars, remove the floor hatch completely by folding it back slightly and pulling it backwards out of its mountings.
Applies to cars with three rows of seats and integrated carrier bag holder on the underside of the centre floor hatch
- Fold up the rear centre floor hatch
- Release the two straps on the panel underneath. Lift up the panel at the rear edge. Fold back the floor hatch towards the panel. Lift out the floor hatch and panel.
Applies to cars with three rows of seats without an integrated carrier bag holder
- Lift up the centre, rear floor hatch at the rear edge and lift it out.
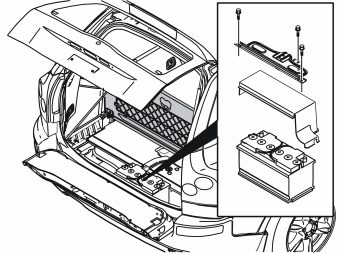
- Remove the three screws in the battery holder. Lift the battery holder out
- Remove the cover from the battery.
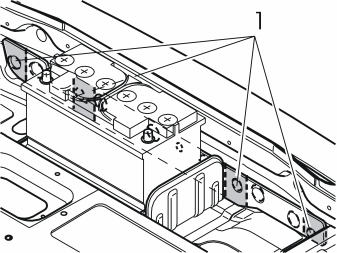
- Remove the four pre-punched sections (1) from the insulation panel in the rear cross member
- Remove the four nuts holding the bumper.
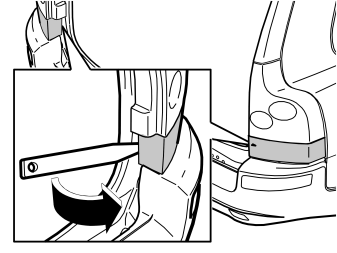
- Remove the panel under the rear lamps on the right and left-hand sides by carefully prying off using a weatherstrip tool.
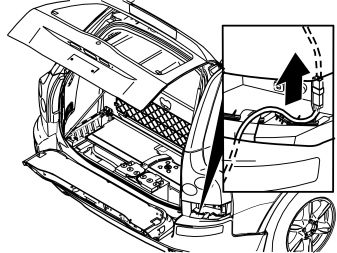
- Disconnect the connectors for the sidemarker lamps on the left and right-hand sides. The connectors must be left in place in their brackets.
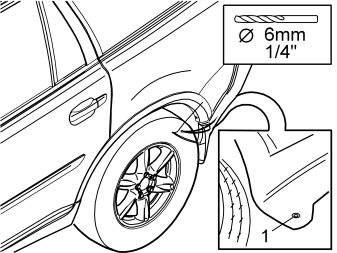
- Drill out the rivet in the rear edge of the wheel arch on the right and left-hand sides. Use a6 mm (1/4” )diameter drill bit
- Remove the remains of the rivets.
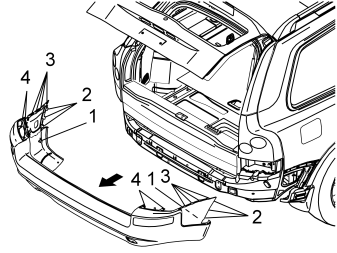
- Pull the ends of the bumper cover away from the body by pulling off the clips (1) at the bottom and then continuing up along the wing extensions and pulling off the three vertically positioned clips (2)
- Pull out the ends some more until the four horizontally positioned clips (3) at the top of the wing extensions release
- Fold up the lower tailgate
- Pull the bumper back so that the two clips (4) which are accessible from the space under the rear lamps release
- Remove the bumper.
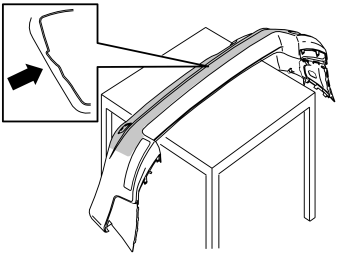
- Place the bumper on a suitable underlay
- Clean the outside of the bumper
- Install the protective paper evenly distributed over the bumper.
Примечание: the paper protects the bumper and must be left in place throughout the operation.
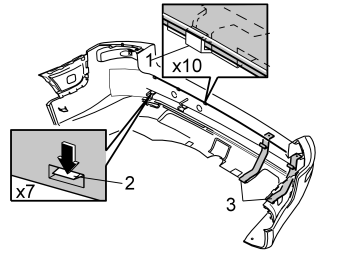
- Release the ten catches in the upper edge (1) and the seven catches in the centre (2) of the bumper
- Detach the two stays (3) from the lower edge of the bumper cover. Remove the rear section and the foam rubber from the bumper cover.
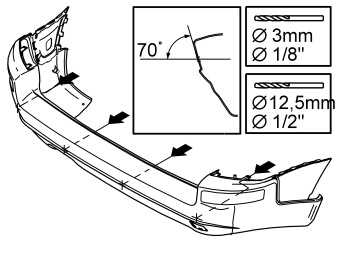
- If necessary, clean the inside of the bumper cover to locate the four markings where the holes for the sensor holders will be drilled
- Pre-drill the holes. Use a3 mm (1/8”)diameter drill bit. Drill out the holes. Use a12.5 mm (1/2”)diameter drill bit.
Примечание: Ensure that the power drill is horizontal when drilling.
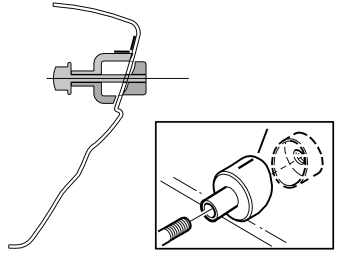
- Take the27.5 mm (1 1/16”)diameter hole cutter (P/N 8671170). Install it in the holes with the screw and the counterhold on the inside and the cutting section on the outside as illustrated. Ensure that both parts of the hole cutter are correctly positioned against the surface of the bumper cover before starting to make holes
- Open the holes
- The mark on the tool must be pointed upwards and coincide with the centre marking on the cover.
Примечание: Clean the threads and surfaces of the tool after cutting each hole.
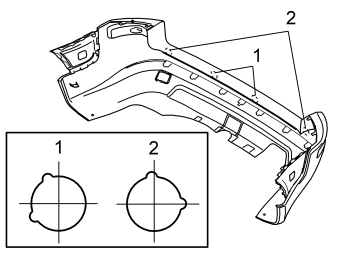
- Using a small round file, file out the two semi-circles marked around each hole. These ensure that each sensor is correctly positioned and does not rotate. The two sensor holders which will be in the centre (1) are the same. The two sensor holders which will be positioned to the sides (2) are different from each other and from the sensors in the centre. The catches on the holders also have text indicating the correct location in the bumper.
Примечание: The marking may be difficult to see. Carefully check that the sensor holder is correctly positioned.
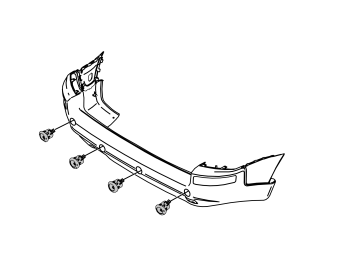
- Ensure that the edge of the holes are smooth. File them if necessary
- Remove the protective paper around the holes
- Take the sensor holders from the kit. Press them into the correct positions in the bumper cover. Press them firmly into place and check that all the catches have engaged.
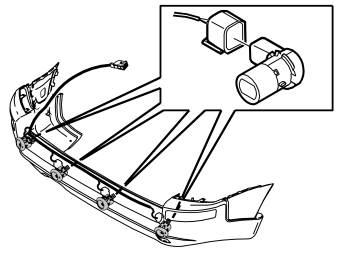
- Take the sensors and the cable harness from the kit
- Connect the connectors on the cable harness to the connectors on the sensors. There must be a click which confirms that the catch has engaged
- Press the sensors into place with the cable harness in the relevant holder so that the connector is pointing to the left as illustrated.
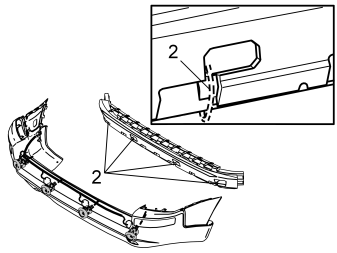
- Place the four cables from the sensors so that they are in the vertical cut-outs (2) in the foam rubber
- Press the rear section with the foam rubber into place in the bumper cover. Check that all the catches have engaged and that the stay has engaged around the bottom of the bumper cover.
Points 17-22 apply to cars with tow hitches
Примечание: On cars with tow hitches, the cable harness for the sensors must be moved: This is to prevent damage from rubbing against the rear edge of the mounting at the sides of the tow hitch.
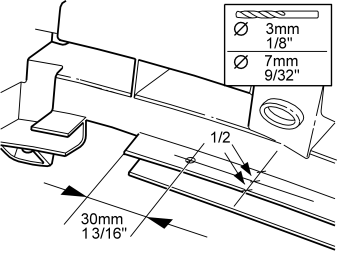
- Measure up to drill the cable lead-in in the upper of the rear section plates as illustrated
- Pre-drill using a3 mm (1/8”)diameter drill bit. Then drill out the hole to a diameter of7 mm (9/32”).
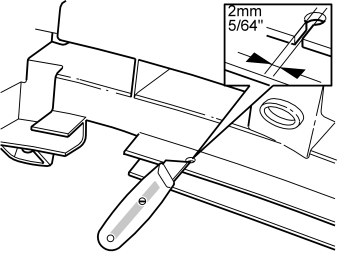
- Cut a 2 mm (5/64”) wide groove through the plate leading in to the hole.
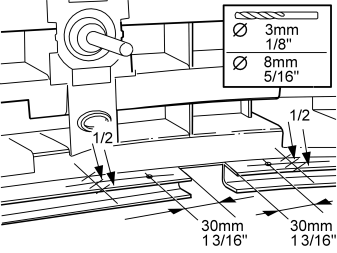
- Measure up to drill the lead-in in the upper plate in the rear section on the left and right-hand sides of the cut-out as illustrated
- Pre-drill using a3 mm (1/8”)diameter drill bit. Then drill out the hole to a diameter of8 mm (5/16”).
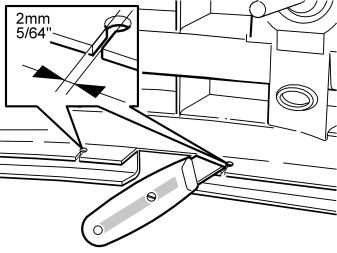
- Cut a 2 mm (5/64”) wide groove through the plate leading in to the hole
- Do the same on the other side of the cut-out.
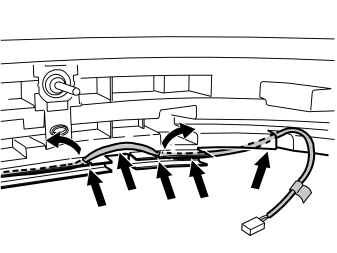
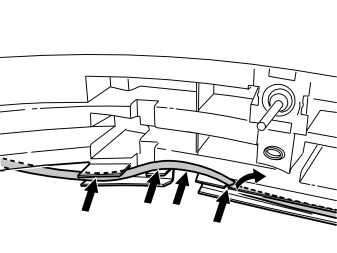
Routing the cable on the left-hand side of the bumper
- Press up the tabs on the plates and insert the cable in the holes drilled earlier. Position the cable as illustrated
- Route the cable to the right-hand side of the existing cable duct as before.
Routing the cable on the right-hand side of the bumper
- Press up the tab on the plate and insert the cable in the previously drilled hole. Position the cable as illustrated.
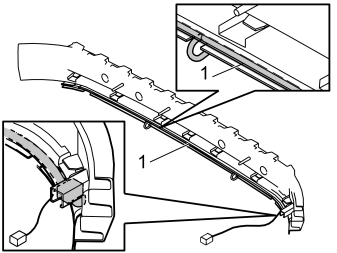
- Press the large cable harness for the sensors into place in the existing cable duct (1) in the bottom of the rear section.
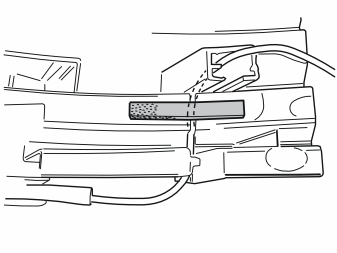
- Take the piece of foam tape from the kit and install it over the cable lead-in on the right-hand side of the rear section of the bumper so that the cable does not fall out.
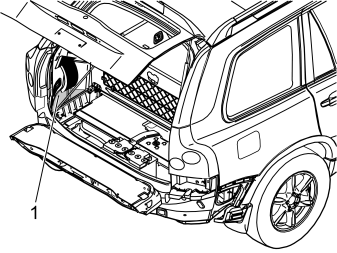
- Remove the left-hand floor hatch (1).
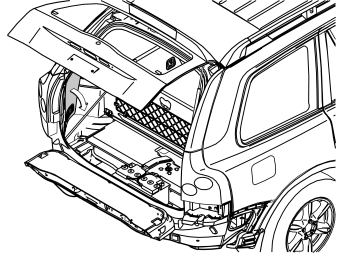
- Remove the folding side panel from the left-hand side in the cargo compartment.
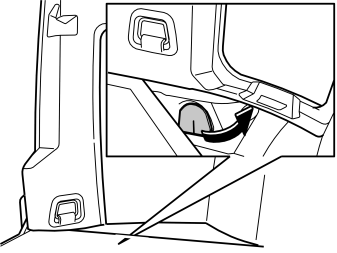
- Remove the expanded polystyrene seal on the left-hand side in the rear cross member under the left-hand side floor hatch. Do not damage the seal, it will be used again.
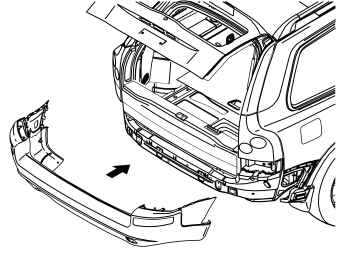
- Fold up the lower tailgate
- Reinstall the bumper, insert the cable from the sensors in the large rectangular hole to the left in the rear cross member and then on to the hole where the expanded polystyrene seal was located. Ensure that the wiring for the sidemarker lamps is in the correct grooves in the spaces under the tail lamps
- Press the four clips for the bumper into place above the sidemarker lamps on the body. Then secure all the clips for the ends to the body
- Fold down the lower tailgate
- Tighten the bumper using the four nuts. Tighten to16 Nm (12 lbf.ft.)
- Take the new pieces of insulation and reinstall them above the holes for the bumper
- Connect the connectors to the sidemarker lamps
- Reinstall the covers under the tail lamps
- Rivet the bumper into place at the rear edges of the wheel arches on both sides. Use the rivets from the kit.
Installing the control module on four-wheel drive cars
Примечание: The relay does not need to be installed on four-wheel drive cars.
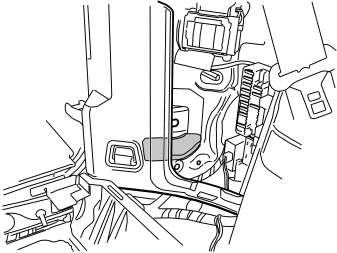
- Clean the flat surface on the plate behind the control module where the Velcro strips will be pressed into place. Use a mixture of 30% windscreen washer fluid and 70% water
- Wipe dry.
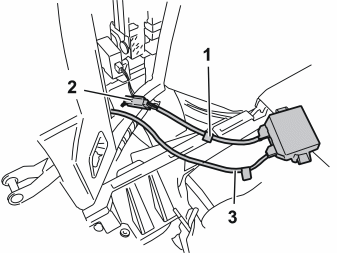
- Connect the power supply cable (1) from the control module to the pre-routed cable harness with the grey connector (2) from the existing cable harness
- Connect the cable harness (3) from the sensors to the control module.
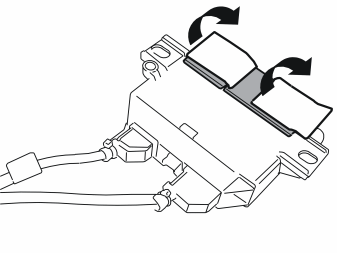
- Remove the backing from the Velcro strips.
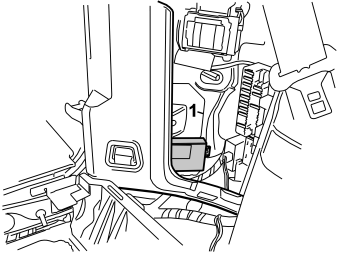
- Press the control module firmly into place on the flat surface behind the panel as illustrated.The visible left side of the control module must be at the same height as the edge of the plate (1).
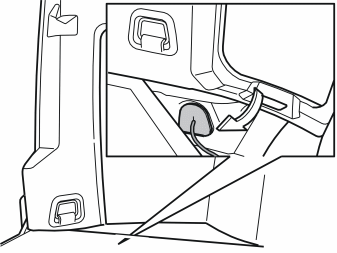
- Reinstall the expanded polystyrene seal together with the cable harness from the sensors in the hole in the rear cross member.
Installing the relay and control module on two-wheel drive cars
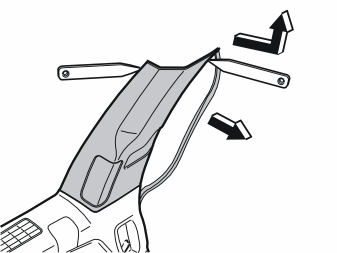
- Pull off the rubber strip at the rear edge of the door opening to the left-hand rear door opposite the left C-post panel
- Carefully pry off the left-hand C-post panel sides at the top using a plastic weatherstrip tool. Then pull until the three clips on the inside release. Do not damage the headlining or the panel
- Remove the panel by pulling upwards slightly and unhooking it from the side panel.
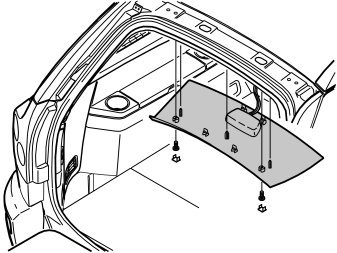
- Remove the covers and the screws underneath for the rear headlining
- Carefully pry off the panel at the rear edge using a plastic weatherstrip tool
- Pull the rear edge of the panel downwards until the four clips on the top release
- If the car has lighting in the panel, disconnect the connector
- Pull the panel backwards to release it.
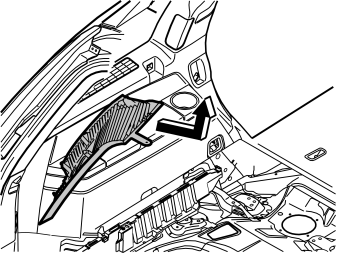
- Carefully pull off the D-post panel. Start at the top edge then pull down until the three clips on the inside release. Do not damage the panel
- Disconnect the connector on the D-post panel (if the car has a loudspeaker in the D-post there is a connector in the loudspeaker)
- Remove the panel by pulling upwards slightly and unhooking it from the side panel.
Illustration A shows the removal of the cover for the load securing eyelets
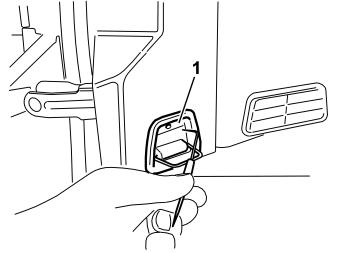
- Fold out the load securing eyelet
- Insert a scriber with an angled tip into the hole in the top of the cover
- Turn the scriber so that the angled tip engages in the reverse of the cover (1). Pull the cover off.
Illustration B applies to cars with two rows of seats
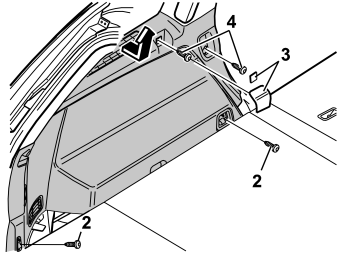
Illustration C applies to cars with three rows of seats
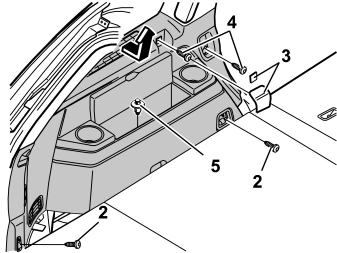
- Remove the two screws (2) from under the cover
- Remove the covers (3) over the front mountings for the left-hand side panel. Pry them off using a plastic weatherstrip tool or a small screwdriver
- Remove the screws (4)
- Remove the clip (5) at the bottom of the storage compartment in the panel (applies to cars with three rows of seats)
- Pull out the panel slightly at the top edge so that the clips on the inside release. Remove the panel by pulling it straight upwards.
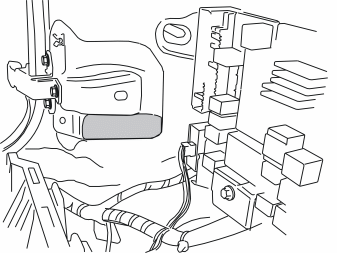
- Clean the flat surface where the Velcro strips will be applied. Use a mixture of 30% windscreen washer fluid and 70% water
- Wipe dry.
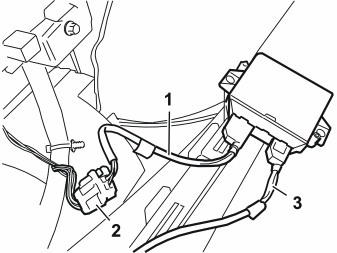
- Connect the power supply cable (1) from the control module to the pre-routed cable harness (2) with the grey connector from the existing cable harness
- Connect the cable harness (3) from the sensors to the control module.
- Remove the backing from the Velcro strips.
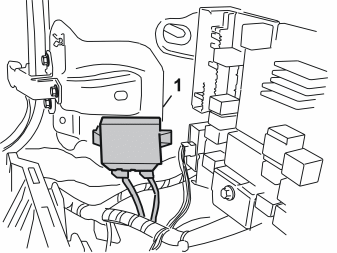
- Press the control module firmly into place on the flat surface, with the wiring positioned behind the existing thick cable harness as illustrated.The left side of the control module must be at the same height as the edge of the plate (1).
- Reinstall the expanded polystyrene seal together with the cable harness from the sensors in the hole in the rear cross member.
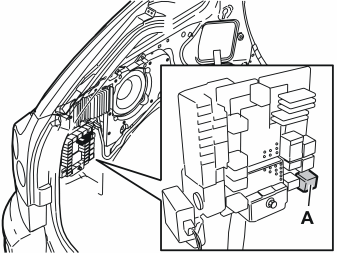
- Take the relay from the kit. Install it in position MA1 in the lower front corner of the fuse holder.
Installing the fuse and switch
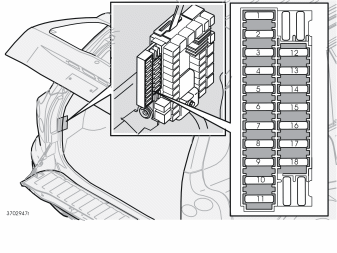
- Take a 20 ampere fuse from the kit. Install it in position 15 in the rear fuse holder.
Illustration A
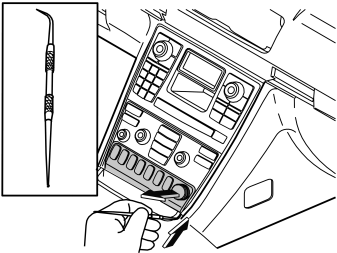
- Remove the blind cover plug from the 12V socket
- Take a scriber with an angled tip
- Insert the angled end of the scriber in the joint on the underneath of the surround for the switch unit.
Illustration B
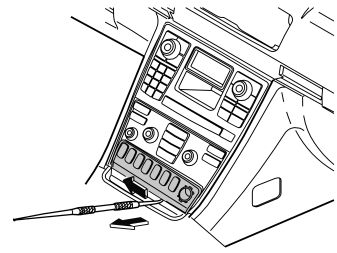
- Carefully pull out the surround using the scriber along the underneath of the surround. The surround is secured by three mounting lugs at the top and lower edges. Do not damage the surround
- Place the surround to one side.
Подсказка: The surround with four button spaces can be replaced by a surround with seven button spaces if necessary. This surround is purchased separately.
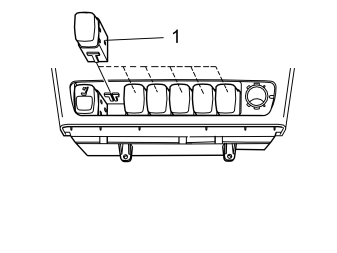
The switch can be installed in any location.
- Remove the switch blank. Install the new switch (1)
- Reinstall the surround and the blind cover plug for the 12V socket.
Applies to two wheel drive cars
Reinstall:
- the left-hand side panel using the screws and cover. Tighten the screws in the load securing eyelets. Tighten to24 Nm (18 lbf.ft.)
- the covers for the load securing eyelets
- The D-post panel with the connector
- the connector for the rear roof lighting (if applicable)
- the rear headlining
- the C-post panel.
Finishing work
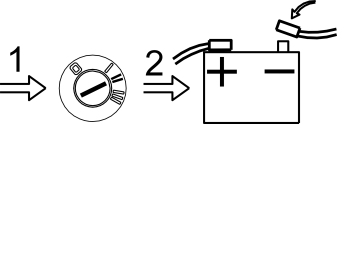
- Turn the ignition key to position II
- Reconnect the battery negative lead
- Reinstall the left-hand folding panel and the left floor hatch
- Reinstall the floor hatches and the storage compartment
- Program the software according to the service information in VIDA.