Примечание: Place these Installation Instructions in the affected car after installation.
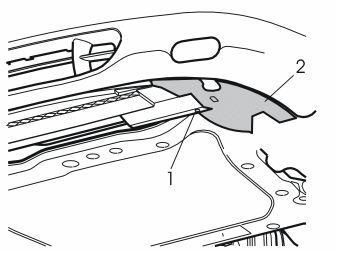
- Raise the car
- Remove the screw (1) from the left air baffle (2) for the front brake
- Pull the left air baffle backwards. Remove the left air baffle
- Remove the right air baffle in the same way.
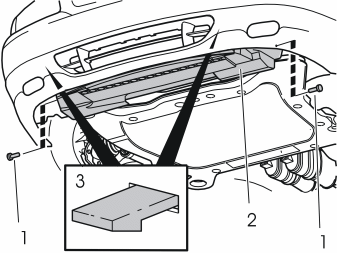
- Remove the screws (1). Slacken off the air baffle (2)
- Release the catches (3). Pull the air baffle backwards
- Remove the air baffle
- Drain the coolant. The nipple for the coolant is positioned on the lower edge of the left-hand side of the radiator.
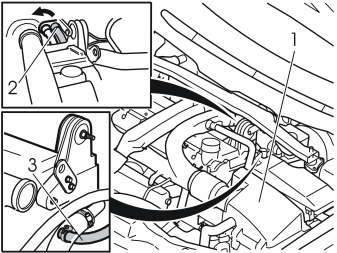
- Move the air cleaner (ACL) (1) to one side by disconnecting the intake manifold, hoses and other connected components. Pull loose from the three mountings in order to make space for routing the hose unit
- Remove the quick-release connector from the left heating hose (2) for the passenger compartment heater at the cowl as follows: Press the connector together opposite the two arrows on the ring around the connector. Turn the ring in the direction of the arrow. Turn the connector slightly and pull it off
- Disconnect the heater hose (3) on the left-hand side of the cylinder head.
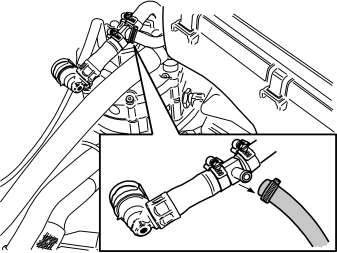
- Route the heater hose previously routed from the cowl and the cylinder head. Remove the hose clamp on the hose to the gas regulator, pull off the hose
- Place the heater hose with the angled connector and T-connector to one side. These will not be reused.
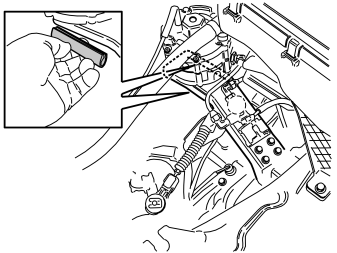
- Take two pieces of chafe protection from the kit. Press the protection on the front and rear edge of the bracket for the gas regulator to avoid rubbing.
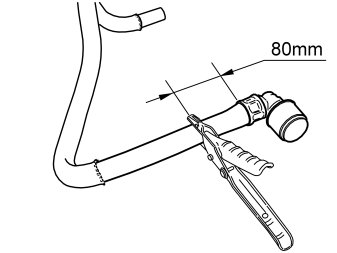
- Take the hose unit from the kit. Cut off the hose and the angled connector 80 mm from the lower edge of the clamped connection as illustrated. Both components will be reused.
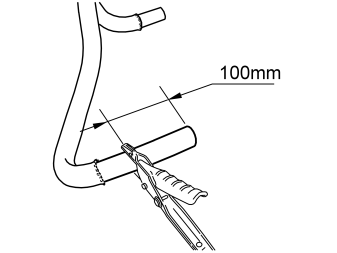
- Cut off the remaining straight section of the hose to the angled connection 100 mm. The short piece of hose will not be reused.
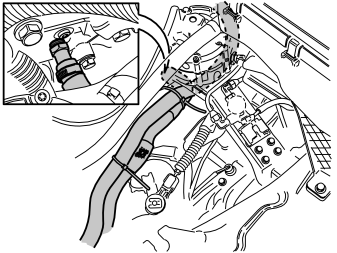
- Position the cut hose unit above the gearbox
- Route the cut end of the hose unit under the bracket for the gas regulator and along the existing larger cable harness. Continue routing under the cable harness behind the gearbox and up to the cowl where the heater hose was removed. Route the shorter angled hose in the same end under the larger radiator hose against the connection on the cylinder head
- Press the hose on the connector to the cylinder head. Tighten the hose using the existing hose clamp
- Route the other end of the hose unit to the left lower edge of the radiator, on top of the existing hoses
- Secure the hose unit at the larger cable harness using two tie straps from the kit.
Осторожно: Secure the hose unit so that it does not rub against any sharp edges or moving parts in the engine compartment.
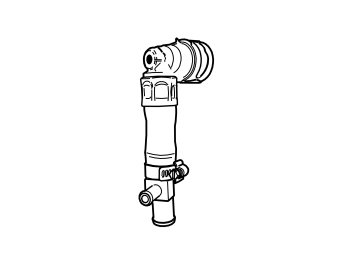
- Assemble the cut angled connection, T-connector and the hose clamp from the kit
- Lubricate the inside of the end of the hose using soap solution to facilitate installing the T-connector
- Turn the T-connector slightly in relation to the angled connection so that it corresponds with the other T- connector on the other heater hose in the cowl. Do not tighten the hose clamp yet.
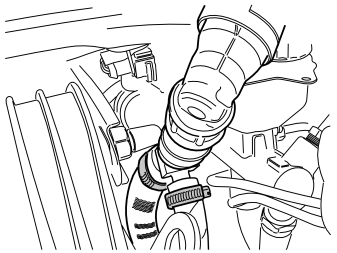
- Take a large and small hose clamp from the kit
- Pull the heater hose, positioned at the cowl, and install the large hose clamp on the heater hose. Position the hose clamp so that it does not rub against the other heater hose at the cowl
- Install the angled connector and the T - connector. Do not tighten the hose clamp yet
- Install the small hose clamp on the hose to the gas regulator. Install the hose on the T-stud. Do not tighten the hose clamp yet
- Press the angled connector into the cowl
- Adjust the position of the hoses, hose clamps and T-connector to prevent trapping and rubbing
- Tighten the hose clamps.
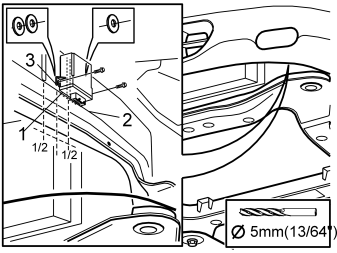
- Take the control module from the kit. Position the lower edge (1) of the control module level with the lower edge of the member (2). Position the front hole (3) in the mounting for the control module between both the stamps on the member
- Mark out the holes. Drill out the holes. Use a 5 mm (13/64”) drill bit
- Place washers between the mountings for the control module and the member (install 2 washers in the front hole and 1 washer in the rear hole). This is to level out any unevenness in the member
- Treat the edges of the holes using a rust-proofing agent
- Screw the control module into place. Use the screws from the kit.
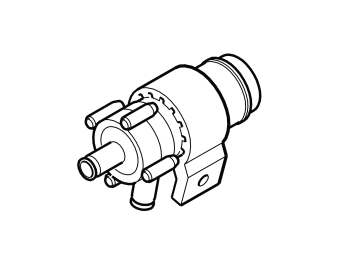
- Install the rubber bracket on the pump as illustrated. Press to the limit position.
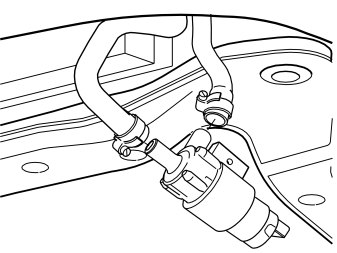
- Install hose clamps on the hoses to the pump. Connect the hoses
- Tighten the hose clamps. Do not over tighten them. It should still be possible to twist and adjust the hose clamps.
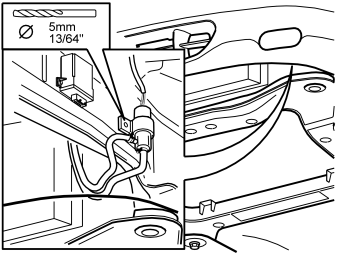
- Connect the cable harness (from the kit) to the pump
- Mark up to drill the holes for the pump bracket. Hold the pump with the hoses in front of the fender liner
- Adjust the hoses on the pump to ensure the best routing. Ensure that the pump connector does not catch on the control module or in the wheel arch
- Mark up the holes when the best position has been found suitable
- Tighten the hose clamps on the pump
- Drill out the hole. Use a 5 mm (13/64”) diameter drill bit
- Treat the edges of the holes using a rust-proofing agent
- Tighten the pump and bracket. Use the screw from the kit. At the same time, adjust the pump to obtain the best position.
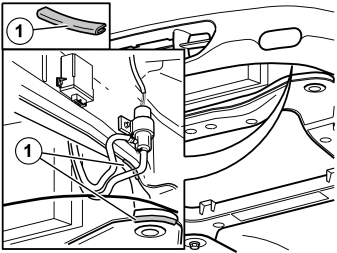
- Install the guard (1) (from the kit) on the panel edges. This is to prevent damaging the hoses
- Check that the hoses are unimpeded. Adjust if necessary.
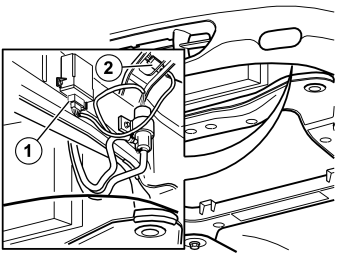
- Connect the connectors in the cable harness to the control module (1). Connect connectors in the cable harness to the pre-routed four pin connector (2) in the wheel arch.
- Reinstall the centre, left and right-hand air baffles
- Lower the car
- Reinstall the air cleaner and connectors.
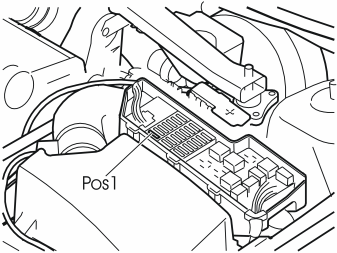
- Open the fuse holder cover in the engine compartment. Install a 25A fuse in position 1
- Reinstall the cover.
- Fill with coolant. Reinstall the expansion tank cap
- Start the engine. Bleed the radiator system
- Program the software. See the service information in VIDA
- Test the function of the heater according to separate instructions.