Применимость
| Модель | Двигатель | Год |
|---|---|---|
| S60 (-09) | — | 2001–2003 |
| S80 (-06) | — | 1999–2003 |
| V70 (00-08) | — | 2000–2003 |
| V70 XC (01-) / XC70 (-07) | — | 2001–2003 |
Примечание: This accessory requires software unique to the car.
Примечание: - Points 1-23, 43-51 apply to the S60 and S80
- Points 1, 24-51 apply to the V70.

- Turn the ignition key to position 0
- Remove the key from the ignition switch (does not apply to cars with automatic gearboxes)
- Disconnect the battery negative lead.
Примечание: Wait at least five minutes before disconnecting the connectors or removing other electrical equipment.
Applies to the S60 / S80
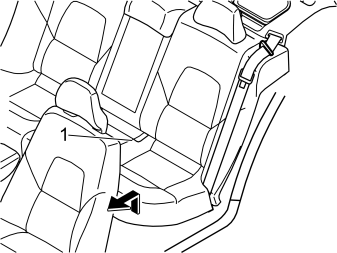
- Remove the seat cushion (1). First pull the front edge of the seat cushion up. Pull the cushion forwards. Then lift the seat cushion out.
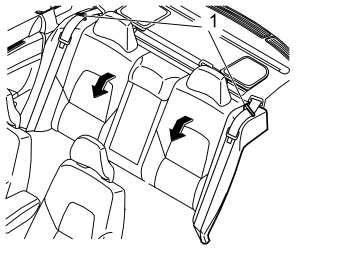
- Fold both the rear backrests forward
- Remove the seat belts from the guides (1).
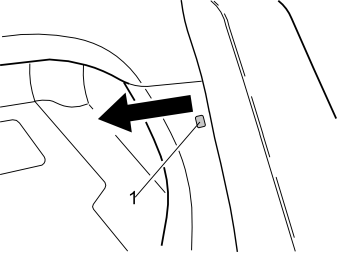
Applies to the S60
- Remove the clip (1) at the side of the left-hand side cushion
- Pull the top edge of the left-hand front cargo compartment panel out to access the upper lock for the side cushion
- Repeat the operation on the right-hand side.
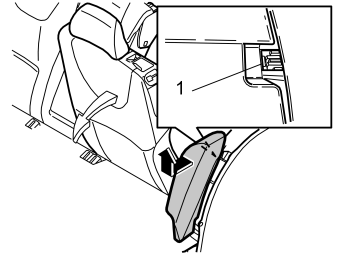
Applies to the S60
- Remove the left-hand side cushion. First press in the catches (1) at the top edge of the reverse of the side cushion. Pull the cushion out slightly
- Grasp the cushion using both hands. Twist anti-clockwise until the catches on the inside release
- Remove the side cushion. First pull out the upper edge of the side cushion. Then pull upwards
- Repeat the operation on the other side.
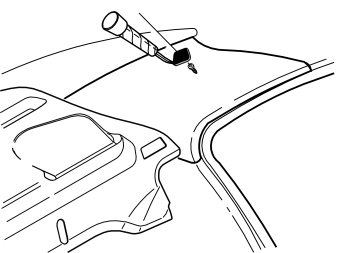
Applies to the S60
- Remove the cover and the screw for the left-hand C-post panel
- Repeat the operation on the other side.
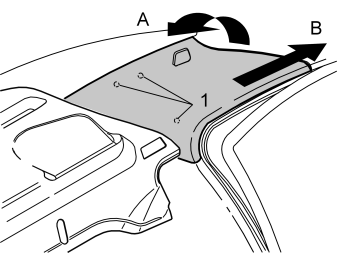
Applies to the S60
- Remove the rubber strip at the rear edge on the left-hand rear door frame
- Grasp the top edge of the C post panel. Pull (A) the panel inwards until the three clips (1) release
- Then pull (B) the panel straight up. Place the panel to one side
- Repeat the operation on the other side.
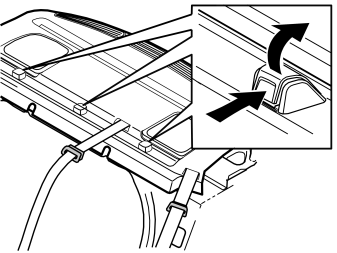
Applies to S60/S80 with mountings for child seats
- Fold up the hatch on the cover over the mounting
- Press in the front ends of the cover. Pull up the front edge. Pull the rear edge from the parcel shelf panel
- Repeat the operation on all mountings.
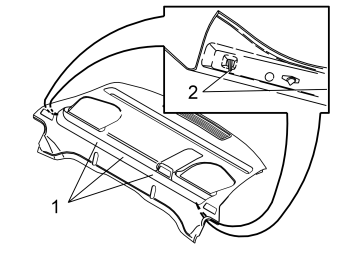
Applies to the S60 / S80
- Carefully lift the front edge of the parcel shelf panel until the clips (1) release
- Lift up the panel further until the locating pins (2) release from their holes
- Pull out the parcel shelf. Lay the parcel shelf on the folded backrests.
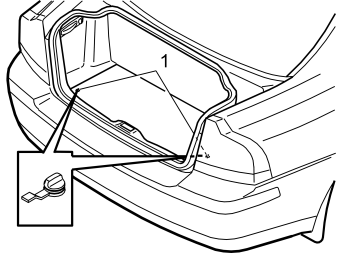
Applies to the S60
- Remove the cargo compartment carpet at the rear edge. First turn the two knobs (1) 90°.
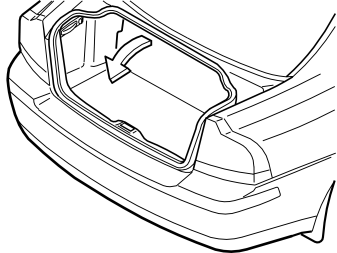
Applies to the S60
- Pull up the front of the cargo compartment carpet. Fold the front half back over the rear half of the cargo compartment carpet.
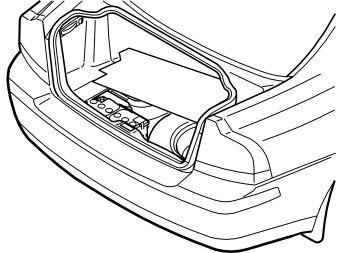
Applies to the S60
- Slide the entire cargo compartment carpet forward slightly. Twist slightly to remove the cargo compartment carpet through the tailgate opening.
Applies to the S80
- Fold the cargo compartment carpet together. Twist the cargo compartment carpet slightly so that it can be removed from the cargo compartment.
Applies to the S60 / S80
- Remove the cargo compartment carpet.
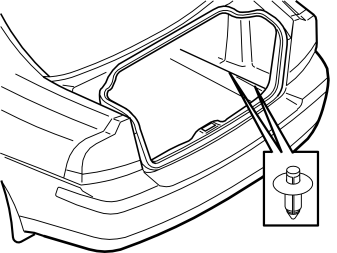
Applies to the S60 / S80
- Press the centres of the clips at the lower edge of the folding side panel on the right-hand side until they click
- Remove the clips.
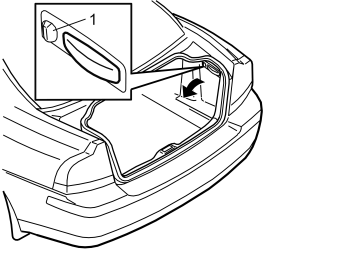
Applies to the S60 / S80
- Turn the handle (1) on the right-hand side through 90°.
- Fold the side panel inwards. Lift the panel out.
Illustration A applies to the S60
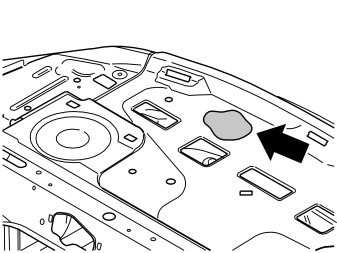
Illustration B applies to the S80
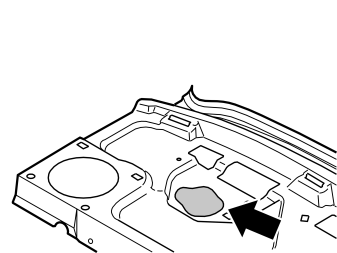
- Clean the shaded surface on the parcel shelf using a damp cloth. Allow to dry.
Illustration A applies to the S60
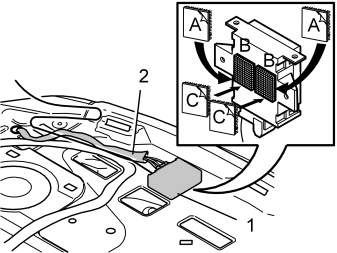
Illustration B applies to the S80
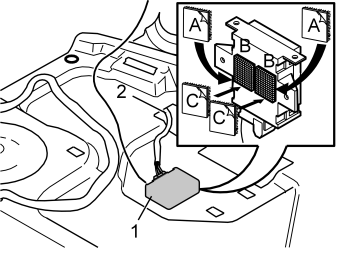
- Clean the reverse of the control module. Use a wet cloth. Allow to dry
- Remove the protective film from two of the Velcro straps of the same type (A)
- Press the Velcro straps into place underneath the control module (B)
- Press the two other Velcro straps on to the newly installed Velcro straps on the control module. Remove the protective film (C)
- Position the control module on the parcel shelf as illustrated. Press the control module into place
- Connect the six pin connector (1) to the control module. Pull the cable out towards the right on the parcel shelf. Thread the wiring down into the existing hole (2) in the parcel shelf.
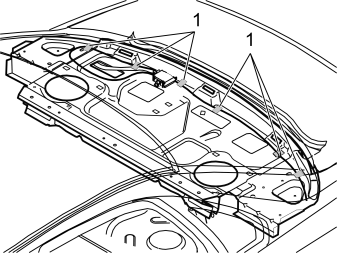
Applies to the S60 / S80
- Take the end of the thin aerial cable. Tape the cable to the left rear edge of the parcel shelf using tape
- Route the cable along the rear edge of the parcel shelf to the right-hand side. Tape in place in the same way (1).
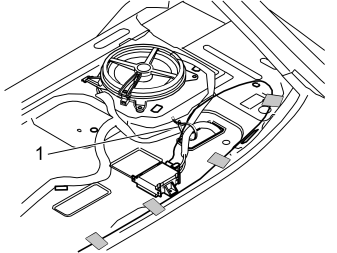
Примечание: Do not clamp the aerial wiring for the radio and TV if the car is equipped with such.
Applies to the S60
- Bind the excess cables. Secure with the existing cable harness and cable harness for the control module, previously routed. Use a tie-strap (1) from the kit.
Applies to the S80
- Bind the excess cables. Secure with the cable harness for the control module (previously routed). Use a tie-strap (1) from the kit.
Applies to the S60 / S80
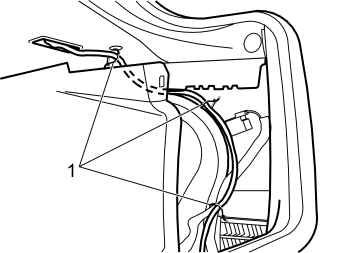
- Route the wiring with the relay holder, relay and cable with the indicator lamp from the control module underneath the right-hand side of the parcel shelf, inside the panel and down along the rear edge of the right-hand wheel arch as illustrated
- Secure the wiring at points (1), at the cable for backrest folding, to the existing hoses and cable harnesses using tie straps from the kit.
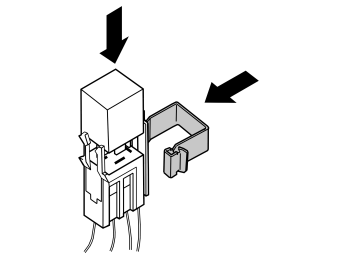
- Take the relay and the large clip from the kit
- Press the relay into the relay holder
- Press the clip into the relay holder.
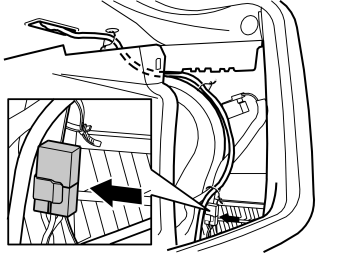
- Press the clip with the relay holder and relay onto the plate edge at the rear edge of the wheel arch.
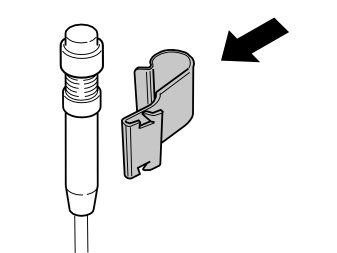
- Press the small clip (from the kit) on to the indicator lamp.
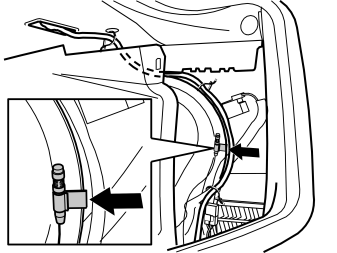
- Press the clip with the indicator lamp on to the edge of the plate at the rear edge of the wheel arch.
Continue with point 43.
Applies to the V70
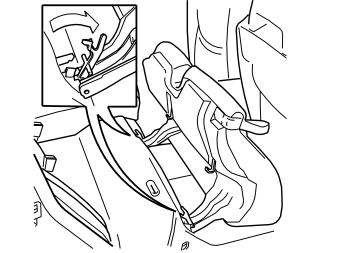
- Fold the right rear seat cushion forward.
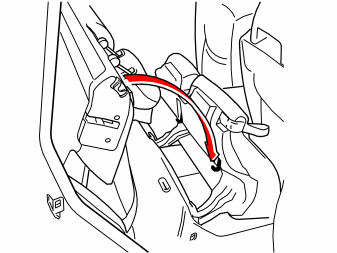
- Fold the right rear backrest forward.
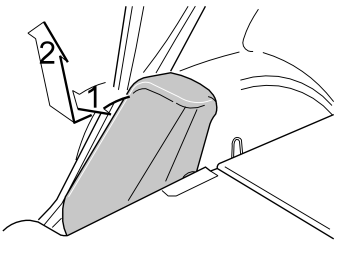
- Remove the right side cushion. First pull the upper edge of the cushion backwards. Then lift the cushion.
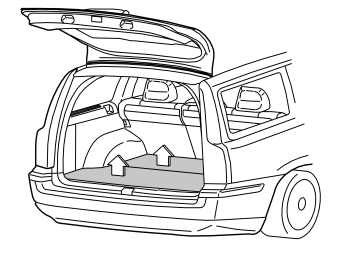
- Remove both the floor hatches. First lift the rear edges of the floor hatches slightly. Then pull the hatches backwards from their mountings.
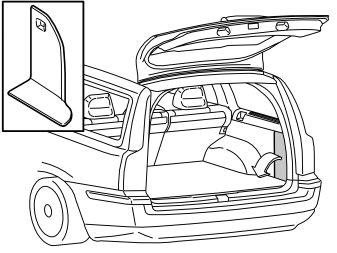
- Remove the right-hand folding panel in the cargo compartment.
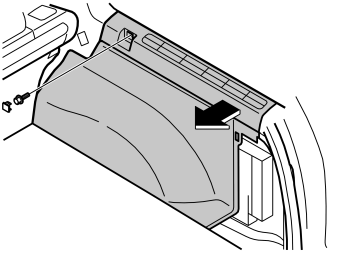
- Remove the right-hand side panel. First remove the cover and the screw at the front edge
- Pull the top of the panel out until the clips release
- Fold the panel inwards. Lift the panel out.
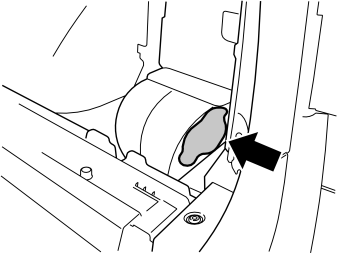
- Clean the shaded surface on the rear face of the right-hand air vent using a damp cloth. Allow to dry.
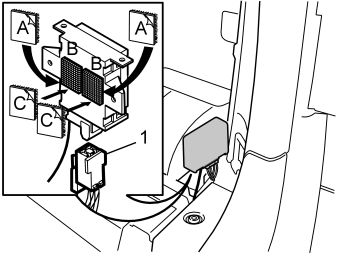
- Connect the six pin connector (1) to the control module
- Clean the reverse of the control module. Use a wet cloth. Allow to dry
- Remove the protective film from two of the Velcro straps of the same type (A)
- Press the Velcro straps into place underneath the control module (B)
- Press the two other Velcro straps on to the newly installed Velcro straps on the control module. Remove the protective film (C)
- Position the control module on the rear end of the right-hand air vent, behind the right-hand rear wheel well. Press the control module firmly into place.
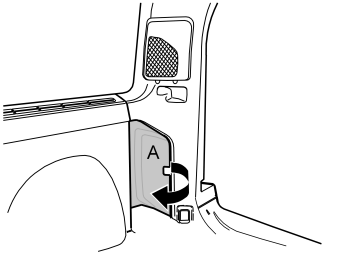
- Remove the small insulation panel in front of the right-hand tail lamp by pulling forwards at points (A).
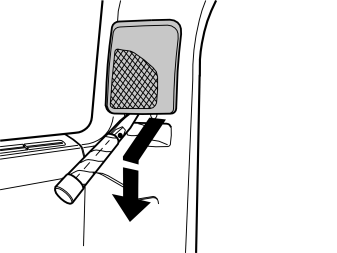
- Remove the loudspeaker grille on the right-hand D-post panel. First pry off the lower edge of the loudspeaker grille using a weatherstrip tool. Pull the grille out slightly and then downwards until the hooks at the top edge release.
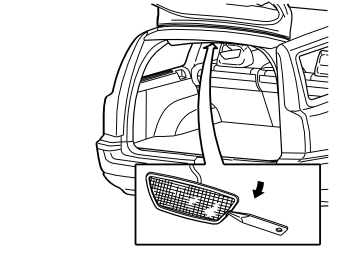
- Carefully pry off the rear roof lighting using a weatherstrip tool
- Disconnect the connectors from the roof lighting. Place to one side.
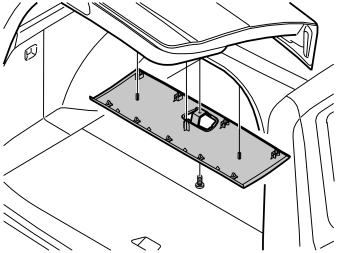
- Remove the rear headlining. First remove the screw in the roof lighting compartment. Pull off the front edge of the headlining to release the four clips. Then pull off the rear edge until the remaining clips release.
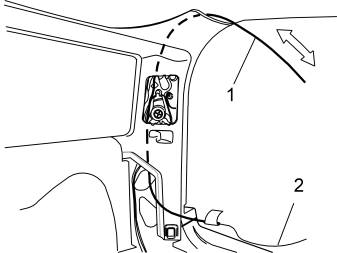
- Insert a piece of wire (1) at the top edge of the right-hand D-post panel. Pull out at the rear edge
- Tape the aerial (2) and the thin black single cable into position at the wire. Route it to the upper edge of the D-post panel.
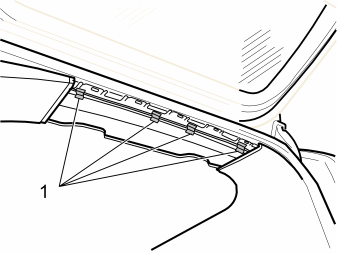
- Route the aerial cable along the rear edge on the inside of the roof. Tape into place using four pieces of tape (1).
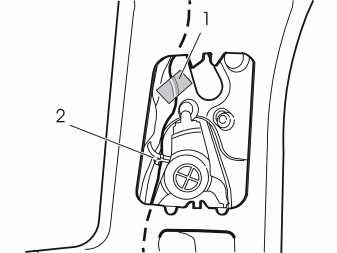
- Pull the cable excess to the lower edge of the D-post panel
- Applies to cars with integrated D-post speakers:Tape the cable at point (1) and secure at the existing clamp (2)
- Applies to cars without integrated D-post speakers:Tape at points (1) and (2).
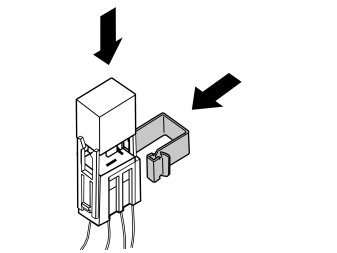
- Take the relay and the large clip from the kit
- Press the relay into the relay holder
- Press the clip into the relay holder.
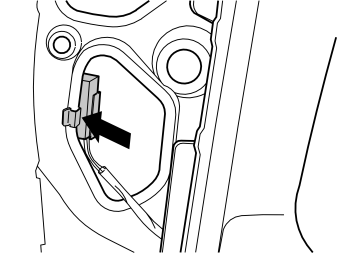
- Press the clip with the relay holder and relay inside the plate in front of the right-hand tail lamp.
- Press the small clip (from the kit) on to the indicator lamp.
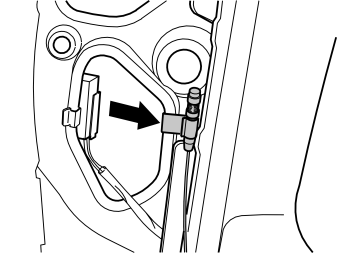
- Press the clip and indicator lamp onto the outside of the plate, opposite the relay holder and relay as illustrated.
Applies to all models
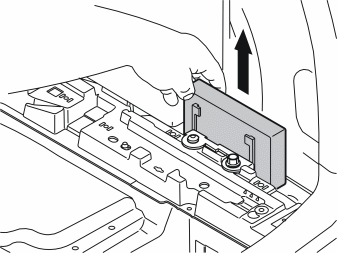
- Lift the accessory electronic module out of the bracket.
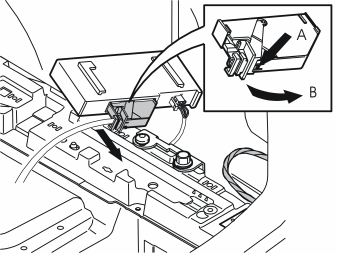
- Disconnect the large connector from the accessory electronic module. First press in catch (A). Pull the black lock handle (B) in the direction of the arrow until a click is heard
- Disconnect the connector from the accessory electronic module (AEM).
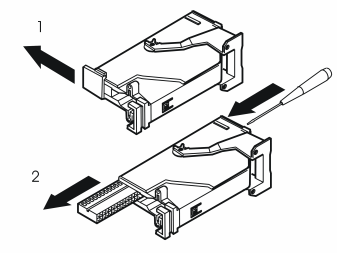
Remove:
- the black catch (1) holding the black terminal pin in place in the connector by pulling in the direction of the arrow
- the black terminal pin (2) by inserting a pointed object into the hole in the other end. Press the switch out.
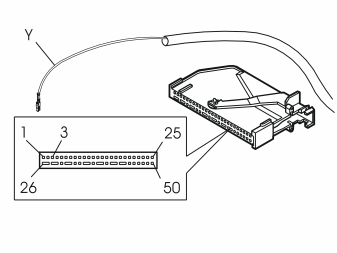
- Connect the small yellow cable from the control module to terminal 3 in the accessory electronic module (AEM) connector.
Примечание: The number markings can be found on the top and bottom of the black terminal pin. However, the markings are extremely small so be careful when installing the cable.
Reinstall:
- the black terminal pin in the connector. Lock into place using the catch
- the connector to the accessory electronic module (AEM). Lock into place using the black locking arm.
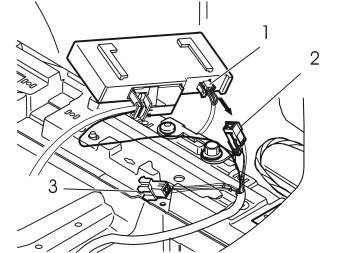
- Remove the connector (1) from the accessory electronic module (AEM)
- Connect the corresponding connector (2) on the T-cable on the larger cable harness to the accessory electronic module (AEM)
- Connect the remaining connector (3) on the T-cable to the connector disconnected from the accessory electronic module (AEM)
- Reinstall the accessory electronic module (AEM) in the bracket.
Illustration A applies to the S60 and the S80
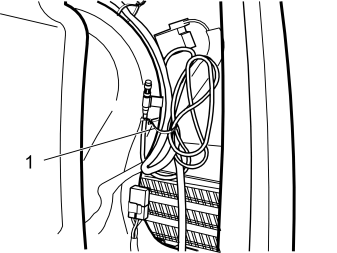
- Take a tie strap (1) from the kit. Bind the cable excess and secure at the rear edge of the wheel arch.
Illustration B applies to the V70
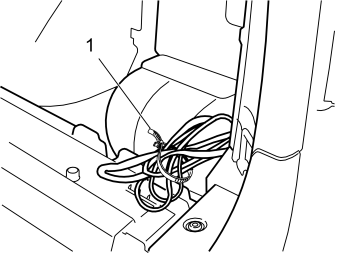
- Collect all cable excess. Clamp the cable excess using a tie strap (1) from the kit. Position all the excess wiring at the rear, down behind the rear end of the air vent.
Applies to the S60 / S80
- Reinstall the right-hand side panel in the cargo compartment
- Turn the ignition key to position II
- Reconnect the battery negative lead
- Reinstall the cargo compartment carpet
- Reinstall the parcel shelf panel
- Applies to cars with child seat mountings: Reinstall the covers for the child seat mountings.
Applies to the S60
- Reinstall both C-post panels
- Reinstall the side bolsters.
Applies to the S60 / S80
- Fold both backrests into position
- Reinstall the seat cushion.
Applies to the V70
- Reinstall both side panels and the small insulation panel on the right-hand side of the cargo compartment
- Reinstall the rear headlining
- Connect and reinstall the roof lighting
- Reinstall the loudspeaker grille in the right-hand D-post panel
- Turn the ignition key to position II
- Reconnect the battery negative lead
- Reinstall both floor hatches
- Reinstall the right-hand side cushion
- Fold back the right-hand rear seat backrest and the seat cushion.
- Program the software. See the service information in VIDA
- Test the function according to the accessory manual
- Hand over the accessory manual.