Применимость
| Модель | Двигатель | Год |
|---|---|---|
| S40 (04-) | — | 2004–2011 |
| V50 | — | 2004–2011 |
Примечание: - Points 1-24 apply to cars with 5-cylinder petrol engines (B5244, B5254T)
- Points 25-51 apply to cars with diesel engines (D4204T).
Applies to cars with 5 cylinder petrol engines
- Open the cover for the glove compartment
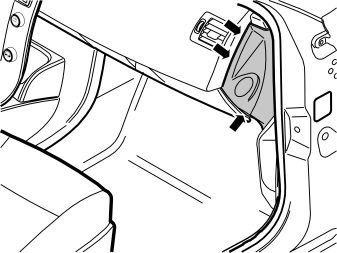
- Remove the panel on the right-hand end of the dashboard. Carefully pry off the panel. Use a weatherstrip tool. Pry all around until the three clips on the inside release.
Примечание: Do not damage the dashboard.
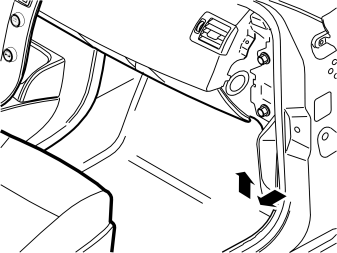
- Remove the sill trim panel from the right-hand front door. Pull the sill trim panel off starting at the front edge until the clips have released. Then continue backwards until the remaining clips on the underneath have released
- Unhook the sill trim panel from the B-post panel.
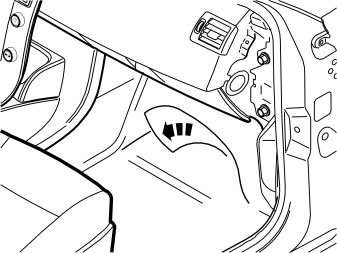
- Fold the floor carpet to one side to access the lead-in in the cowl panel. Install the passenger compartment connector socket
- Unscrew the clips holding the insulation panel against the body. Place it to one side. It will not be reused.
- Remove the right-hand front wheel
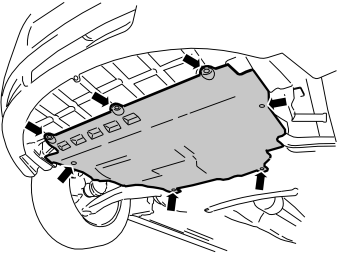
- Remove the 7 x screws holding the engine splash guard in place. Remove the engine splash guard.
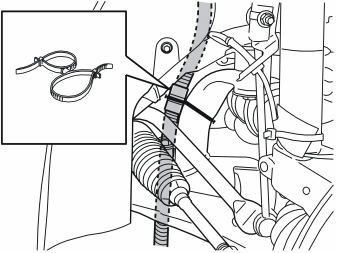
- Cut off the tie strap around the strut and over the locking sleeve on the strut on the mounting for the right-hand control arm
- Remove the locking sleeve over the cable junction. Pull the cables apart.
Installing the junction connector
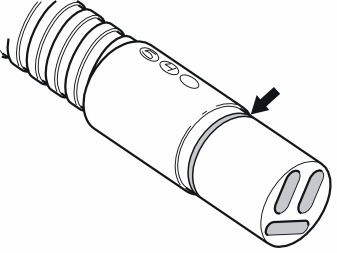
- Grease the O-ring on the cable from the front engine block heater socket, the cable for the passenger compartment connector socket and the junction connector. Use low temperature grease (P/N 1161417-9).
Примечание: Do not get any grease on the contact surfaces of the connector.
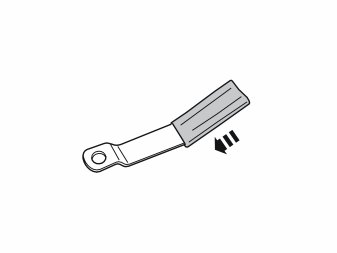
- Take the bracket and the rubber guard from the kit for the passenger compartment connector socket. Press the rubber guard into place on the bracket.
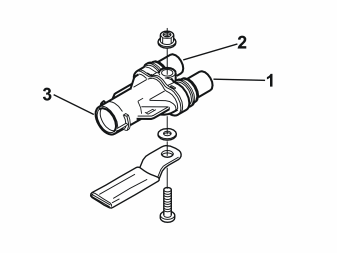
- Tighten the junction connector at the bracket in the position illustrated. Use the screw, thrust washer and nut from the kit. The bracket must be parallel to the length of the junction connector
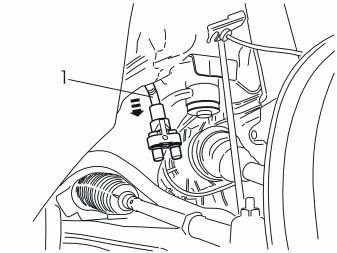
- Disconnect the cable from the front engine block heater socket and engine block heater from its clamps/clips. This will make it easier to install the junction connector for the passenger compartment connector socket
- Connect the cable (1) from the front engine block heater socket to the junction connector. Firmly press the cable junction together.
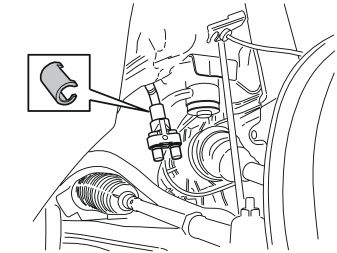
- Press the existing locking sleeve into place over the junction for the cable from the front engine block heater socket.
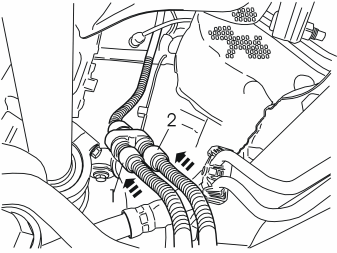
- Connect the cable (1) from the engine block heater
- Connect the cable (2) from the kit to the passenger compartment connector socket
- Firmly press the cables into the junction connector.
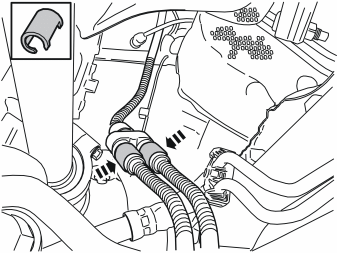
- Press two locking sleeves from the kit over the cable junctions.
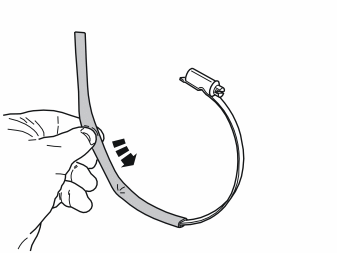
- Thread the rubber guard from the kit onto the hose clamp.
Illustration A
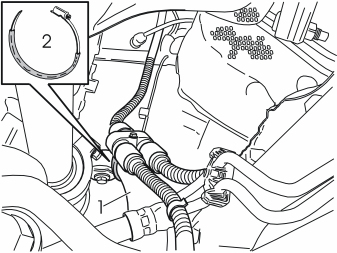
Illustration B
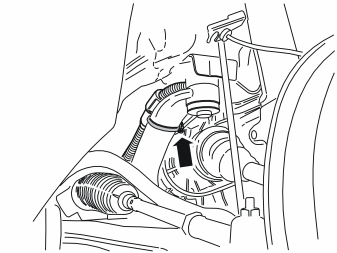
Illustration C
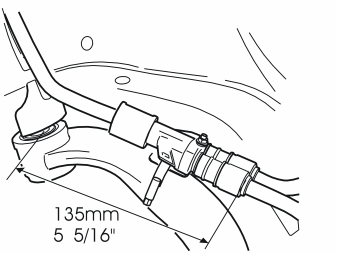
- Secure the junction connector and the connector cables to the strut (1) (Illustration A). Use the hose clamp (2) (Illustrations A and B) and the bracket on the junction connector. Ensure that the junction connector is in the centre of the strut. Adjust the position of the junction connector so that the dimension is 135 mm (5 5/16”) (Illustration C)
- Tighten the hose clamp fully
- Reinstall the cables for the engine block heater and front engine block heater socket in their clamps.
Cable routing
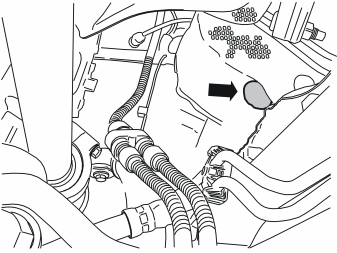
- Make a hole in the insulation panel to access the rubber grommet in the cowl panel.
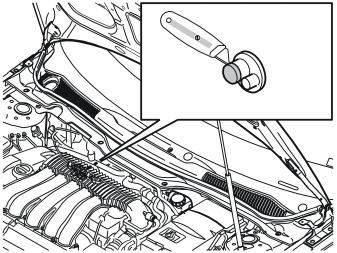
- Using a knife, cut off the top of the large ”rubber nipple” in the rubber grommet in the cowl panel. This is on the right-hand side at the bottom of the engine compartment.
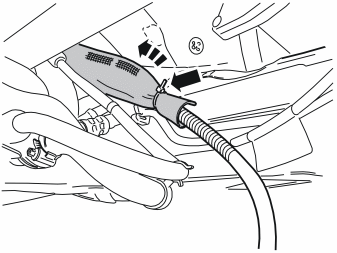
- Take the heat shield and tie strap from the kit. Thread the heat shield on the cable for the passenger compartment connector socket. If the heat shield is too long, cut it to the correct length. (It must cover the cable between the junction connector/timer relay and the lead-in in the cowl panel). Thread the heat shield as far towards the junction connector as possible
- Tighten the tie strap.
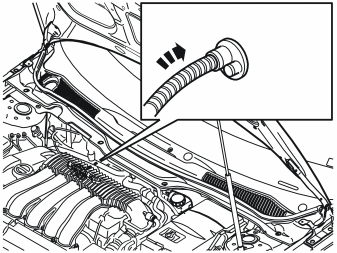
- Grease the rubber grommet. Use low temperature grease (P/N 1161417-9). This will make it easier for the connector to slide through
- Insert the cable for the passenger compartment connector socket through the rubber grommet and into the passenger compartment. Slide all the excess cable into the passenger compartment
- Reinstall the engine splash guard
- Reinstall the wheel. Tighten the wheel nuts. Tighten to 90 Nm (66 lbf.ft).
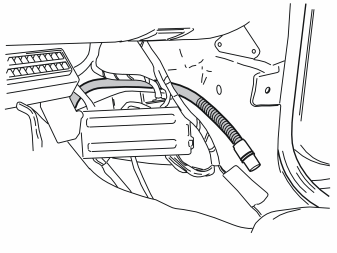
- Pull out the cable from the rubber grommet in the cowl panel. Route it on the reverse of the wiring to the fuse box.
Installing the passenger compartment connector socket
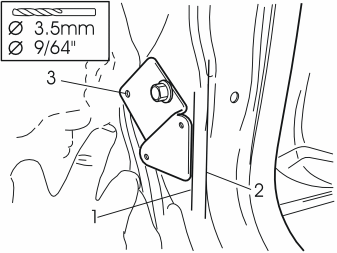
- Move the insulation panel to one side to drill the holes for the bracket for the passenger compartment connector socket
- Clean any sealant from where the corners of the bracket will be
- Secure the bracket from the kit on the lug for the clip for the insulation. Use the plastic nut from the kit
- Angle the bracket so that the edge (1) of the bracket is parallel with the edge (2) at the front edge of the door opening
- Drill out the hole (3) in the body through the bracket. Use a 3.5 mm diameter (9/64”) drill bit
- Smooth off and rust-proof the edges of the hole
- Secure the bracket. Use the plastic nut and screw from the kit.
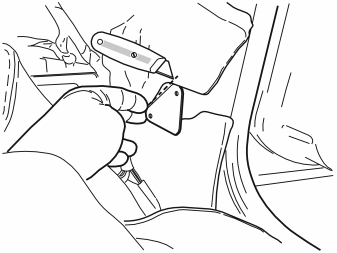
- Fold the insulation panel back over the bracket. Cut a slit in the insulation panel so that the bracket is visible. Use a utility knife.
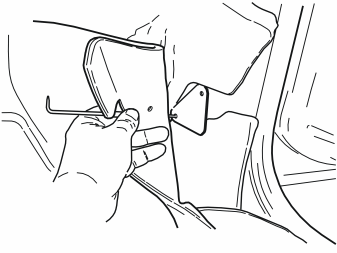
- Fold the floor carpet back over the bracket. Make holes in the floor carpet for the screws that will secure the passenger compartment connector socket.
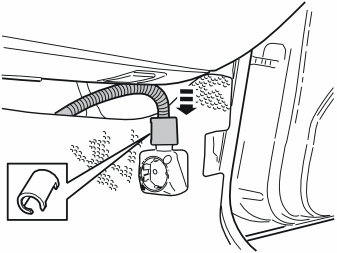
- Connect the cable to the passenger compartment connector socket. Press the cable firmly into place
- Press a locking sleeve, from the kit, over the cable junction.
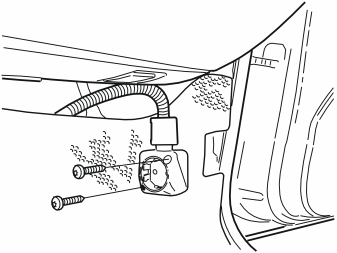
- Screw the passenger compartment connector socket onto the bracket. Use the screws from the kit
- Reinstall the sill trim panel in the right-hand front door
- Reinstall the right-hand end panel on the dashboard.
Applies to diesel engine cars
- Open the cover for the glove compartment
- Remove the panel on the right-hand end of the dashboard. Carefully pry off the panel. Use a weatherstrip tool. Pry all around until the three clips on the inside release.
Примечание: Do not damage the dashboard.
- Remove the sill trim panel from the right-hand front door. Pull the sill trim panel off starting at the front edge until the clips have released. Then continue backwards until the remaining clips on the underneath have released
- Unhook the sill trim panel from the B-post panel.
- Fold the floor carpet to one side to access the lead-in in the cowl panel. Install the passenger compartment connector socket
- Unscrew the clips holding the insulation panel against the body. Place it to one side. It will not be reused.
- Remove the left front wheel
- Remove the 7 x screws holding the engine splash guard in place. Remove the engine splash guard.
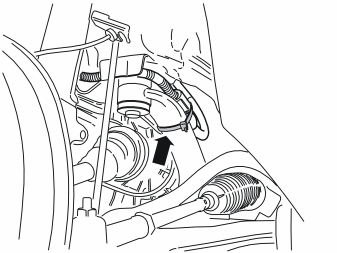
- Cut off the tie strap around the strut and over the locking sleeve on the strut on the mounting for the left-hand control arm
- Remove the locking sleeve over the cable junction. Pull the cables apart.
Installing the junction connector
- Grease the O-ring on the cable from the front engine block heater socket, the cable for the passenger compartment connector socket and the junction connector. Use low temperature grease (P/N 1161417-9).
Примечание: Do not get any grease on the contact surfaces of the connector.
- Take the bracket and the rubber guard from the kit for the passenger compartment connector socket. Press the rubber guard into place on the bracket.
- Tighten the junction connector at the bracket in the position illustrated. Use the screw, thrust washer and nut from the kit. The bracket must be parallel to the length of the junction connector
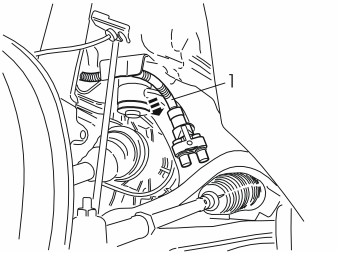
- Disconnect the cable from the front engine block heater socket and engine block heater from its clamps/clips. This will make it easier to install the junction connector for the passenger compartment connector socket
- Connect the cable (1) from the front engine block heater socket to the junction connector. Firmly press the cable splice together.
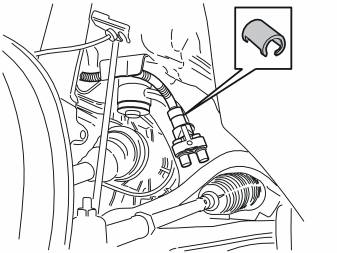
- Press the existing locking sleeve into place over the junction for the cable from the front engine block heater socket.
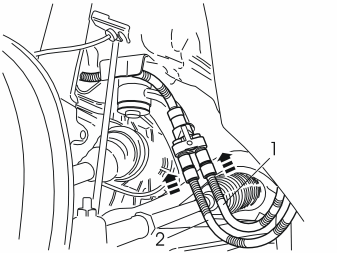
- Connect the cable (1) from the engine block heater
- Connect the cable (2) from the kit to the passenger compartment connector socket
- Firmly press the cables into the junction connector.
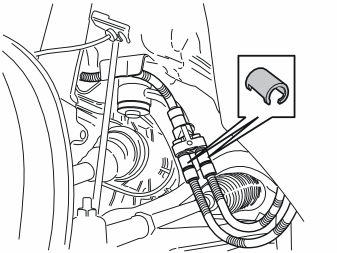
- Press two locking sleeves from the kit over the cable junctions.
- Thread the rubber guard from the kit onto the hose clamp.
Illustration A
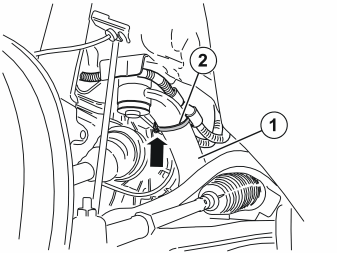
- Secure the junction connector with the connected cables to the strut (1). Use the hose clamp (2) and the holder on the junction connector. Ensure that the junction connector is in the centre of the strut.
Illustration B
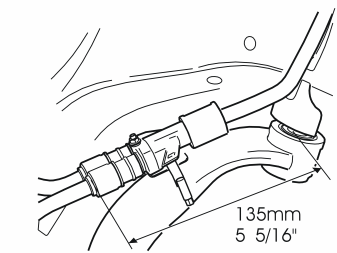
- Adjust the position of the junction connector so that the dimension is 135 mm (5 5/16”)
- Tighten the hose clamp fully
- Reinstall the cables for the engine block heater and front engine block heater socket in their clamps.
Cable routing
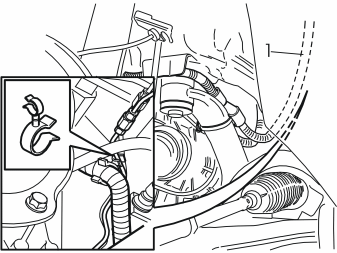
- Slide the cable (1) up to the top of the engine compartment
- Clamp the cable at the lower of the two horizontal brake pipes at the upper edge of the cowl panel. Use a double clamp.
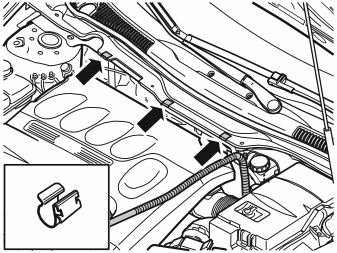
- Install the three clips from the kit at the front of the panel over the windscreen wiper motor
- Slide the cable up to the top of the engine compartment to the position illustrated.
Illustration A
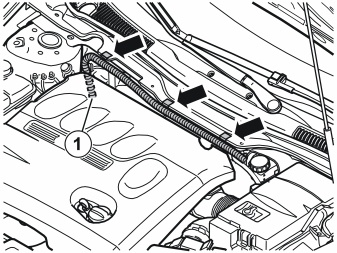
- Press the cable for the passenger compartment connector socket into the installed clips. Slide down the cable at point (1). Route the cable through the engine compartment (behind the A/C pipes) down to the strut at the mounting for the right-hand control arm.
Illustration B
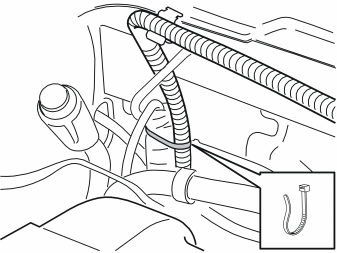
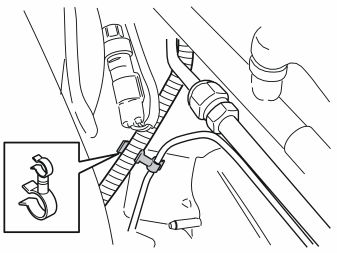
- Clamp the cable into place from the top of the engine room and downwards. Use a tie strap (illustration B) and double clamp (illustration C) at the existing cables and pipes.
Примечание: The cable must not be secured to the fuel lines, air conditioning (A/C) pipes or brake pipes.
Illustration C
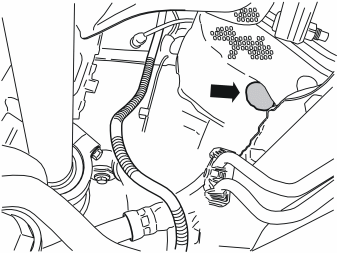
- Make a hole in the insulation panel to access the rubber grommet in the cowl panel.
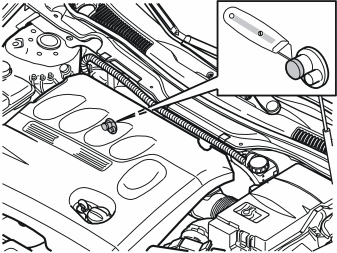
- Using a knife, cut off the top of the large ”rubber nipple” in the rubber grommet in the cowl panel. This is on the right-hand side at the bottom of the engine compartment.
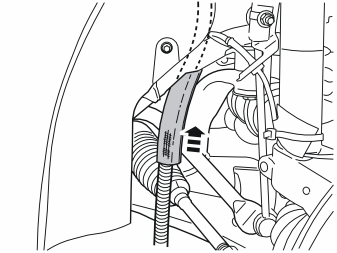
- Take the heat shield and tie strap from the kit. Thread the heat shield on the cable for the passenger compartment connector socket. If the heat shield is too long, cut it to the correct length.
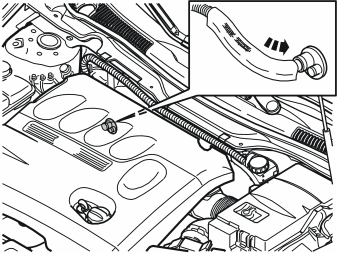
- Grease the rubber grommet. Use low temperature grease (P/N 1161417-9). This will make it easier for the connector to slide through
- Insert the cable for the passenger compartment connector socket through the rubber grommet and into the passenger compartment. Slide all the excess cable into the passenger compartment
- Slide the heat shield towards the rubber grommet in the cowl panel. Clamp the heat shield into place using the tie strap from the kit
- Reinstall the engine splash guard
- Reinstall the wheel. Tighten the wheel nuts. Tighten to 90 Nm (66 lbf.ft).
- Pull out the cable from the rubber grommet in the cowl panel. Route it on the reverse of the wiring to the fuse box.
Installing the passenger compartment connector socket
- Move the insulation panel to one side to drill the holes for the bracket for the passenger compartment connector socket
- Clean any sealant from where the corners of the bracket will be
- Secure the bracket from the kit on the lug for the clip for the insulation. Use the plastic nut from the kit
- Angle the bracket so that the edge (1) of the bracket is parallel with the edge (2) at the front edge of the door opening
- Drill out the hole (3) in the body through the bracket. Use a 3.5 mm diameter (9/64”) drill bit
- Smooth off and rust-proof the edges of the hole
- Secure the bracket. Use the plastic nut and screw from the kit.
- Fold the insulation panel back over the bracket. Cut a slit in the insulation panel so that the bracket is visible. Use a utility knife.
- Fold the floor carpet back over the bracket. Make holes in the floor carpet for the screws that will secure the passenger compartment connector socket.
- Connect the cable to the passenger compartment connector socket. Press the cable firmly into place
- Press a locking sleeve, from the kit, over the cable junction.
- Screw the passenger compartment connector socket onto the bracket. Use the screws from the kit
- Reinstall the sill trim panel in the right-hand front door
- Reinstall the right-hand end panel on the dashboard.
Обсуждение и оценка
0Пока нет комментариев. Будьте первым.