Применимость
| Модель | Двигатель | Год |
|---|---|---|
| XC70 (08-) | — | 2008–2015A |
Примечание: These installation instructions apply to left-hand drive vehicles. When installing in a right-hand drive vehicle, the procedure is carried out on the opposite side and/or mirrored. Where the operations differ, right-hand versions are also displayed with text and images.
Preparations
Passenger compartment
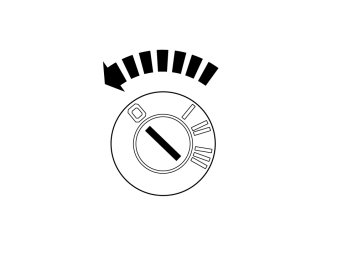
- Turn the ignition switch to position 0.
Примечание: Wait at least one minute before unplugging the connectors or removing other electrical equipment.
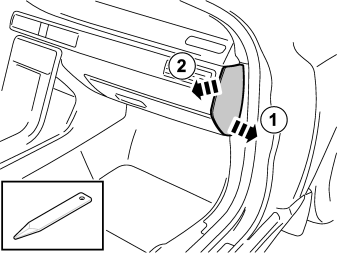
- Remove the end panel.
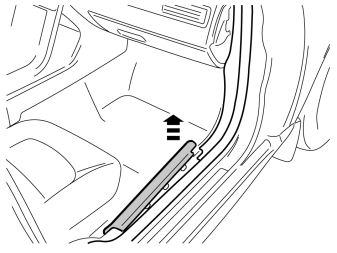
- Remove the middle sill trim panel by first prizing it off at the front edge and pulling it up until the three clips release. Following which, pull it away forwards.
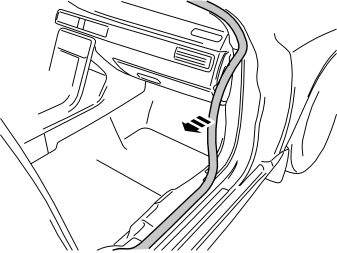
- Pull off the sill molding at the front sill trim panel.
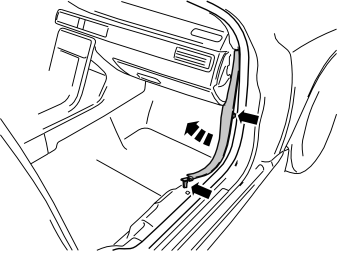
- Remove the front sill trim panel by first pulling it up at the rear edge until the clip there releases. Pull it backwards further until the clip in the middle releases. Following which, pull it diagonally downwards until it releases from the A-pillar panel.
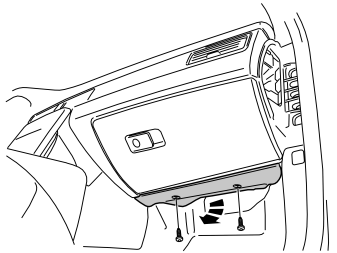
- Remove the screws and sound proofing bracket.
- Unplug the connector for the lighting.
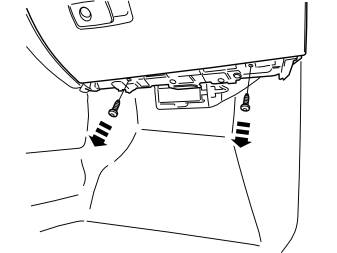
- Remove the two screws.
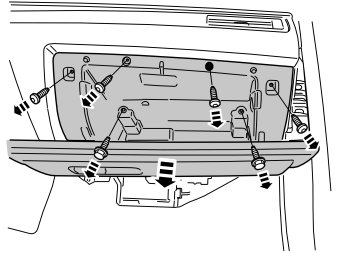
- Remove the seven screws.
- Pull the glovebox out slightly and unplug the gray connector on the rear side.
- Remove the glovebox.
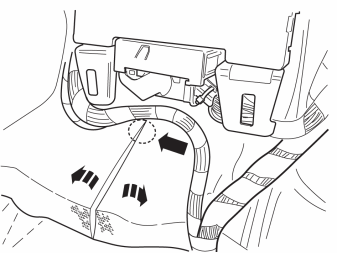
- Move the carpeting aside. Make a cut in the thick insulating mat starting level with the blue connector of the central electronic module (CEM) and then continue straight down.
- Move aside the insulating mat to access the grommet.
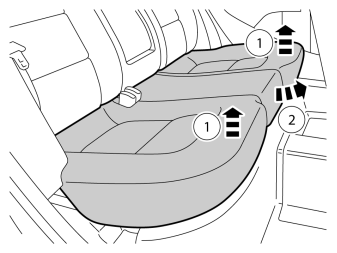
- Remove the rear seat cushion by releasing the catches at the front edge (1) and then pulling forwards (2).
- Disconnect any connectors.
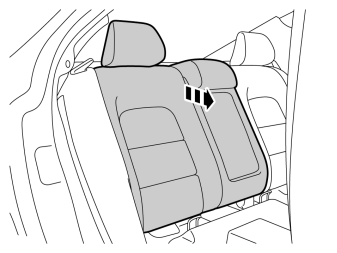
- Fold the backrest forward.
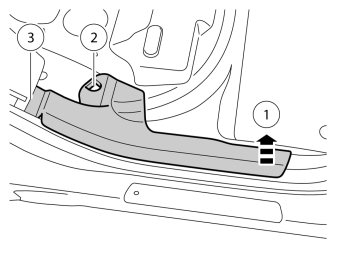
- Remove the rear sill trim panel by pulling it up at the front edge (1) and then unhooking it from the clip (2).
- Push the side cushion at the lower edge to one side and pull the panel so that the hook (3) releases.
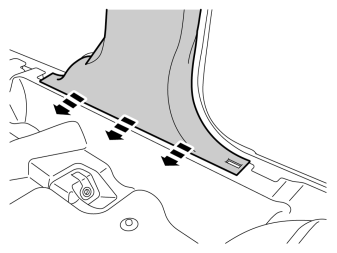
- Fold the carpeting to one side from the lower edge on the B pillar panel.
Cargo compartment
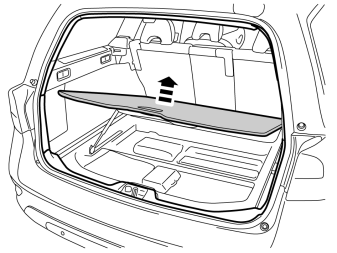
- Fold up the floor hatch.
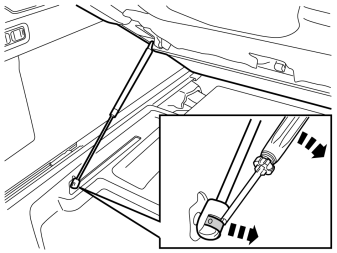
- Detach the clip on the gas damper using a small screwdriver. Unhook the damper.
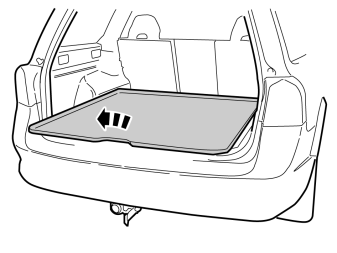
- Lift out the floor hatch.
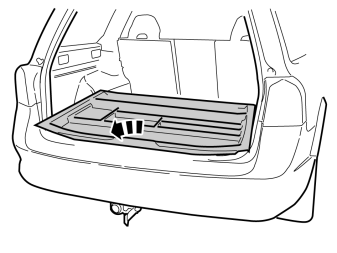
- Lift out the storage box.
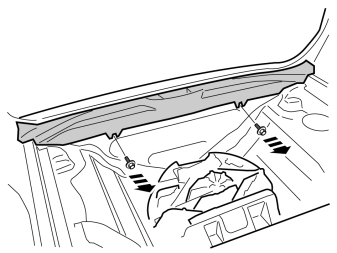
Applies to right-hand drive cars
- Remove the two screws on the tailgate sill trim panel.
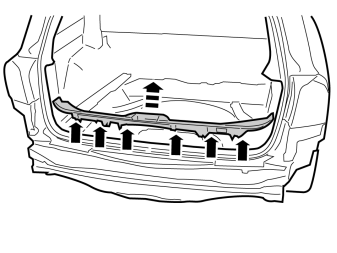
Applies to right-hand drive cars
- Carefully pull off the panel, it is secured by six clips.
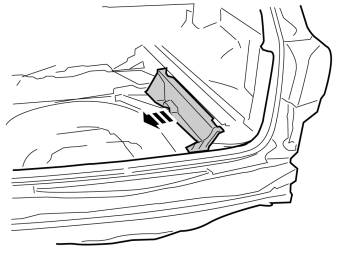
- Remove the panel.
- Applies to right-hand drive cars: Remove the panels on both sides.
Exterior
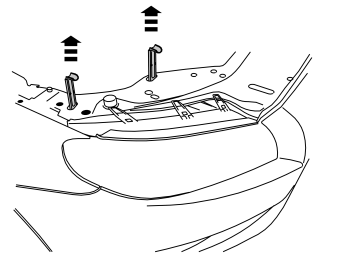
- Open the hood. Remove the lock facings for the headlamp on the passenger side.
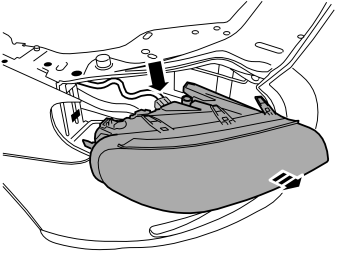
- Disconnect the connector and remove the headlamp.
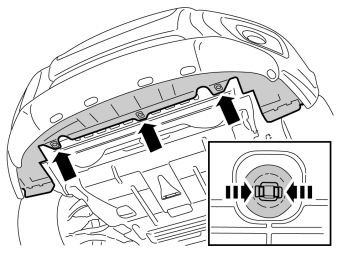
- Raise the car. Remove the clip by squeezing together the catches and then pulling them out.
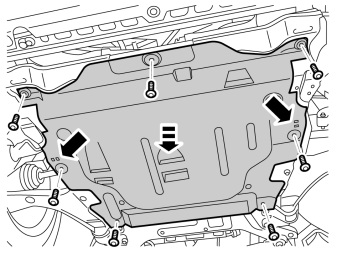
- Remove the seven screws.
- Remove the engine splash guard, at the same time undo the two hooks.
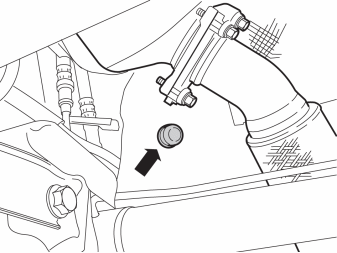
- Remove the existing rubber grommets on the cowl panel.
Примечание: On certain models the rubber grommet may be covered by the heat deflector shield.
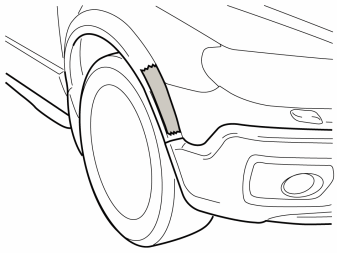
Steps 26-29 are carried out on both sides.
- Apply tape to the front edge of the wing extender to protect it.
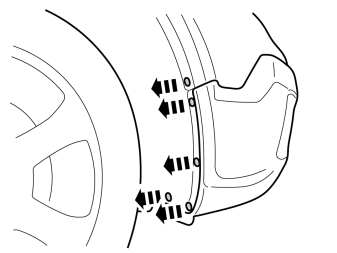
- Turn the wheel inwards. Remove the five screws and the wing liner.
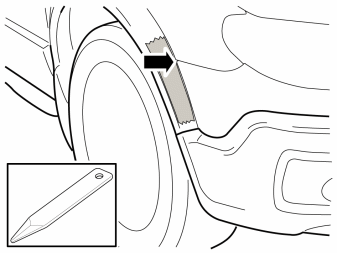
- Using a weatherstrip, pry between the wing extender and the corner of the bumper cover.
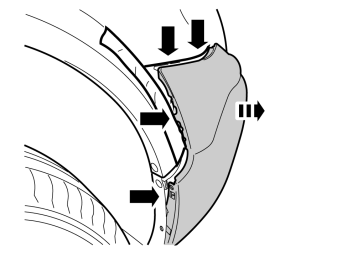
- Pull the end of the bumper cover straight off until the hooks release.
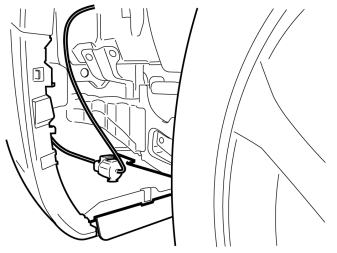
Steps 30-33 apply to cars with headlamp washing
- Push the wing liner to one side on the left to access the connector on the deflector.
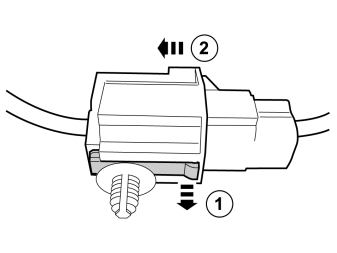
- Release the catch (1) and pull the connector (2) backwards.
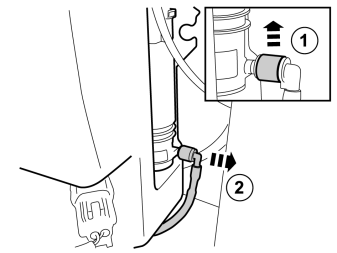
- Place a container under the car.
- Release the catch (1) on the connection for the washer pump.
- Pull the connection (2) straight out.
- Allow the washer fluid to run into the container. Alternatively, plug the connection on the pump using a suitable rubber plug.
Подсказка: Use a drainage hose.
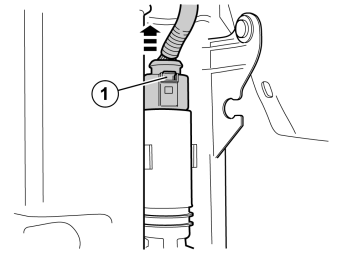
- Disconnect the connector on the pump by pressing the catch (1) down and pulling upwards.
Bumper cover
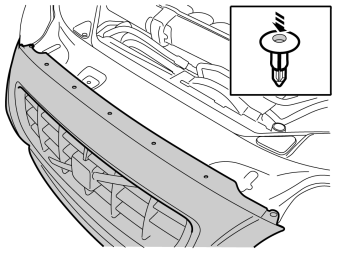
- Push in the middle of the seven clips. Remove the clips.
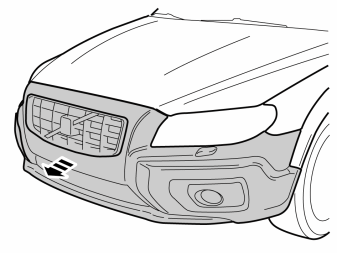
- Remove the bumper cover by pulling it straight forward until all hooks release. At the same time disconnect the connectors for the fog lamps.
- Place the cover on a suitable surface with the outer side facing down.This procedure is easier carried out by two people.
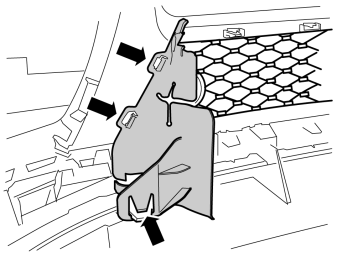
- Release the three catches on the air baffle and remove them. Also carry out on the other side.
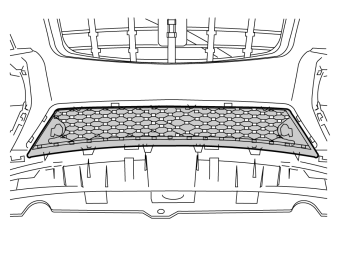
- Remove the central grille by first releasing the upper catches and then the lower ones.
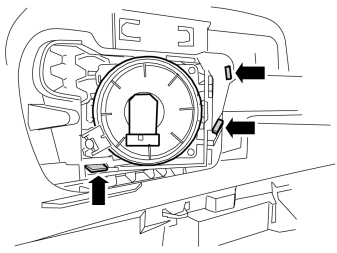
- Release the three catches and press out the fog lamp cover. Also carry out on the other side.
Installation
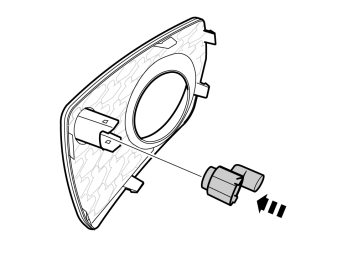
- Take two sensors and fog lamp covers from the kit. Install the sensors in the covers.
- Install the fog lamp covers in the cover.
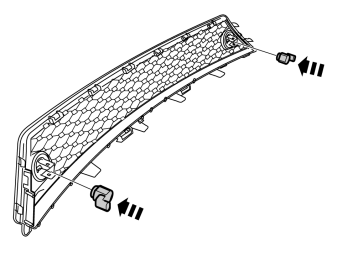
- Take two sensors and grilles from the kit. Install the sensors in the grille.
- Install the grille in the cover starting at the lower edge.
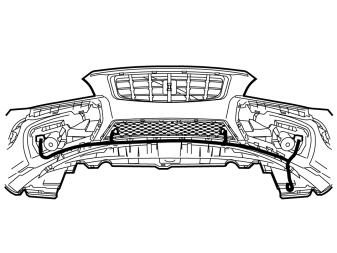
Applies to left-hand drive cars
- Take the cable harness from the kit and connect it to the sensors. The large connector must be on the right-hand side of the cover.
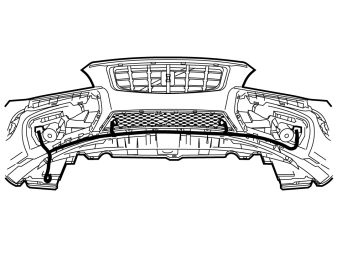
Applies to right-hand drive cars
- Take the cable harness from the kit and connect it to the sensors. The large connector must be on the left-hand side of the cover.
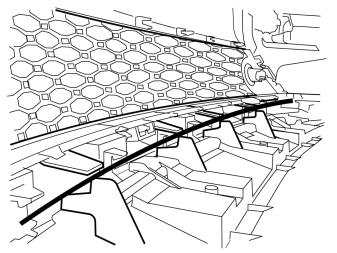
- Place the cable harness under the flanges on the middle grille so that it locks securely.
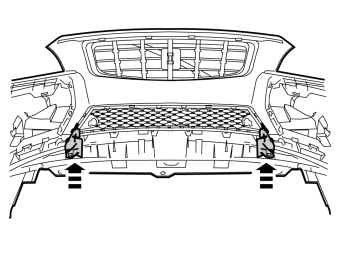
- Reinstall the two air baffles.
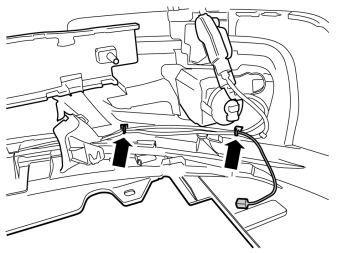
- Take four cable ties with clips from the kit. Secure the clips on the flanges and tighten the cable ties around the cable harness. Carry out on the opposite side.
Applies to cars with headlamp washing
- Secure the cable harness using cable ties at the existing clips.
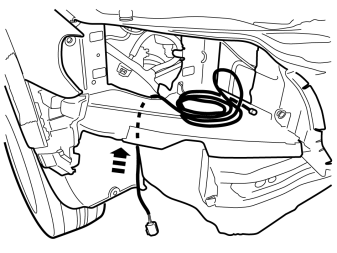
- Take the short cable harness from the kit.
- Remove the taped connector from the cable harness.
- Pull the cable harness from underneath and up to at the rear edge of the headlamp. Allow the connector to hand down as illustrated.
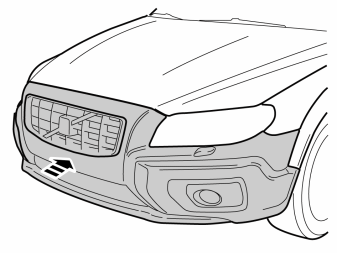
- Reinstall the bumper cover so that the hooks under the headlamps engage. At the same time connect the connectors for fog lamps.
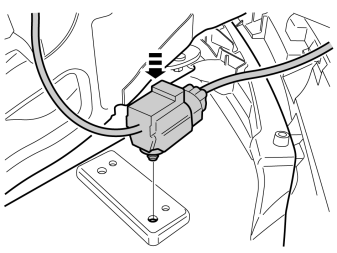
- Connect the cable harness from the sensors.
- Press the connector into intended holes on the deflector.
- Install the bumper cover by repeating points 26 - 34 in reverse order.
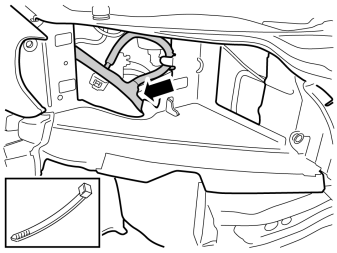
- Align the length of the cable harness from the deflector. Secure it using a cable tie on the existing cable harness.
Steps 50–54 apply to left-hand drive cars
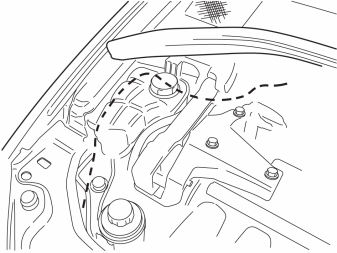
- Route the cable backwards at the existing cable harness.
Примечание: Make sure that the cable is positioned so that it is not damaged by heat or wear.
- Reinstall the headlamp.
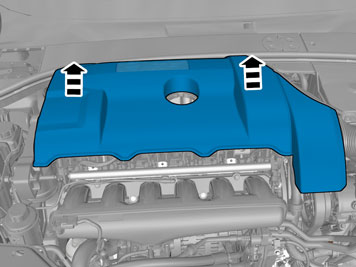
Applies to 6 cylinder engines
- Remove the engine cover by pulling it straight up.
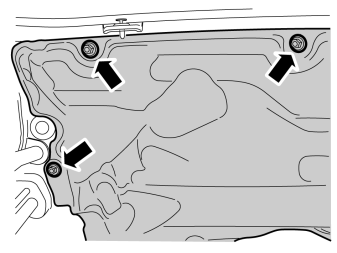
- Remove the three plastic nuts on the insulation for the cowl panel.
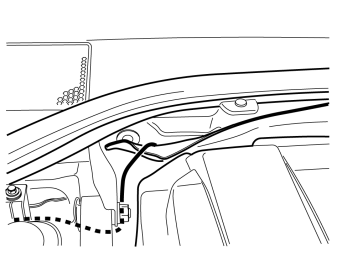
- Pull out the insulation at the upper edge. Insert the cable harness between the insulation and cowl panel and down to where the rubber grommet was.
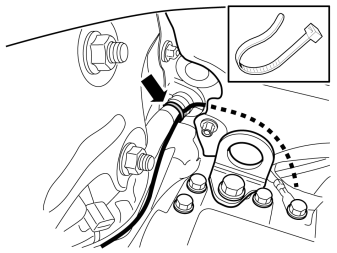
- Position the cable harness so that it goes underneath the insulation. Secure using a cable tie in the existing cable harness.
- Fold back the insulation and reinstall the nuts.
Steps 55–57 apply to right-hand drive cars
Applies to 6-cyl engines and diesel engines
- Remove the engine cover by pulling it straight up.
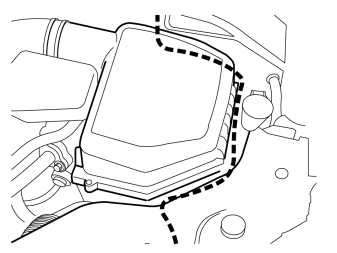
- Route the cable harness from the headlamp and around the air filter housing.
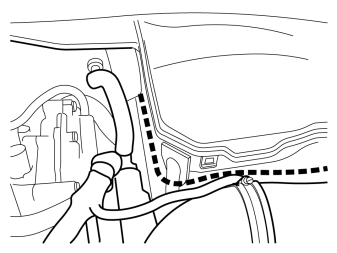
- Route the cable harness in-between the battery box and insulation for the cowl panel, and down to the rubber grommet.
- Secure using a cable ties on the outgoing cable harness from the battery box.
Примечание: Make sure that the cable is positioned so that it is not damaged by heat or wear.
- Reinstall the headlamp.
Applies to all models
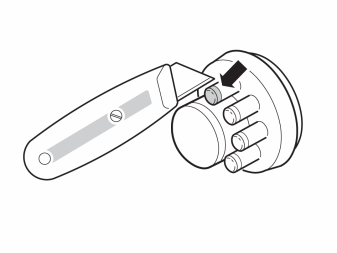
- Cut off a small rubber nipple on the new rubber grommet. Lubricate the cable using soap solution and insert.
- Pull the cable into the passenger compartment. Adjust the length.
- Install the rubber grommet and move the heat shield on the cable towards the rubber grommet.
- Reinstall the engine splash guard and cover panel for the bumper.
- Lower the car.
- Reinstall the engine cover.
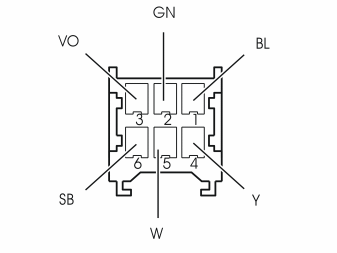
Applies to left-hand drive cars
- Take the connector that was taped and connect it to the cable harness that was routed into the passenger compartment.
- Install the cable ends' pins in the connector as illustrated:
- Blue (BL)
- Green (GN)
- Violet (VO)
- Yellow (Y)
- White (W)
- Black (SB)
- Slide the connector's catch back.
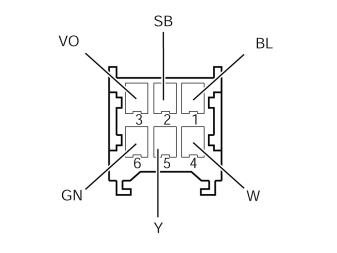
Applies to right-hand drive cars
- Take the connector that was taped and connect it to the cable harness that was routed into the passenger compartment.
- Install the cable ends' pins in the connector as illustrated:
- Blue (BL)
- Black (SB)
- Violet (VO)
- White (W)
- Yellow (Y)
- Green (GN)
- Slide the connector's catch back.
Applies to all models
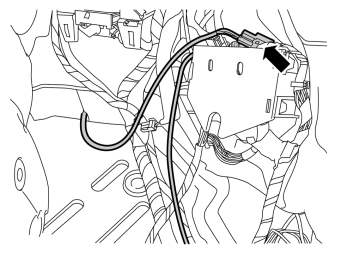
- Take the long cable from the kit and connect it to the connector which has just been prepared.
- Place the connector in the holder.
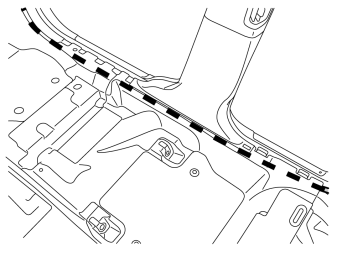
- Route the cable harness between the sill and carpeting.
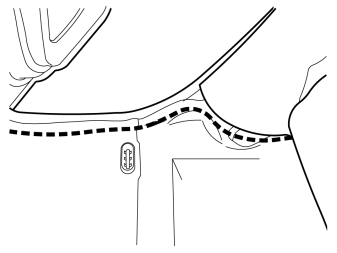
- Route the cable harness under the insulation, on the outside of the mounting for the seat belt, and under the backrest's lower mounting.
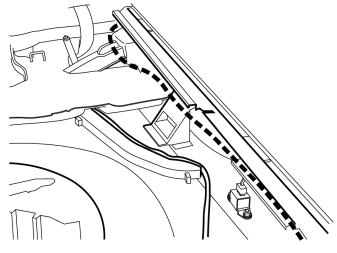
- Route the cable harness under the reinforcement plate, backwards and under the insulation mats.
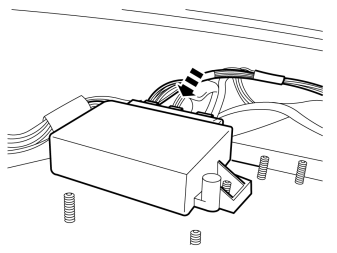
- Connect the connector to the middle connection in the parking assistance module (PAM).
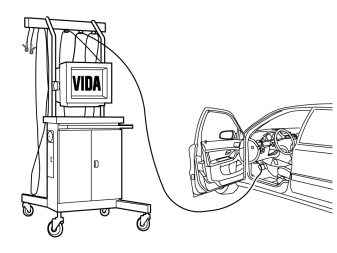
- Download the software for the accessory's function following the service information in VIDA.
Reinstall:
- the glove box
- the sound barrier
- the sill trim panels
- the end face panel
- the rear seat cushion.
in the cargo compartment
- Applies to right-hand drive cars: the side panel and the sill trim panel
- the side panel
- the storage box
- the floor hatch with shock absorber.
Обсуждение и оценка
0Пока нет комментариев. Будьте первым.