Применимость
| Модель | Двигатель | Год |
|---|---|---|
| S80 (07-) | — | 2007, 2008 |
| V70 (08-) | — | 2008 |
| XC70 (08-) | — | 2008 |
Preparations
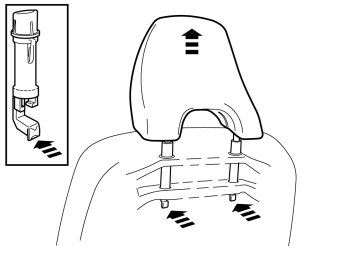
- Slide both the front seats all the way back and upwards all the way at the front and rear edge.
- Press the headrest downwards.
- Find the headrest's two locks on the back of the seat. Press in the catches and pull the headrest upwards at the same time.The seats may require to be lowered slightly at the rear edge in order to be able to pull out the head restraint from the backrest completely.Remove the head restraint from both front seats and leave the seats in the same position.
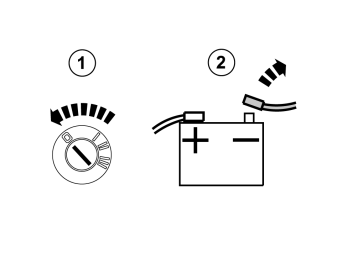
- Turn the ignition key to position 0.
- Disconnect the battery negative lead.
Примечание: Wait at least three minutes before unplugging the connectors or removing other electrical equipment.
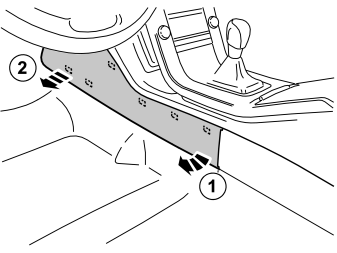
- Remove the tunnel console's left and right-hand side panels by carefully pulling them away starting at the rear edge. These are secured with six clips on the inside.
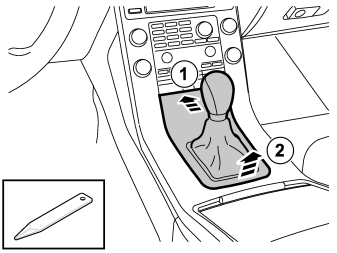
Applies to cars with manual gearbox
- Move the gear selector to neutral.
- Press the front edge of the panel to increase the gap at the rear edge. Pry at the rear edge using a weatherstrip tool.
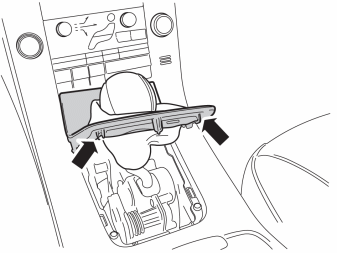
Applies to cars with manual gearbox
- Press in the catches on the boot. At the same press the inner surround of the boot. Remove the panel.
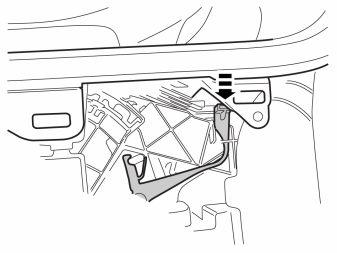
Applies to cars with automatic transmission
- Depress the catches and move the gear lever to D.
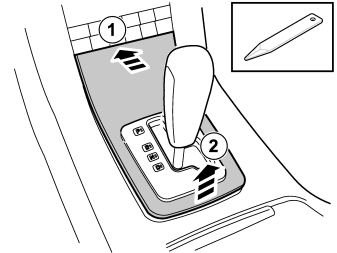
Applies to cars with automatic transmission
- Depress the catches and move the gear selector to D.
- Press the front edge of the panel to increase the gap at the rear edge. Pry at the rear edge using a weatherstrip tool.Remove the panel.
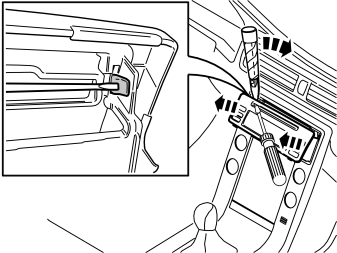
- Remove the panel around the display and media player. Use a small screwdriver and press in the catch in one of the panel's upper corners. Carefully bend loose the radio panel on the same side with a plastic pry tool.
- Carry out the same procedure on the other side. Then fold the radio panel backward in the vehicle.
- Pull up the radio panel until it detaches.
Подсказка: If there is difficulty removing the panel, press the panel back into place on both sides and start the removal procedure again. Start from the opposite side to before.
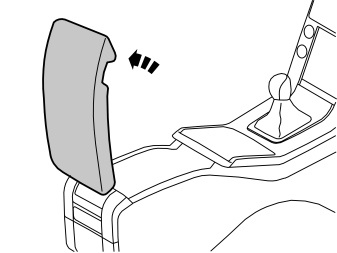
- Fold up the cover for the storage compartment.
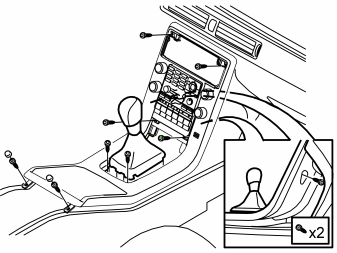
Remove:
- cover and screws in the trailing edge on the center console's upper part of the panel
- screws on the back of the panel
- remaining screws on the top, a total of ten.
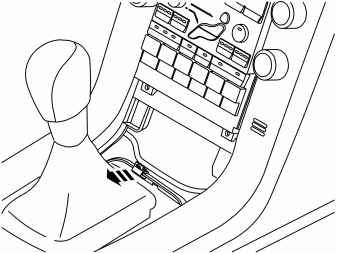
- Remove the edge clip with cable from the lower section of the center console.
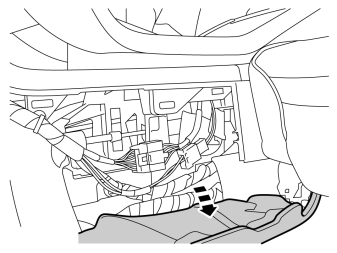
- Fold aside the floor mat on the left side of the center console.
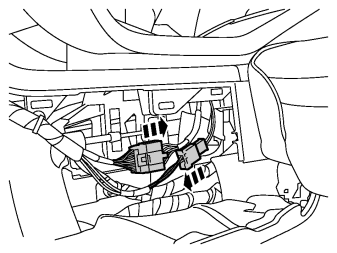
- Disconnect the two connectors on the left side of the lever carrier.
- Disconnect the connectors from the bracket at the lever carrier.
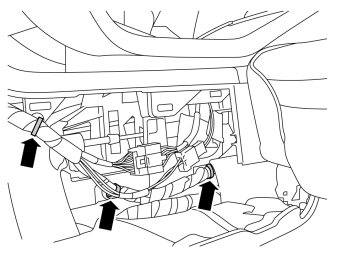
- Remove the three clips holding the cable harness to the SRS control unit.
- Cut off the three cable ties.
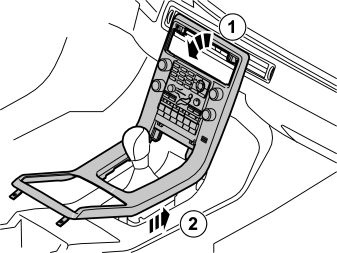
- Remove the upper section of the panel by moving it backward at the front edge and then lifting it out from the front edge of the tunnel console.
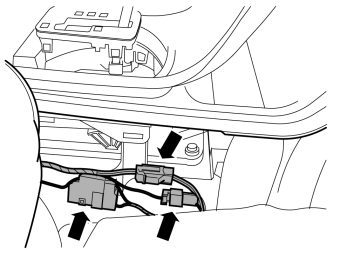
- Fold aside the floor mat on the right side of the tunnel console.
- Detach and unhook the three connectors on the right-hand side of the tunnel console.
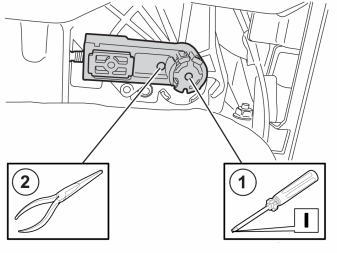
Applies to cars with manual gearbox
- Move the gear selector to "4".
- Disconnect the mechanical cable from the lever carrier's lever on the left-hand side. Use pliers to grip in front of the ball joint of the mechanical cable. Press in the ball joint lock as far as possible, at the same time pull the mechanical cable out from the lever carrier.
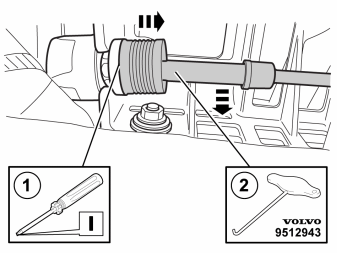
Applies to cars with manual gearbox
- Disconnect the front mounting of the mechanical cable in the lever carrier by moving the white sleeve backwards and at the same time pulling out the cable from the lever carrier using a hook.
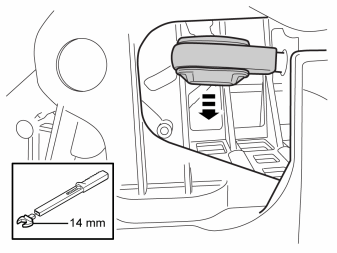
Applies to cars with manual gearbox
- Unhook the cable from the lever on the right-hand side. Use a torque wrench with a 14 mm socket wrench.
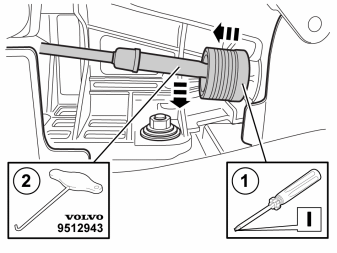
Applies to cars with manual gearbox
- Disconnect the front mounting of the mechanical cable in the lever carrier by moving the black sleeve backwards and at the same time pulling out the cable from the lever carrier using a hook.
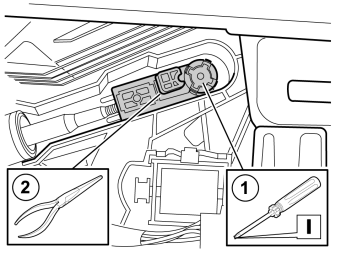
Applies to cars with automatic transmission
- Move the gear selector to "P".
- Disconnect the mechanical cable from the lever carrier's lever on the left-hand side. Use pliers to grip in front of the ball joint of the mechanical cable. Press in the ball joint lock as far as possible, at the same time pull the mechanical cable out from the lever carrier.
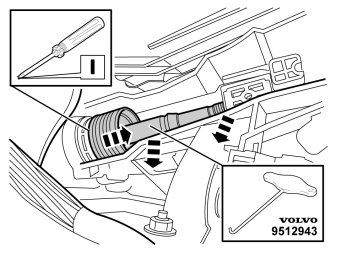
Applies to cars with automatic transmission
- Disconnect the front mounting of the mechanical cable in the lever carrier by moving the white sleeve backwards and at the same time pulling out the cable from the lever carrier using a hook.
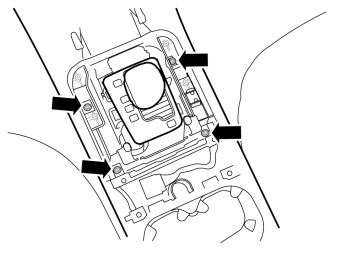
- Remove the four screws.
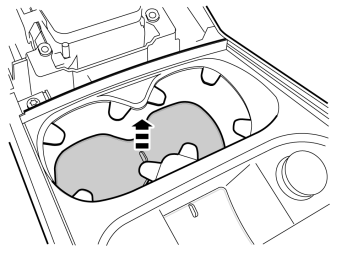
- Remove the mat in the cup holder.
- Remove the M8 screw.
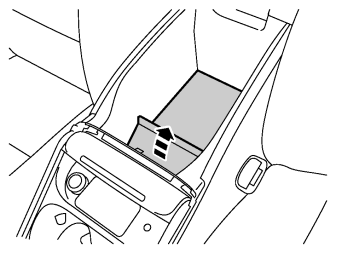
- Remove the rubber mat in the bottom of the storage compartment by pulling it up at the front edge.
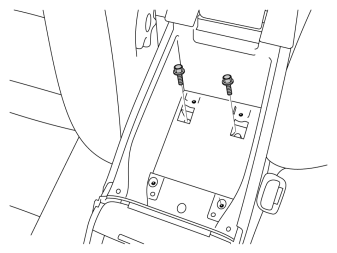
- Remove the two recessed M8 screws at the bottom of the storage compartment.
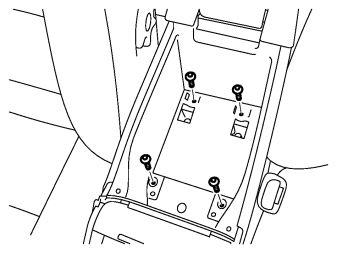
- Remove the four recessed screws at the bottom of the storage compartment.
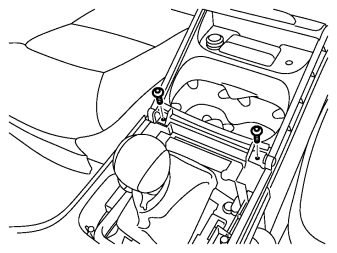
- Remove the two screws.
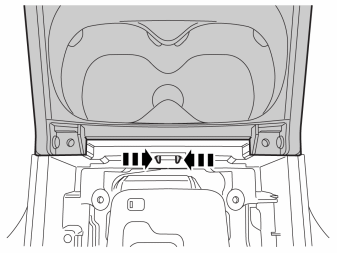
- Press together the catches and lift the rear tunnel console rearwards slightly.
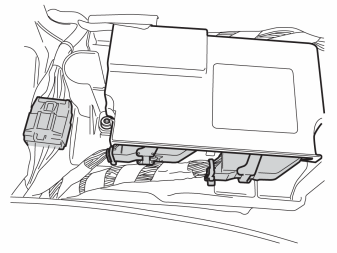
- Disconnect the gray connector and the two connectors on the SRS control module.
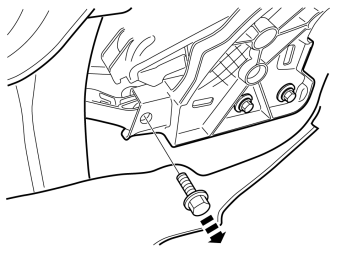
Illustrations A and B
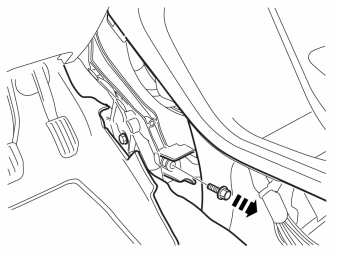
- Remove the two screws on each side of the center console.
Applies to cars with automatic transmission
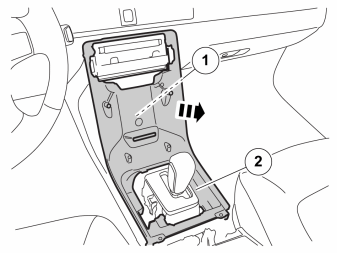
- Depress the catches and move the gear lever to D.
Applies to all models
- Remove the lower section of the center console. Detach and unhook any connectors for the antenna for the keyless system (1) and Four-C system (2).
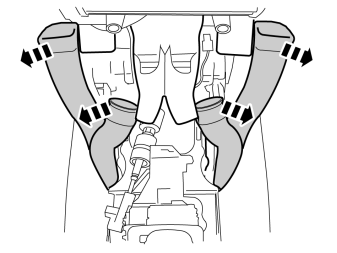
- Unhook and place the air ducts to one side.
- Pull the tunnel console with the lever carrier backwards and remove from the car.
Внимание: Do not damage the SRS connectors when removing the tunnel console.
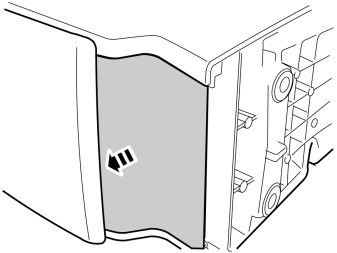
- Place the tunnel console on a suitable surface.
- Remove the cover panel.
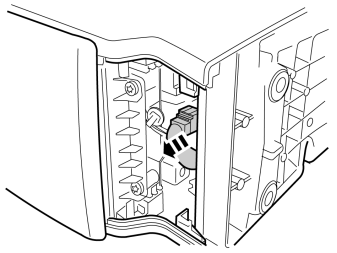
- Disconnect and unhook the connector for any handsets.
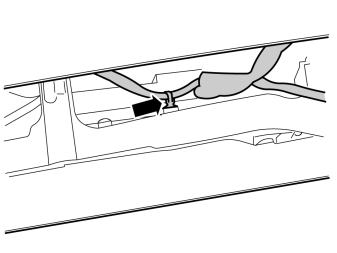
- Cut off the cable tie for the cable harness.
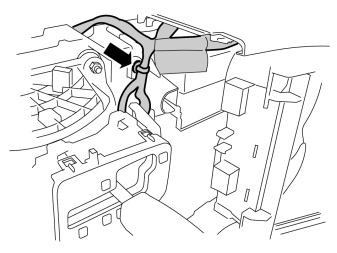
- Cut off the cable tie for the cable harness.
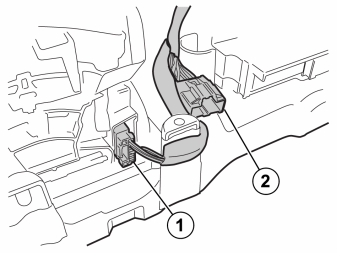
- Disconnect the connector (1) from the lever carrier.
- Unhook the connector (2) from the tunnel console surround.
- Remove the tunnel console surround.
- Remove all cut cable ties from the surround.
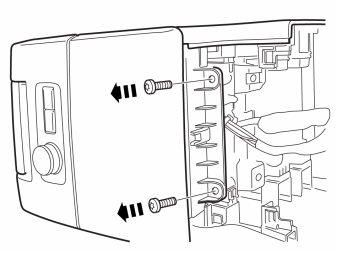
- Remove the two screws.
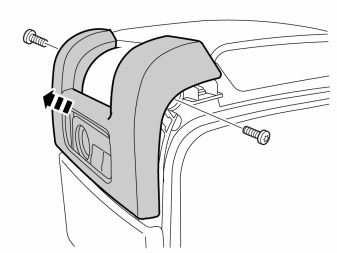
- Remove the two screws and the cover panel.
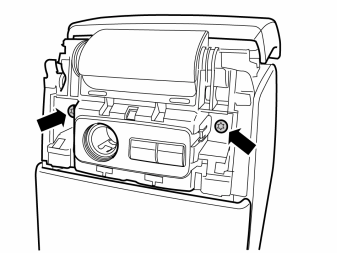
- Remove the two screws.
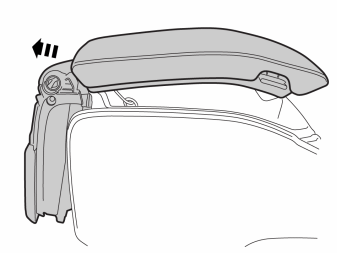
- Remove the armrest with its mounting.
- Disconnect and unhook the connectors.
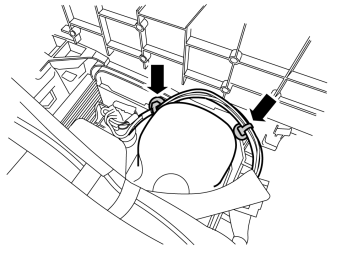
- Detach the connectors on the underside of the cup holder.
- Cut off the cable ties and remove the clips.
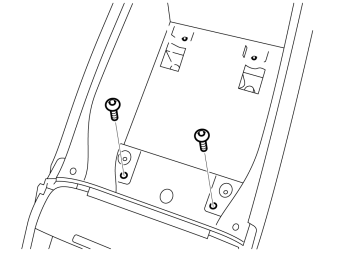
- Remove the front screws at the bottom of the storage compartment.
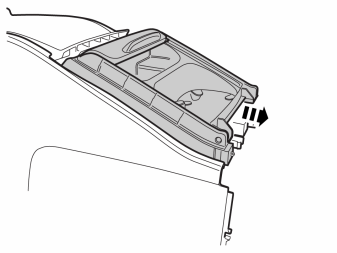
- Remove the cup holder from the tunnel console by pulling it forwards.
Installing components in the new tunnel console
AUX socket
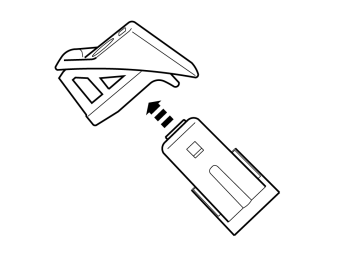
- Take the AUX socket with holder from the kit. Install the socket in the holder.
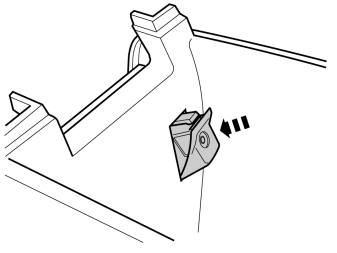
- Take the new tunnel console from the kit. Install the AUX socket in the tunnel console by first hooking it at the lower edge.
Cable harness
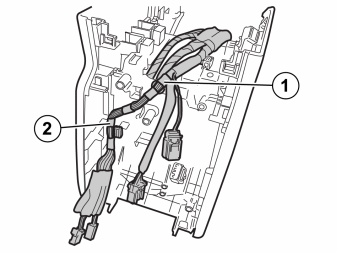
- Take the cable harness from the kit. Press the cable harness clip in the hole (1) and on the flange (2).
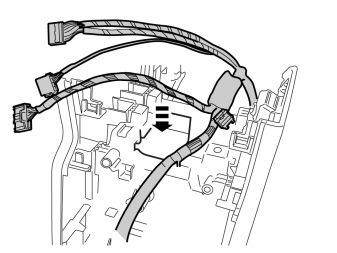
- Insert the three connectors for the DVD player through the hole at the bottom of the tunnel console.
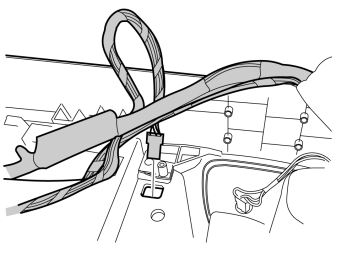
- Insert the green 5-pin connector for the AV socket through the hole in the bottom of the tunnel console.
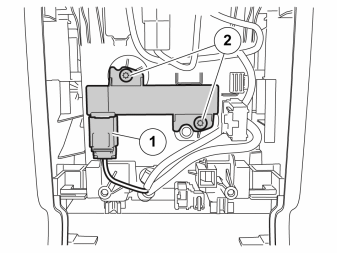
Applies to cars with keyless system
- Unplug the connector (1).
- Remove the two screws (2) and the antenna.
- Install the antenna on the new tunnel console.
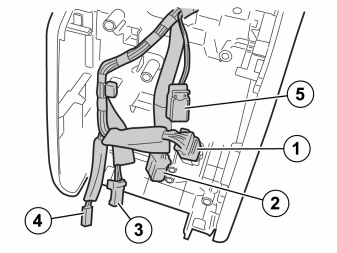
-
Connect the connector to the AUX socket (1).
-
Tape the connectors that are not used (depends on the specification of the car) to the tunnel console using butyl tape.
Cup holder
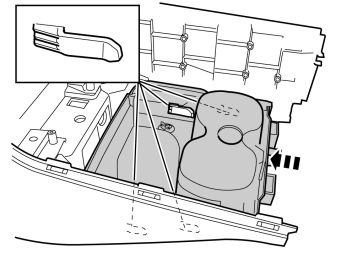
- Install the cup holder. Check that the two hooks engage on each side.
- Reinstall the front screws at the bottom of the storage compartment.
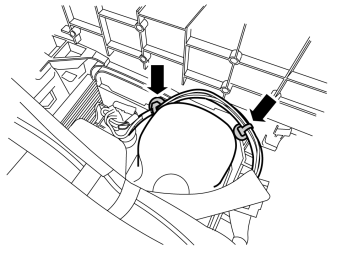
- Connect the connectors and press the two clips in for the cable harness.
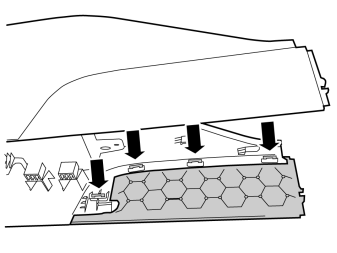
- Remove the panel from the tunnel console by carefully releasing the four hooks.
- Install the panel on the new tunnel console.
Armrest
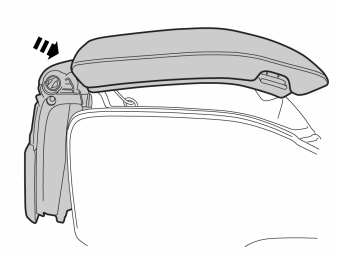
- Install the armrest with its mounting and two screws. At same time connect the connectors.
Cover panel
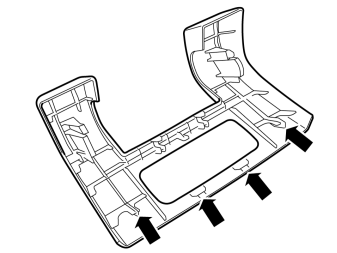
- Install the cover panel and the two screws. Check that the hooks at the lower edge engage.
Lever carrier
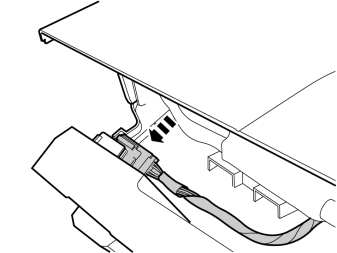
- Take the lever carrier with the tunnel console surround and move it towards the tunnel console.
- Press the connector for any handsets on the surround and connect the cable for the handset.
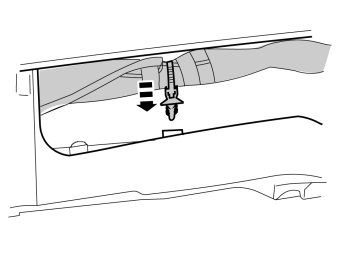
- Secure the clip of the cable harness to the surround.
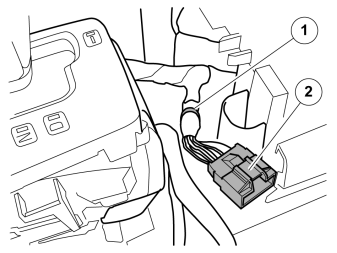
- Press the cable harness clips (1) and the connector (2) onto the surround.
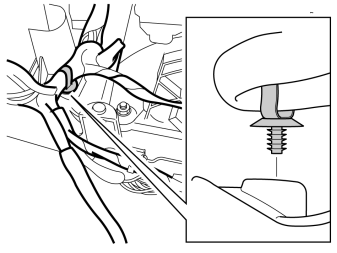
- Secure the clip of the cable harness to the surround.
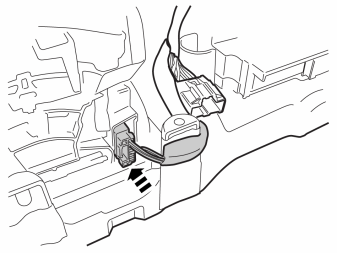
- Connect the connector to the lever carrier.
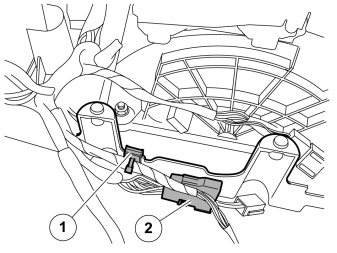
- Hook the cable harness clips (1) and the connector (2) onto the surround.
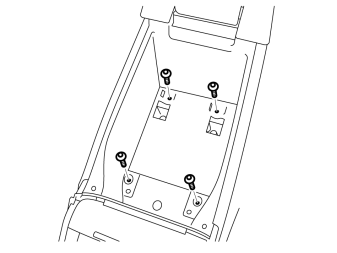
- Temporarily reinstall the four screws at the bottom of the storage compartment.
Installing, screens
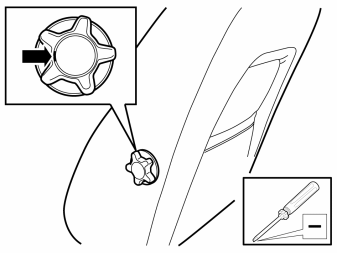
- Remove the knob for the lumbar support adjustment by removing the cover using a small screwdriver and pull the knob straight off.
Примечание: Images 65-81 apply to both front seats. Complete one seat at a time.
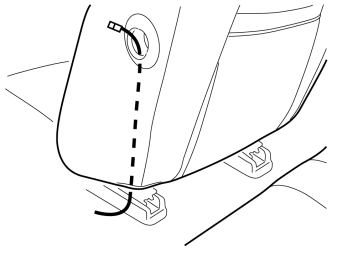
- Take a long cable tie from the kit and insert it through the hole for adjusting the lumbar support and inside the upholstery. The cable tie must be routed between the thin foam of the upholstery and the support pad.
Illustrations A and B
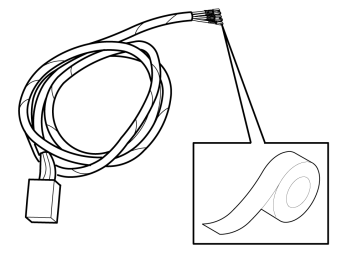
- Take the cable harness from the kit. Tape the cable terminals together on the cable tie. Tape together as flat as possible (see image B).
- Pull the cable tie through with the cable harness.
- Remove the cable tie from the cable harness.
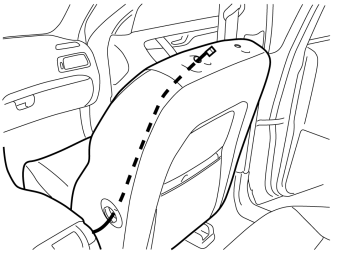
Applies to the right-hand front seat
- Thread the cable tie from the headrest's inner mounting down to the hole for lumbar adjustment. The cable tie must be routed between the upholstery's thin foam and the protective pad (also see image 74).
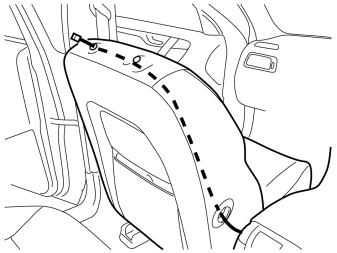
Applies to the left-hand front seat.
- Thread the cable tie from the headrest's outer mounting down to the hole for lumbar adjustment. The cable tie must be routed between the upholstery's thin foam and the protective pad (also see image 74).
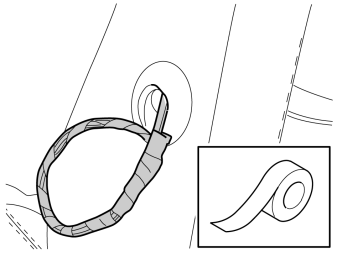
- Tape the cable harness on the cable tie. Tape as flat as possible.
- Pull the cable harness up towards the upper edge of the seat and out through the hole for the head restraint.
- Remove the cable tie and the tape from the cable harness.
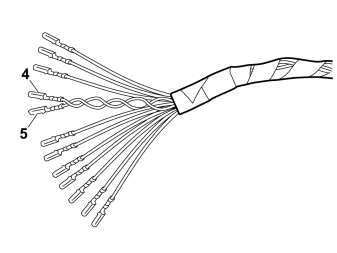
Примечание: There are two green and two white wires in the cable harness. The green wire for position 4 is twisted with the white wire for position 5.
Position:
- 1 Black (SB)
- 2 Red/White (R/W)
- 3 Violet/Gray (VO/GR)
- 4 Green (GN)
- 5 White (W)
- 6 Orange (OR)
- 7 Pink (P)
- 8 Gray (GR)
- 9 Yellow (Y)
- 10 Green (GN)
- 11 Brown (BN)
- 12 White (W)
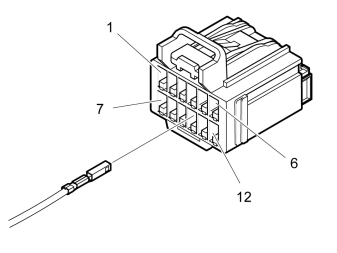
- Take the gray connector from the kit. Connect the cable harness terminals according to the previous steps.
- Slide the connector's catch in.
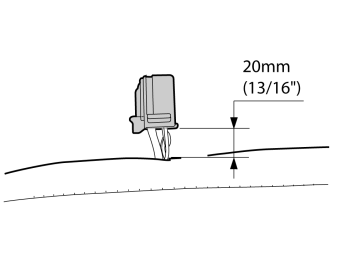
- Adjust the length of the cable harness so that the connector protrudes approximately 20 mm (13/16").
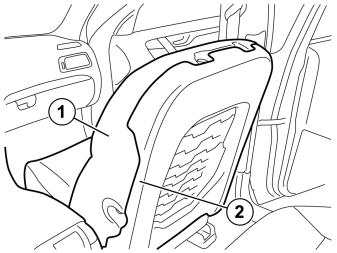
- Using your fingers, press the cable harness under the protective pad, the cable harness must not press out the upholstery after installation.
Примечание: The image shows right hand seat without upholstery.
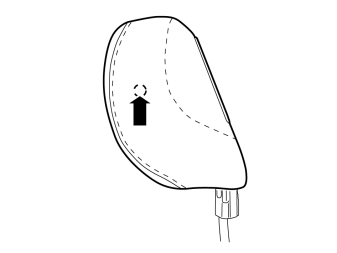
- Take the head restraint from the kit. Locate the hole under the upholstery on the side of the head restraint (on the side turned inwards in the car).
- Make a hole in the upholstery using a scriber or an awl.
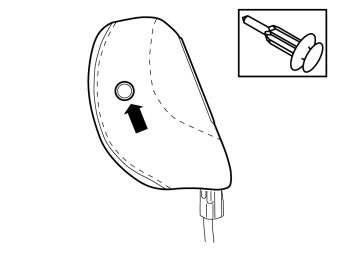
- Take the coat hook from the kit.
- Press into the hole.
- Tap it in lightly using a plastic hammer so that it secures properly.
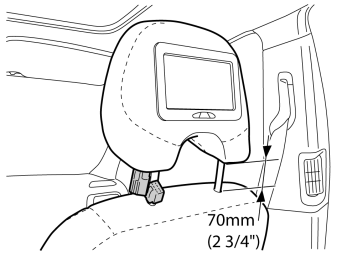
- Install the head restraint on the seat. Push it down so that the distance between the seat and the lower edge of the head restraint is approximately 70 mm (2¾")
- Connect the connector to the headrest.
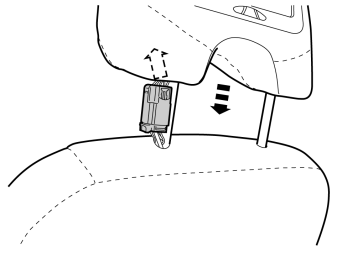
- Insert the connector diagonally forwards through the hole in the headrest, at the same as moving the headrest down on the seat to the locked position.
- Check that the head restraint has locked into place by pulling it upwards.
- Reinstall the lumbar adjustment.
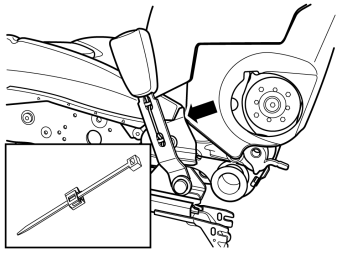
Applies to cars without electrically heated seats
- Take a clip with cable tie from the kit and install it on the cover's edge on the left-hand side of the right-hand seat.
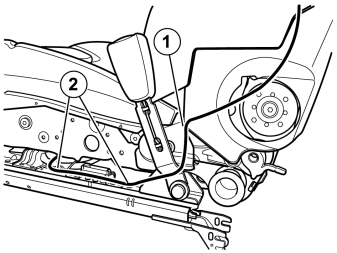
Applies to cars without electrically heated seats
- Take the cable harness from the headrest and pull forward, in underneath the seat. Follow the cable harness for the seat belt buckle.
- Tighten the cable tie (1).
- Secure the cable using two cable ties (2).
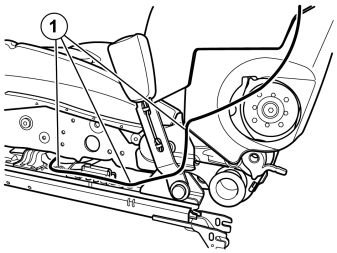
Applies to cars with electrically heated seats
- Take the cable harness from the headrest and pull forward, in underneath the seat. Follow the cable harness for the heating element.
- Secure the cable using three cable ties (1).
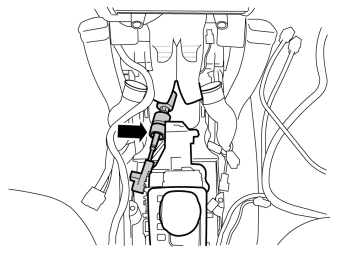
- Reinstall the tunnel console. Check that the gear selector cable is on the correct side.
Внимание: Do not damage the SRS connectors when installing the tunnel console.
- Remove the four screws at the bottom of the storage compartment.
- Raise the front edge of the tunnel console and connect the connectors to the SRS control module.
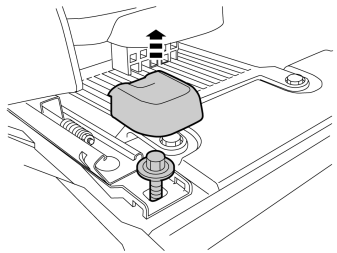
- Remove the front seat side pieces and the screws on the right-hand front seat.
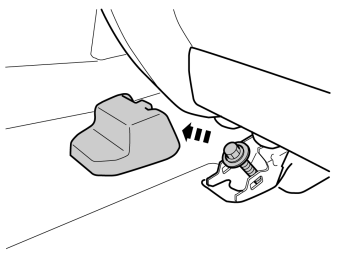
- Remove the rear seat side pieces and the screws. Tilt the seat back.
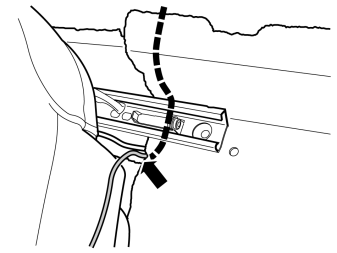
- Route the cable harness to the screen under the floor mat's joint at the seat rail.
- Route the cable harness at the existing cable harness.
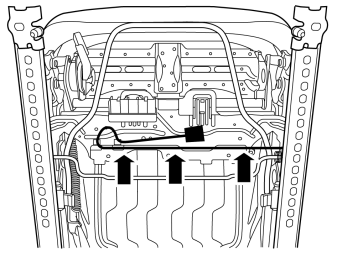
Applies to the right-hand front seat
- Route the cable harness in a loop under the seat. Secure it using three cable ties in the existing cable harness.
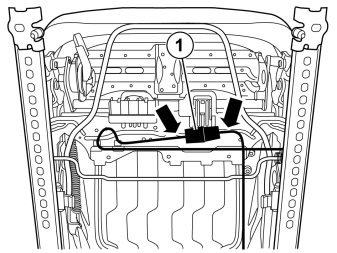
Applies to the right-hand front seat
- Connect the cable harness from the floor to the connector (1).
- Place a cable tie on each side of the connectors and tighten.
- Reinstall the seat with screws and side pieces. Torque tighten the screws to 40 Nm.
- Check that the cable harness is not trapped when the seat is slid forwards and backwards.
Applies when the right-hand seat is the passenger seat.
- Fold the backrest forward and backwards and check that the cable harness is not trapped when folding the backrest.
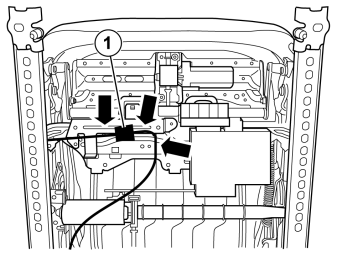
Applies to the left-hand front seat.
- Carry out points 84-86.
- Route the cable harness under the seat.
- Connect the cable harness from the floor to the connector (1).
- Secure it using a cable tie in the existing cable harness or in a bracket.
- Place a cable tie on each side of the connectors and tighten.
- Reinstall the seat with screws and side pieces. Torque tighten the screws to 40 Nm.
- Check that the cable harness is not trapped when the seat is slid forwards and backwards.
Applies when the left-hand seat is the passenger seat.
- Fold the backrest forward and backwards and check that the cable harness is not trapped when folding the backrest.
Illustration A
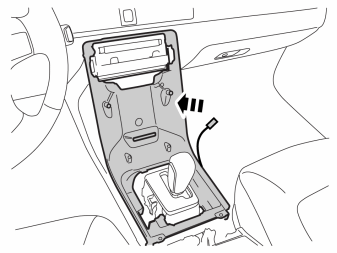
- Check that the gear selector is in neutral.
- Reinstall the lower section of the center console (without screws).
Illustration B
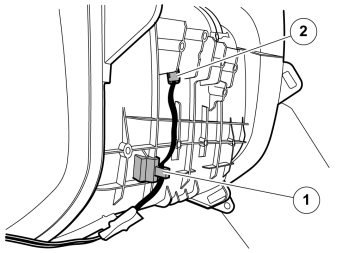
- At the same time install the cable harness clips (1) on the rear edge.
- Connect the connector (2) to the antenna, or attach it using butyl tape if it is not to be used.
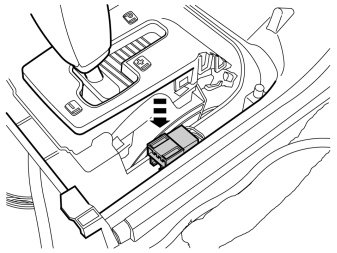
- Install the 6 pin green connector with holder on the center console.
- Slide the entire tunnel console forward.
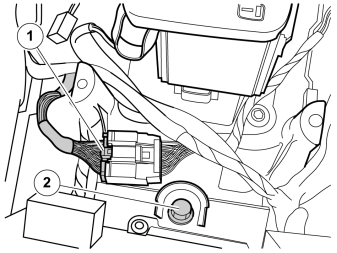
- Connect the gray connector (1).
- Reinstall the M8 screw (2).
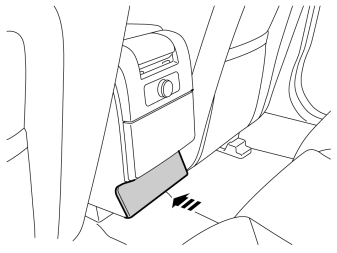
- Reinstall the panel under the ashtray.
- Align the rear section of the tunnel console with the lower part.
Reinstall:
- 6 screws for the lower part of the center console
- 4 screws in the storage compartment
- 2 M8 screws in the storage compartment
- 2 M8 screws in the front edge of the tunnel console.
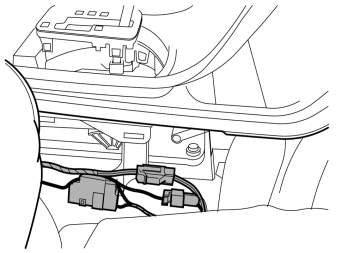
- Connect and hook the three connectors on the right-hand side.
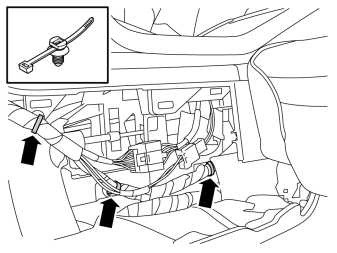
- Take three cable ties with clips from the kit and install the cable harness.
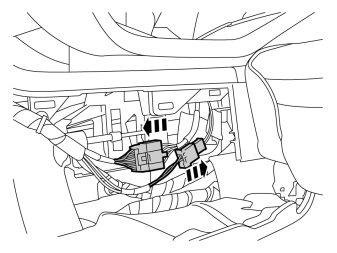
- Connect and hook the two connectors on the left-hand side of the lever carrier.
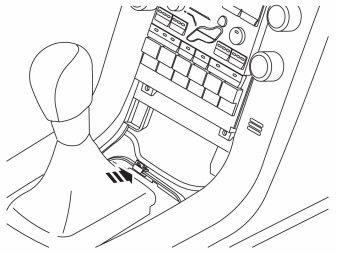
Reinstall:
- the upper part of the center console
- the panel around the display
- clips with cable harness
- the panel around the gear lever selector. At the same time connect the connectors for the Four-C system, if applicable.
- mat in the cup holder.
Applies to automatic gearboxes
- Move the gear selector to P.
- Reinstall the gear selector cable.
- Reinstall the side panels.
Applies to manual gearboxes
- Move the gear selector to 4.
- Reinstall the gear selector cables.
- Reinstall the side panels.
Installation, DVD player
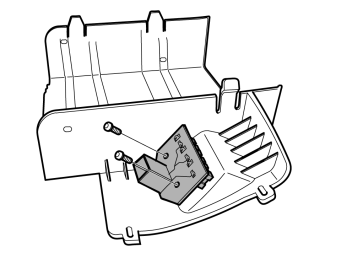
- Take the DVD holder, AV socket and two screws from the kit. Install the AV socket on the holder.
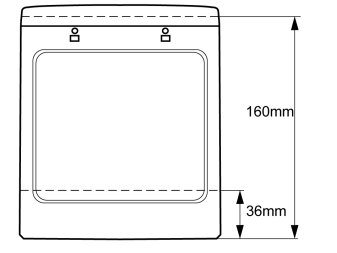
- Make markings on the top of the DVD player as illustrated. Make marks using a scriber.
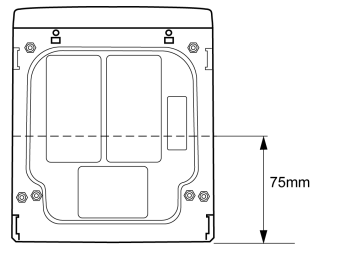
- Make markings underneath the DVD player as illustrated. Make marks using a scriber.
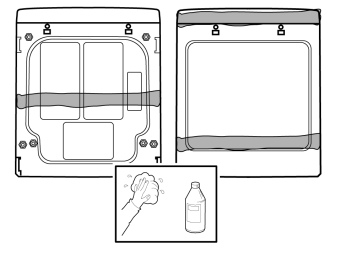
- Clean the areas around the markings using isopropanol.
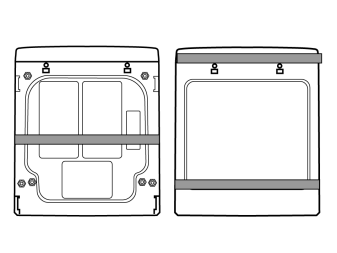
- Attach the three pieces of foam tape at the lower edge of the markings
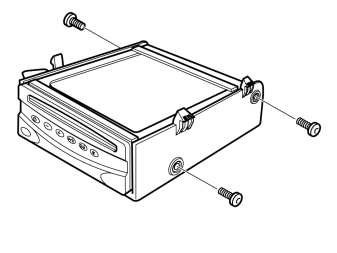
- Place the DVD player in the holder. Tighten the three M4x8 screws from the kit.
Illustrations A and B
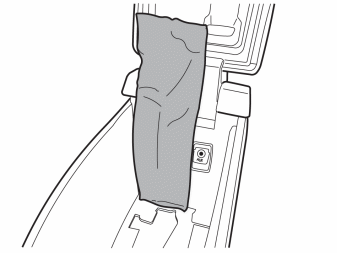
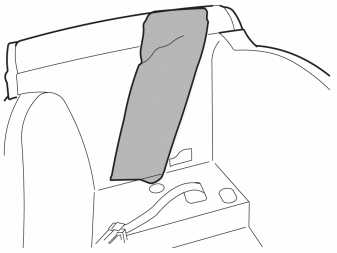
- Attach tape at the front and rear edge of the tunnel console for protection when installing the DVD player.
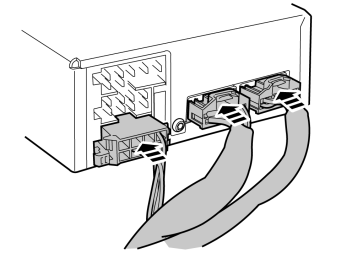
- Connect the three connectors from the tunnel console to the DVD player.
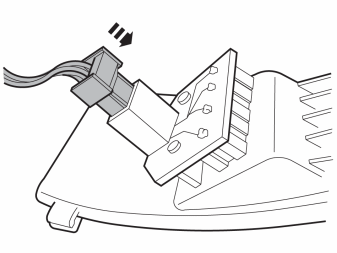
- Connect the connector to the AV socket.
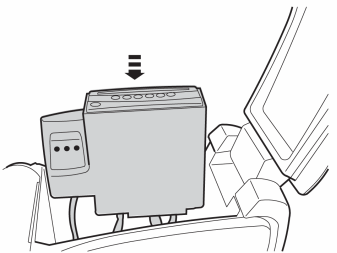
- Insert the DVD player down towards the long side of the tunnel compartment.
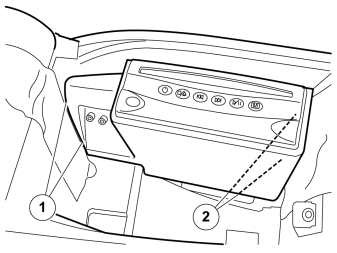
- Press the catches in at the front edge first, then at the rear.
- Remove the tape.
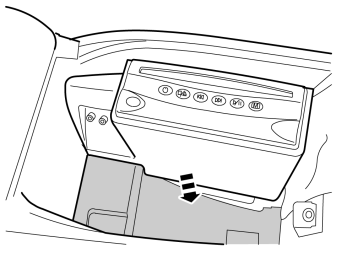
- Take the rubber mat from the kit and secure it at the bottom of the tunnel compartment.

- Install the batteries in the remote control and headsets.
- Region code the DVD player. Information is in VIDA under:
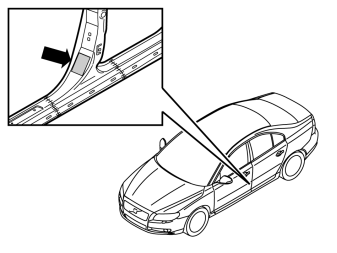
Only applies to the USA and Canada: Installing labels
- Take the black decal from the kit.
- Clean the area (1) where the label is to be placed using isopropanol, and wipe dry.
- Pull off the protective paper from the adhesive side of the label and attach the label as illustrated. Press the label securely into place.
Обсуждение и оценка
0Пока нет комментариев. Будьте первым.