Применимость
| Модель | Двигатель | Год |
|---|---|---|
| S40 (04-) | — | 2004 |
| V50 | — | 2004 |
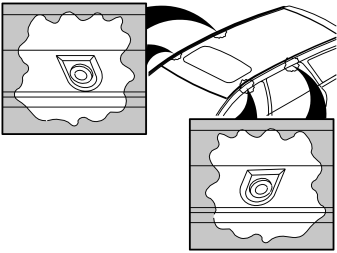
- Open all the doors
- Locate the mounting points for the load carriers in the door frames. The mounting points comprise countersunk rivet nuts in the door frames
- Clean around the rivet nuts and the roof where the securing devices and feet for the load carriers will rest.
Примечание: Clean carefully. Do not damage the paintwork.
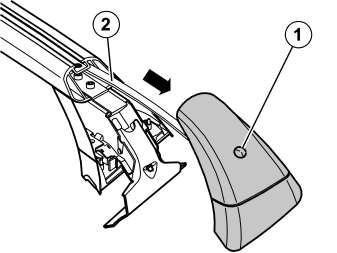
- Remove the covers from the load carriers. Turn the clip (1) 90° anti-clockwise. Then pull off the cover, which is secured to the load carrier with a plastic band (2) to prevent it falling off
- Check the decal on the mounting. Ensure that the correct load carrier is in the correct position. The mountings are marked:
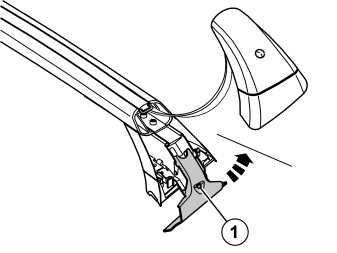
- Take one of the load carriers
- Slacken off the screw (1) a little on either side of the load carrier mounting
- Pull out the mounting. Fold the mounting up.
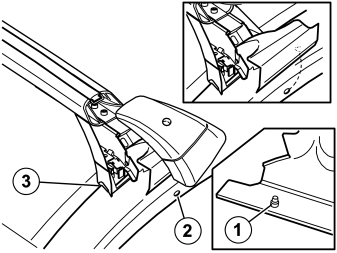
- Position one load carrier foot at the roof edge. The lug (1) on the mounting must be aligned with the rivet nut (2) in the door frame
- Carefully lower the other load carrier foot against the roof edge on the other side
- Check that the small radius (3) on the load carrier foot is in contact with the corresponding curvature on the top of the roof edge.
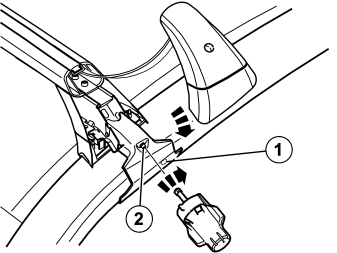
- Lower the mounting towards the roof edge.
Примечание: Do not damage the paintwork.
- Pull out the mounting so that the lug (1) is free of the roof edge. Slacken off the screw (2) if necessary
- Slide the mounting in towards the upper door frame. The lug must align in the rivet nut in the door frame. Adjust the load carrier foot sideways if necessary
- Take the torque wrench from the kit. Press the mounting against the car. Finger-tighten the screw (2) for the mounting. The lug (1) must not fall out of the rivet nut
- Cross to the other side and repeat the procedure.
- Check that the load carrier foot is in contact with the roof edge. See point 4
- Tighten the screw for the mounting. Tighten to2 Nm (1.5 lbf. ft).
Примечание: Always use the torque wrench supplied. Tighten until the torque wrench clicks over.
- Cross to the other side and repeat the procedure.
- Repeat points 3-6 for the other load carrier.
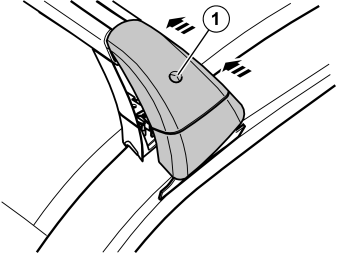
- Reinstall the covers over the ends of the load carriers. Turn the retaining clip (1) 90° clockwise.
Подсказка: We recommend the use of the Volvo “One Key” locking system for locking the cover and therefore any accessories that are to be secured in the T-groove.
Safety instructions
The maximum permitted roof load and total weight for the car must not be exceeded. See the owner's handbook (permitted roof load 75 kg, weight of the load carriers approximately 5.4 kg). The maximum roof load is the sum of the weight of the roof carriers, accessories and load.
Distribute the load evenly across the load surface with as low a centre of gravity as possible. Secure the load so that it cannot move. Regularly check the position of the load and that the load is secure.
Check the screwed joint and the mountings after driving a short distance. If necessary, tighten to the prescribed torque. Check regularly.
The handling of the car and vulnerability of the car to side winds changes when there is a load on the roof. Adapt your speed to the vehicle load (maximum speed 130 km/h).
The load carriers should be removed when not in use both for the safety of other traffic and to save energy.
Обсуждение и оценка
0Пока нет комментариев. Будьте первым.