Alpha 175 auxiliary lamps with P/N 9166090 is recommended for this installation kit.
- Turn the ignition key to position 0
- Remove the key.
Примечание: Wait at least three minutes before disassembling the connectors or removing other electrical equipment.
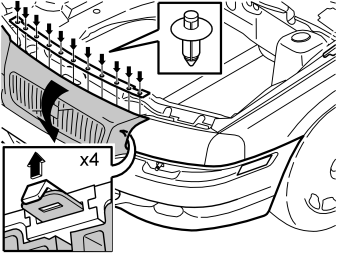
- Detach the top of the grille by pushing the centre of each clip (x 11) until it clicks
- Remove the clips
- Pull the top of the grille forwards
- Insert a hand inside the grille. Press up the 4 catches along the top of the grille
- Pull the top of the grille outward to release the catches.
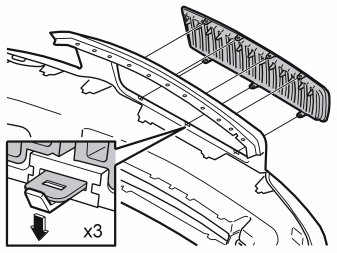
- Detach the bottom of the grille. Insert a small screwdriver between the gaps. Press down the three catches
- Pull out the grille. Put it to one side.
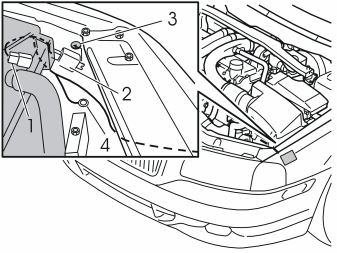
- Connect the connector (1) for the cable harness (taken from the kit) to the pre-routed connector on the front left-hand edge of the air cleaner (ACL)
- Connect the relay (2) (from the kit) to the other connector for the cable harness
- Check that the catches engage
- Install the relay and clip in the hole (3) from the rear of the left-hand fender liner, to the left of the headlamp
- Connect the remaining cable terminal (4) to the front ground terminal behind the left-hand headlamp. Use the screw from the kit.
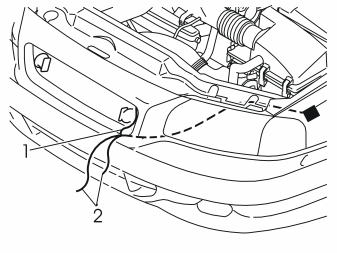
- Push the rubber seal (1) (on the left inside of the grille) to one side
- Route the cable harness (2) through the top of the lead-in in the bodywork. This is on the right side of the left headlamp. Pull the cable harness from the grille
- Push the rubber seal back into place. Ensure that it provides a good seal
- Reinstall the eleven clips in the top edge of the grille.
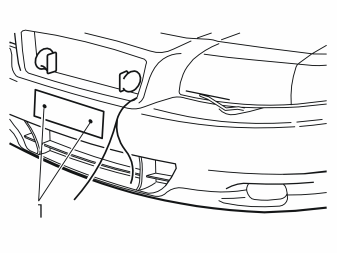
- Remove the number plate by knocking the moulding to one side at bottom of the number plate using a block of wood. The moulding is securely positioned. Do not damage painted surfaces
- Remove the number plate
- Remove the screws (1) for the number plate holder. Then remove the number plate holder.
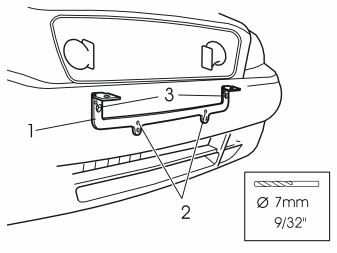
- Install the auxiliary lamp holder (1) in the same holes (2) as the number plate (use the upper holes in the bracket)
- Mark out for drilling two upper holes (3) for the auxiliary lamp holder
- Drill a 7 mm (9/32") hole through the middle of hole (3). Drill through the bumper cover and through the bumper rail (approximately 80 mm (3 5/32") inside the bumper cover).
Примечание: Hold the drill horizontally.
- Remove the screws and the auxiliary lamp holder.
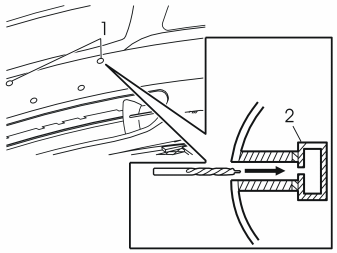
- Drill the hole (1) to the correct dimension using drill bit P/N 8633152. Drill through the plastic using the larger section of the drill bit. Drill through the bumper rail (2) using the smaller section of the drill bit (7.3 mm diameter).
Примечание: It is important that the tip of the drill bit hits the hole that was previously drilled into the bumper rail.
- The flat surface of the drill bit must drill out all the plastic up to the bumper rail.
Примечание: Hold the drill horizontally. Use a torch to check that there are is no plastic swarf in the drilled holes.
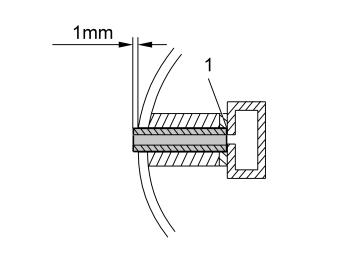
- Check that there is no plastic on the area (1) on which the spacers will rest
- Install the two spacer sleeves, lengths of approximately 81 mm in the holes.
Примечание: The spacer sleeves must protrude approximately 1 mm from the bumper cover.
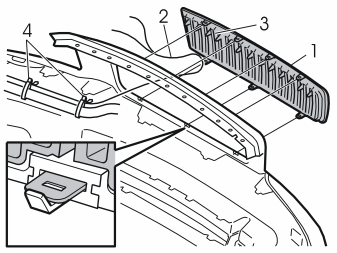
- Insert the cable harness into the fifth hole (3) from the left on the grille (1)
- Reinstall the grille
- Secure the cable behind the left-hand headlamp using the larger cable harness. Use two tie straps (4) from the kit.
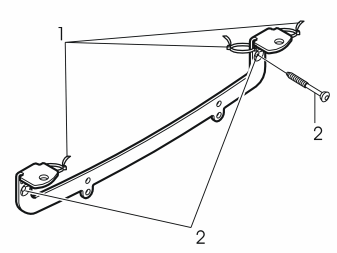
- Secure the tie straps (1) in the holes in the auxiliary lamp bracket. Do not tighten
- Install the auxiliary lamp bracket on the bumper using the screws (2) from the kit. Finger tighten. The screws are self-tapping so it may be hard to screw them in.
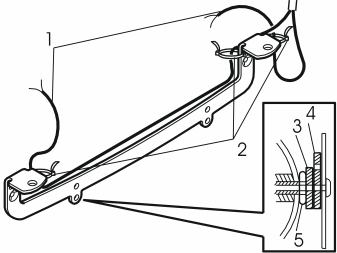
- Insert the two cable ends (1) in the three tie straps (2)
- Route the wiring as illustrated
- Ensure that there is enough cable to reach the lamps. Push any excess cable back through the grille
- Tighten the tie straps.
Примечание: Tighten the two screws for the auxiliary lamp bracket.
- Install a spacer washer (3) between the auxiliary lamp bracket (4) and the expander nut (5) on both sides
- Install the number plate in the number plate holder
- Secure the number plate by pressing the lower edge of the plastic moulding over the number plate and holder until a number of clicks is heard
- Press along the entire length of the moulding.
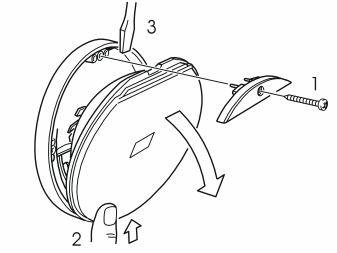
Disassembling the spot lampsUse Volvo dealer recommended spot lamps
- Remove the screw (1) and cover
- Press lightly on the lens (2)
- Position a screwdriver (3) between the insert and lamp housing and pry gently.
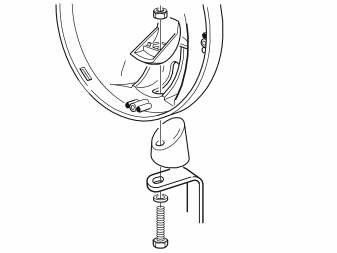
- Install the lamp housing on the auxiliary lamp mounting. Use a screw and nut. Finger tighten.
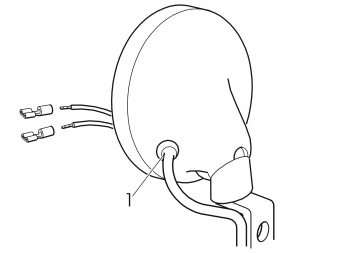
- Route the cable harness through the rubber grommet (1)
- Install cable terminals.
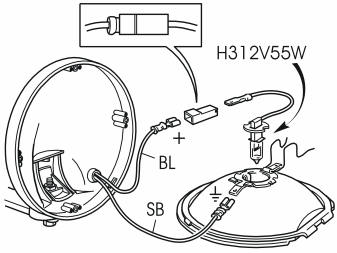
- Connect the blue (BL) cable to the lamp cable via a socket housing
- Connect the black (SB) cable to ground on the lamp insert.
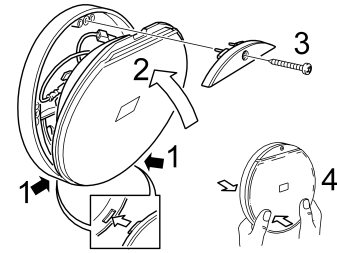
- Assemble the spot lamp as illustrated.
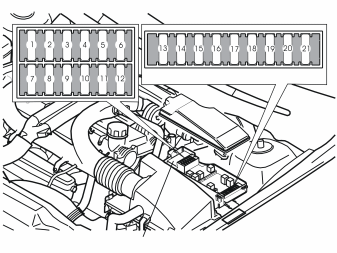
- Open the cover on the fuse holder in the engine compartment
- Look inside the cover to see which terminal the fuse is to be positioned in (terminal 2 or 10)
- Install a 20A fuse (from the kit) in the correct terminal
- Reinstall the cover.
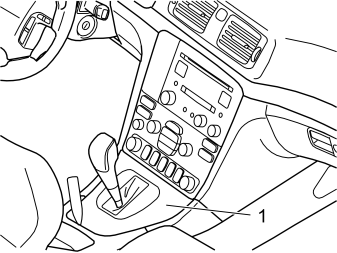
- Carefully remove the panel (1) with the boot. Pry carefully with a weatherstrip tool or similar.
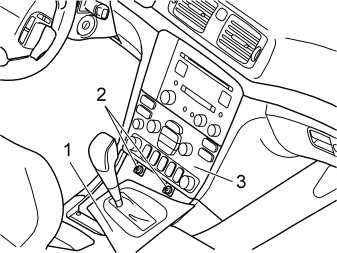
- Move the gear selector lever to the rearmost position
- Pull the panel (1) with the boot backward as far as possible
- Remove the screws (2) from the dashboard environment panel (3).
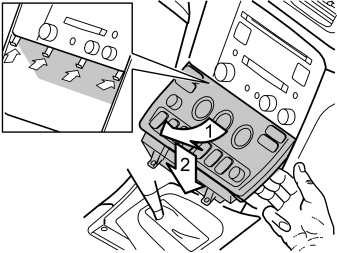
- Angle the dashboard environment panel outwards so that it is possible to insert a couple of fingers between the centre console and the side of the dashboard environment panel
- Pull the dashboard environment panel downwards while maintaining the same angle. Remove the dashboard environment panel. Some force is required because the panel is tightly installed
- Disconnect the connectors on the reverse of the dashboard environment panel. Put the dashboard environment panel to one side.
Примечание: If any of the outer hooks break off, these must be repaired. The method for this can be found in the Workshop Manual in the section about the dashboard.
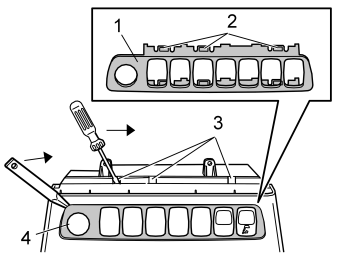
- Position the dashboard environment panel as illustrated
- Detach the surround (1) by carefully pushing down the three catches (2) in the holes (3) using a small screwdriver. At the same time pry out the surround using a thin plastic weatherstrip tool. Starting at the 12 volt socket (4) pry up one corner. The surround is well secured so do not damage any components.
Примечание: The surround with three button places must be replaced with a surround with seven button places if necessary. This can be purchased separately.
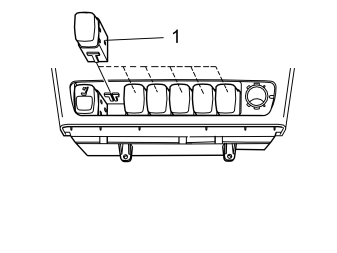
- Remove the switch blank. Install the new switch (1) in any location
- Reinstall the surround and the cigarette lighter
- Connect the connectors to the dashboard environment panel. Reinstall the panel
- Reinstall the gear selector lever surround with the boot.
- Align the headlamps
- Tighten the two screws
- Install protective caps on the screw heads.
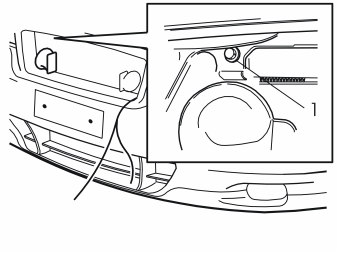
- If the lamps vibrate irritatingly install a stay. Secure the stay to the horn mounting (1).
Обсуждение и оценка
0Пока нет комментариев. Будьте первым.