Применимость
| Модель | Двигатель | Год |
|---|---|---|
| S80 (-06) | — | 1999–2004 |
Preparations
Auxiliary lamps Alpha 175 (P/N 9166090) are recommended for this installation kit.
- Turn the ignition key to position 0
- Remove the ignition key from the ignition switch.
Примечание: Wait at least five minutes before disconnecting the connectors or removing other electrical equipment.
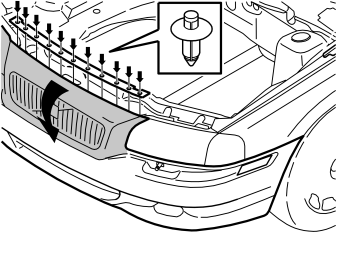
- Detach the top of the grille by pushing the centre of each clip (x 11) until it clicks. Remove the clips by pulling them straight up. On cars from model year 2003, the grille is secured by six clips
- Pull the top edge of the grille forwards. Fold rubber strip inside to one side.
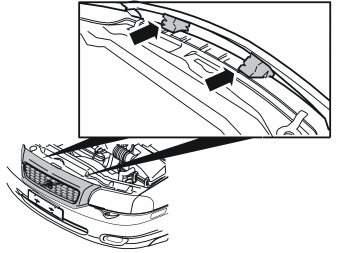
- Position something soft such as a shim so that there is a gap between the grille and the car panel.
Installing the cable harness
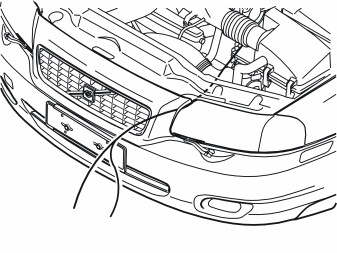
- Thread a wire between the headlamp and the grille, and on into the engine compartment.
Примечание: Do not damage any painted surfaces.
- Take the cable harness from the kit. Using tape, secure the shorter cable without connectors along the long cable without connectors
- Using tape, secure the long cable without connectors to the end of the wire in the engine compartment. Route the cable out past the grille.
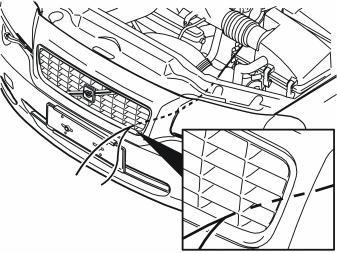
- Route the wire and cable past the rubber seal inside the radiator grille and out through the fifth hole from the left in the radiator grille. On cars from model year 2003, the wire must be routed out through the second hole from the left, at the bottom of the radiator grille. The cable must be pulled out exactly where the left auxiliary lamp is to be positioned
- Pull the cable out through the hole.
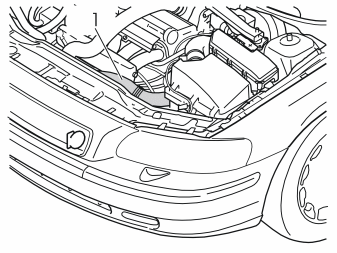
- Remove the intake manifold (1).
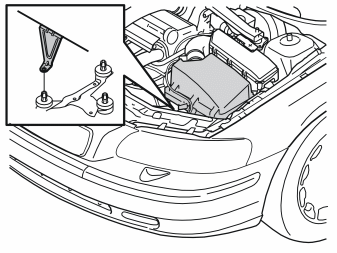
- Release the air cleaner module from its three catches. There is one catch on the rear edge of the air cleaner module, one on the front edge and one on the left-hand side. Lift up the air cleaner module. Use a small socket with an extension bar to compress the four catches on the clips. Detach the air cleaner module by pulling it straight up.
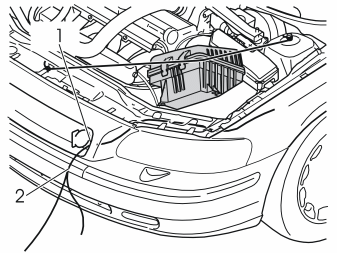
- Disconnect the vacuum hose at the front edge of the air cleaner module by lifting it out of the mounting
- Fold the air cleaner module to one side and secure it using a piece of string
- Move the air cleaner (ACL) to one side so that the stainless steel bracket beneath it is visible.
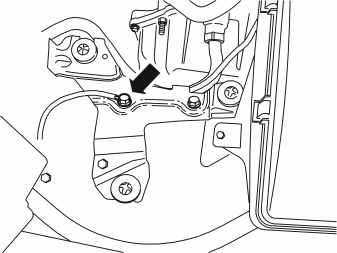
- Remove the screw from the bracket. Connect the ground lead from the cable harness. Tighten it to the bracket along with the screw. Tighten to 24 Nm (18 lbf. ft.).
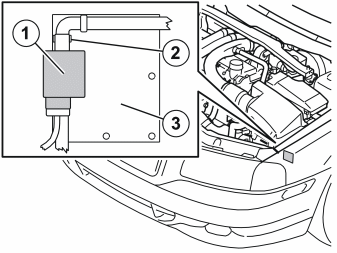
- Connect the relay (from the kit) to the cable harness. Press the relay securely into the connector
- Connect the connector from the cable harness to the connector on the pre-routed cable harness. It is positioned between the air cleaner module and the bodywork, behind the left headlamp
- Thread a tie strap into the eyelet on the relay mounting (2)
- Clamp the relay (1), with the connection downwards, in the wiring boot behind the left headlamp (3)
- Reinstall air cleaner module, vacuum hose and intake manifold.
Installing the auxiliary lamp bracket
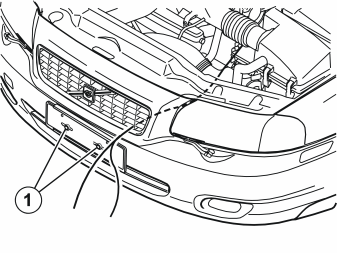
- Remove the number plate by knocking the moulding at the bottom of the number plate to one side using a block of wood. The moulding is securely positioned. Do not damage painted surfaces. Remove the number plate
- Remove the screws (1) and the number plate holder.
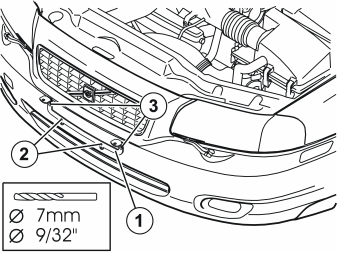
- Install the auxiliary lamp bracket (1) from the kit in the same holes (2) as the number plate (use the upper holes in the bracket)
- Mark out where the two upper holes (3) for the auxiliary lamp bracket will be drilled
- Using a 7 mm (9/32”) diameter drill bit, drill the centre of the holes (3). Drill through the bumper cover and the bumper rail which is positioned approximately 80 mm (3 5/32”) inside.
Примечание: Hold the drill horizontally.
- Remove the screws and the auxiliary lamp bracket.
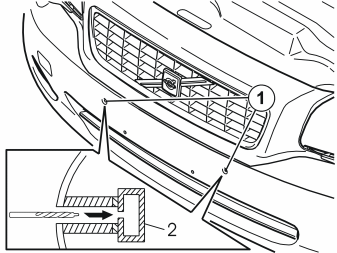
- Drill the holes (1) to the correct dimension using drill bit P/N 8633152. Drill through the plastic using the larger section of the drill bit. Drill through the bumper rail (2) using the smaller section of the drill bit (7.3 mm diameter).
Примечание: It is important that the tip of the drill bit hits the hole that was previously drilled into the bumper rail.
The flat surface of the drill bit must drill out all the plastic up to the bumper rail.
Примечание: Hold the drill horizontally. Use a torch to check that there is no plastic swarf in the drilled holes.
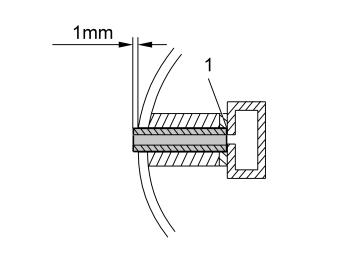
- Check that there is no plastic on the area (1) on which the spacers will rest
- Install the two spacer sleeves, measuring approximately 81 mm in length, in the holes.
Примечание: The spacer sleeves must protrude approximately 1mm from the bumper cover.
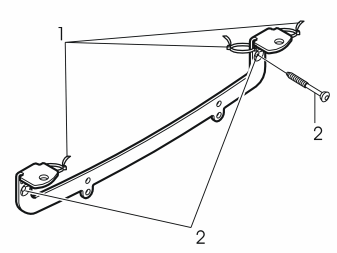
- Secure the tie straps (1) in the holes in the auxiliary lamp bracket. Do not tighten them yet
- Install the auxiliary lamp bracket on the bumper using the screws (2) from the kit. Finger tighten. The screws are self-tapping so it may be hard to screw them in.
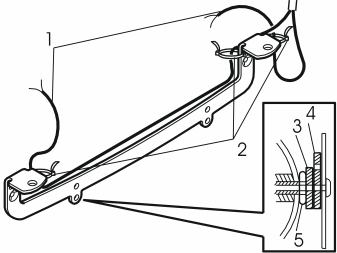
- Insert the two cable ends (1) in the three tie straps (2). Route the wiring as illustrated
- Ensure that there is enough cable to reach the lamps. Press any excess cable length back in through the radiator grille
- Tighten the tie straps
- Tighten the two screws for the auxiliary lamp bracket
- Install a spacer washer (3) between the auxiliary lamp bracket (4) and the expander nut (5) on both sides
- Install the number plate in the number plate holder
- Secure the number plate by pressing the lower edge of the plastic moulding over the number plate and holder, until a number of clicks is heard. Press along the entire length of the moulding.
Installing and connecting the auxiliary lamps
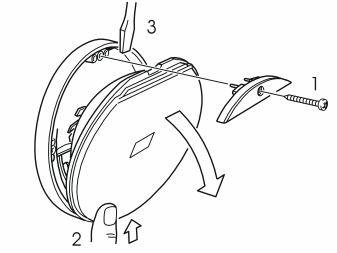
Use auxiliary lamps recommended by your Volvo dealer
- Remove the screw (1) and cover
- Press lightly on the lens (2)
- Position a screwdriver (3) between the insert and lamp housing and pry gently.
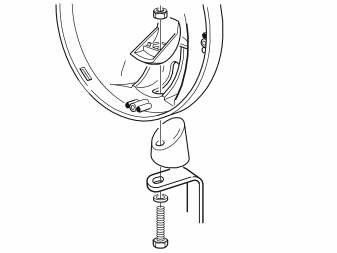
- Install the lamp housing on the auxiliary lamp mounting. Use a screw and nut. Finger tighten.
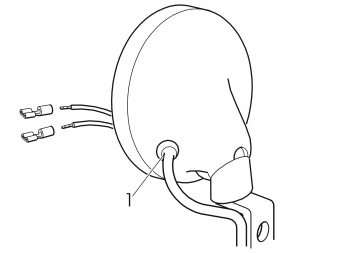
- Route the cable harness through the rubber grommet (1)
- Install cable terminals.
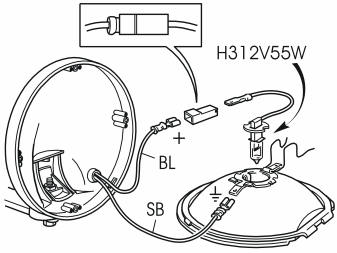
- Connect the blue (BL) cable to the lamp cable via a socket housing
- Connect the black (SB) cable to ground on the lamp insert.
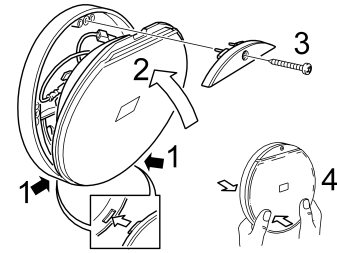
- Assemble the auxiliary lamp as illustrated.
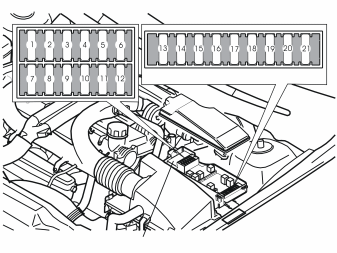
- Open the cover on the fuse holder in the engine compartment
- Look inside the cover to check in which terminal the fuse must be installed (terminal 2 or 10)
- Install a 20A fuse (from the kit) in the correct terminal
- Reinstall the cover.
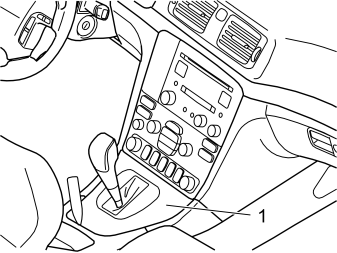
- Carefully pry off the gear selector lever panel (1) using a weatherstrip tool.
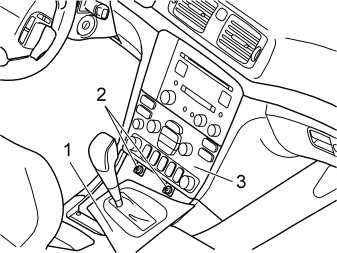
- Move the gear selector lever to the rearmost position
- Pull the panel (1) with the boot backward as far as possible
- Remove the screws (2) from the dashboard environment panel (3).
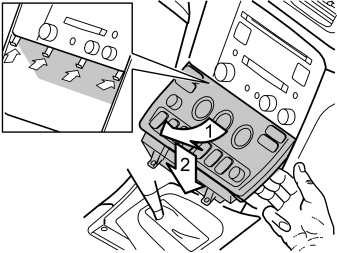
- Angle the dashboard environment panel outwards so that it is possible to insert a couple of fingers between the centre console and the side of the dashboard environment panel
- Pull the dashboard environment panel downwards while maintaining the same angle. Remove the dashboard environment panel. Some force is required because the panel is tightly installed
- Disconnect the connectors on the reverse. Place the dashboard environment panel to one side.
Примечание: If any of the outer hooks break off, these must be repaired. The method for this can be found in the Workshop Manual in the section about the dashboard.
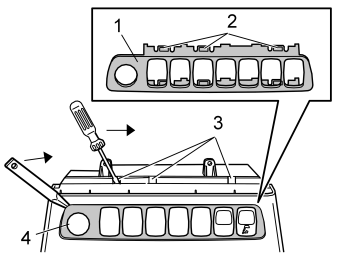
- Position the dashboard environment panel as illustrated
- Detach the surround (1) by carefully pushing down the three catches (2) in the holes (3) using a small screwdriver. At the same time pry out the surround using a thin weatherstrip tool. Starting at the 12 volt socket (4), pry up one corner. The surround is well secured so do not damage any components.
Примечание: The surround with three button spaces can be replaced with a surround with seven button spaces if necessary. This can be purchased separately.
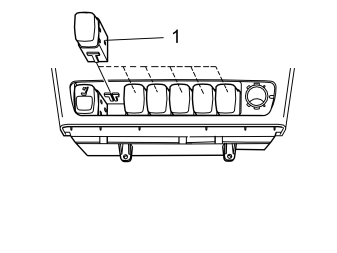
- Remove the switch blank. Install the new switch (1). The switch can be installed in any location
- Reinstall the surround and the cigarette lighter
- Connect the connectors to the dashboard environment panel. Reinstall the panel
- Reinstall the gear selector lever panel.
- Align the auxiliary lamp beams
- Tighten the two screws
- Install protective caps on the screw heads.
Installing top stays
Install top stays if the lamps vibrate irritatingly. Secure the stays to the horn mounting (1). See points 30-34
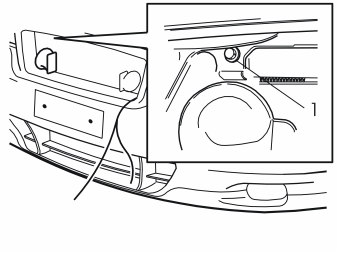
Applies to cars up to model year 2002
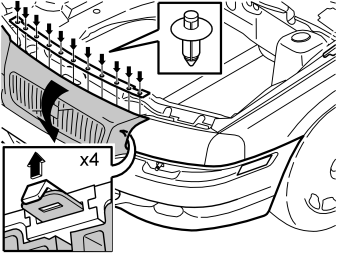
- Detach the top of the grille by pushing the centre of each clip (x 11) until it clicks. Remove the clips
- Pull the top of the grille forwards
- Insert a hand inside the radiator grille. Press up the four catches evenly distributed along the top edge
- Pull the top of the radiator grille outward to release the catches.
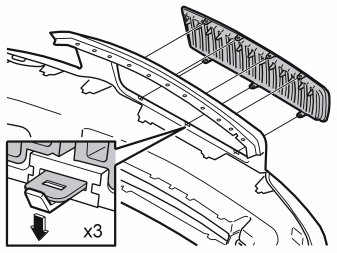
- Detach the lower edge of the radiator grille by inserting a small screwdriver into the gaps. Press down the three catches
- Remove the radiator grille. Put it to one side.
- Take the top stays from the kit
- Unscrew the screws holding the horn. Install the top stays using the same screws. Tighten to 10 Nm (7.3 lbf. ft.)
- Reinstall the radiator grille.
Applies to cars from model year 2003
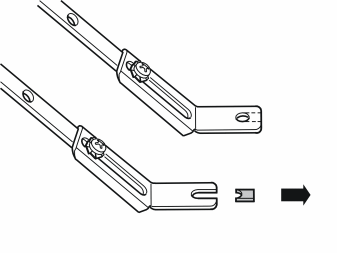
- Take the top stays from the kit. Cut away material on one side so that the stay can be threaded onto a screw without having to remove the screw completely. File away any burrs or unevenness. Repeat on the other top stay
- Slightly slacken off the two screws holding the horn. Insert a hinged spanner through the holes in the radiator grille. Turn the spanner using an adjustable spanner
- Insert the modified sides of the stays through the radiator grille and in under the slackened screws
- Ensure that the stays are correctly positioned. Tighten the screws. Tighten to 10 Nm (7.3 lbf. ft.).
Applies to all models
- Adjust the length and angle of the stays. Screw the stays into the auxiliary lamps. Use screws from the kit.
Обсуждение и оценка
0Пока нет комментариев. Будьте первым.