Применимость
| Модель | Двигатель | Год |
|---|---|---|
| C70 Conv (-05) | — | 1998–2005 |
| C70 Coupe (-02) | — | 1998–2002 |
| S70 | — | 1997–2000 |
| V70 (-00) | — | 1997–2000 |
Осторожно: This information must be presented to the customer verbally and in writing: Cooling deteriorates when auxiliary lamps have been installed. This can cause overheating in certain conditions. Therefore, take note of the engine coolant temperature (ECT) in warm conditions or under heavy loads when driving. Remove the auxiliary lamps when towing a caravan in warm conditions.
Preparations

- Make a note of the radio code
- Disconnect the battery leads
- Remove the battery.
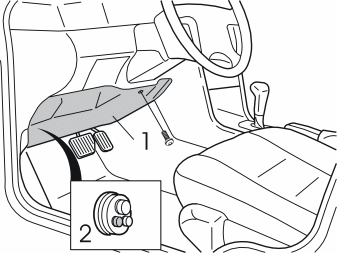
- Remove the soundproofing panel (1)
- Locate the accessory duct. Remove the rubber grommet (2)
- Cut off one of the cut-outs. Adjust the size of the hole for the green/orange (GR/OR) cable from the kit.
Installing the cable harness
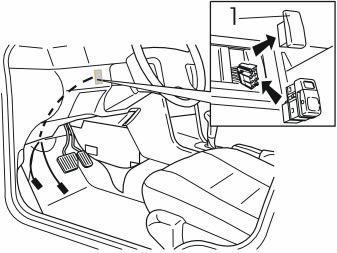
- Remove the cover (1)
- Insert the 6-pin yellow (Y) connector for the auxiliary lamp cable harness through the hole in the control panel. Connect the connector to the switch for the auxiliary lamp
- Install the switch in the control panel.
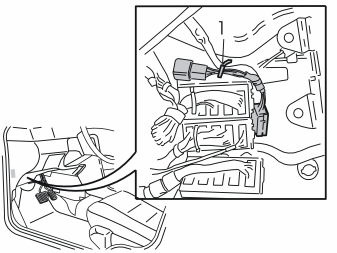
- Connect the relay to the cable harness for the auxiliary lamp
- Clamp the relay to the bracket for the switch units. Use a tie strap
- Secure the cable harness using a tie strap.
Illustration A applies to left-hand drive cars
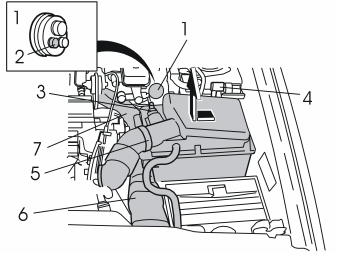
- Detach the accessory duct from the holder. Remove the rubber grommet (1)
- Cut off one of the cut-outs (2) in the grommets. Adjust the size of the hole for the green/orange (GN/OR) cable
- Remove the connector (3), ignition cable (4), hose clamps (5), intake hose (6) and the preheating hose (7)
- Detach the air cleaner (ACL) housing and fold to one side over the engine.
Illustration B applies to right-hand drive cars
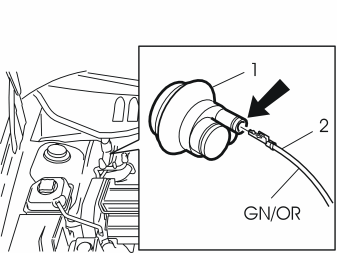
- Detach the accessory duct from the holder. Remove the rubber grommet (1)
- Cut off one of the cut-outs (2) in the grommet. Adjust the size of the hole for the green/orange (GN/OR) cable.
- Insert the green/orange (GN/OR) cable through the rubber grommet and the accessory duct into the passenger compartment. Ensure that the black casing enters the rubber grommet in the engine compartment to form a seal. Welding rod (wire) can be used to help insert the cable through, if necessary
- Reinstall the rubber grommets on the accessory duct in the passenger compartment and engine compartment.
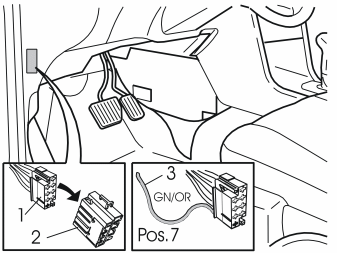
- Remove the pre-routed yellow (Y) 8-pin connector (1). Remove the cover plug (2)
- Open the catch for the wiring on the yellow connector. Connect the green/orange (GN/OR) cable (3) to terminal 7
- Reinstall the connector
- Reinstall the soundproofing panel.
Illustration A applies to left-hand drive cars
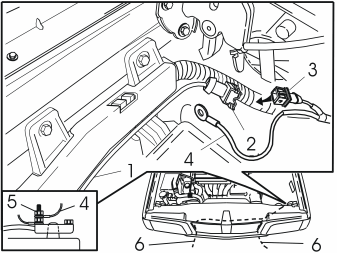
- Route the green/orange (GN/OR) cable (1) under the cable duct
- Connect the connector (2) to the connector (3) from the cable harness for the auxiliary lamp
- Connect the black (SB) cable (4) to the pole piece on the battery negative lead using nut (5)
- Route the cable harness for the auxiliary lamp through the openings (6) on the radiator member.
Illustration B applies to right-hand drive cars
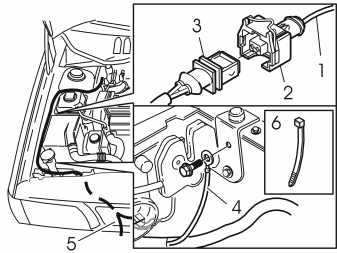
- Route the green/orange (GN/OR) cable (1) between the spring strut turret and the radiator expansion tank. Continue along the side to the bonnet catch
- Connect the connector (2) to the connector (3) from the cable harness for the auxiliary lamp
- Connect the black (SB) cable (4) to the screw in the bonnet catch. Remove the screw and position the cable in between. Tighten the screw again
- Route the cable harness for the auxiliary lamp through the opening (5) on the radiator member. Secure the cable using tie straps (6) at suitable positions.
Installing the auxiliary lamp bracket
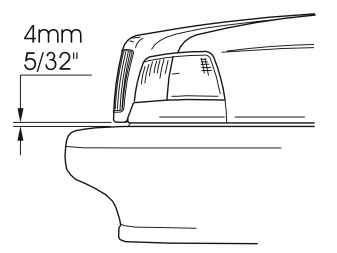
- Check the clearance between the bonnet catch and bumper. If the clearance is below 4 mm, the bumper must be adjusted downwards.
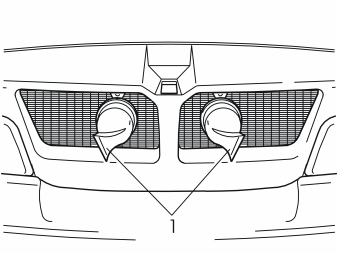
- Remove the horn (1).
Illustration A
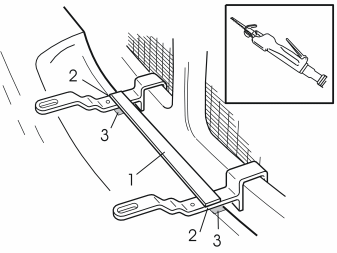
- Position the auxiliary lamp bracket (1) centrally
- Make a mark using a sharp object to cut out the bumper cover where it is in contact with the mounting (2)
- Measure approximately 5 mm (13/64") to the left of the auxiliary lamp bracket. Mark out the rest shown in the shaded area (3)
- Cut or saw out according to the new markings.
Illustration B applies to turbocharged cars
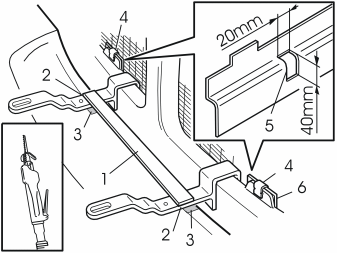
- Remove the clips (4)
- Cut a 40 mm deep, 25 mm wide groove (5) in the air baffle.
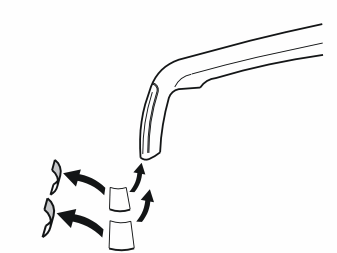
- Wipe dry the underside of the bonnet
- Secure the two transparent pieces of tape to the underside of the bonnet as protection against the auxiliary lamp bracket.
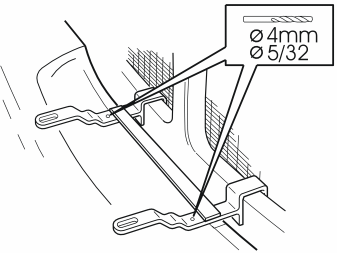
- Reinstall the auxiliary lamp bracket
- Mark and drill two 4 mm (5/32") holes (1).
Installing and connecting the auxiliary lamps
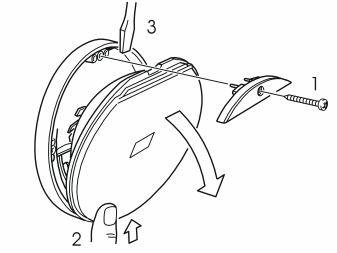
Use auxiliary lamps recommended by your Volvo dealer.
- Separate the auxiliary lamp by removing the screw (1) and the cover
- Press lightly on the lens (2)
- Position a screwdriver (3) between the insert and lamp housing and pry gently.
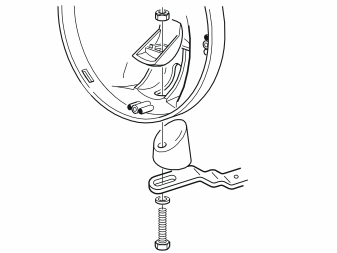
- Install the lamp housing using the screw and nut in the front position on the auxiliary lamp bracket. Finger tighten.
Applies to larger/heavier auxiliary lamps
- Install the mounting bracket. See point en-GB0900c8af81e3dea6#KC08716567.
Illustration A
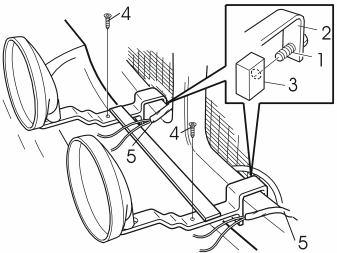
- Tighten the screws (1) on the auxiliary lamp bracket (2) a few turns
- Position spacers (3) between the radiator member and screws (1). Tighten the screws.
Примечание: Do not damage the radiator. Use a ring wrench. Check that no wiring is trapped.
- Tighten the auxiliary lamp bracket in the bumper rail using two pre-sunk screws (4). Tighten to 4 Nm (3 lbf. ft.)
- Route the wiring (5) to the auxiliary lamps
- Reinstall the horn.
Illustration B
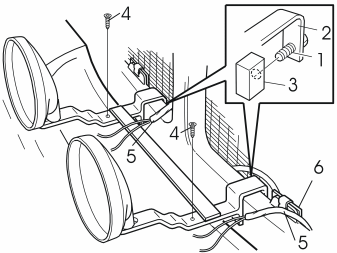
Applies to cars with turbochargers (TC)
- Reinstall the air baffle (6). Install the clips
- Reinstall the horn.
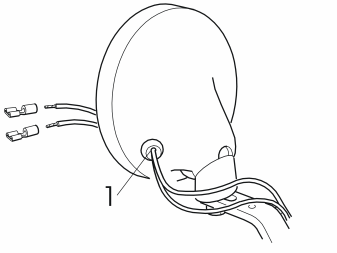
- Route the wiring through the rubber grommet (1)
- Install cable terminals.
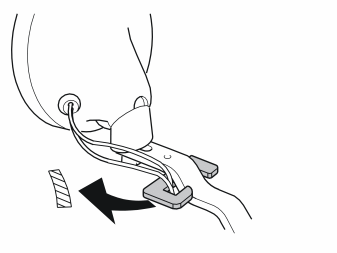
- Remove the backing from the tape on the cable protection
- Position the wiring on the left-hand side of the auxiliary lamp bracket. Install the cable protection.
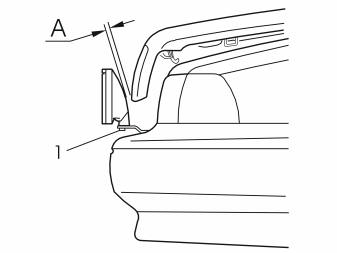
- Close the bonnet carefully. Check that the underside of the bonnet does not catch the auxiliary lamps
- Slacken off the screws/nuts (1) slightly. Adjust the auxiliary lamps so that they are as close to the bonnet edge as possible
- Tighten the screws /nuts (1).
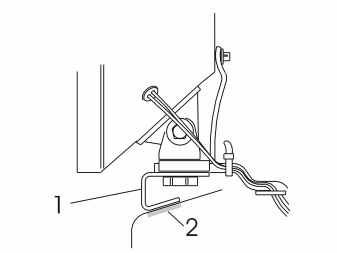
Applies to heavier/larger auxiliary lamps
-
Примечание: > Use an extra mounting bracket to relieve the load on the auxiliary lamp bracket when installing heavier auxiliary lamps.
-
Wipe dry the surface on the bumper where the mounting bracket (1) will rest
- Mark and install the pieces of tape (2).
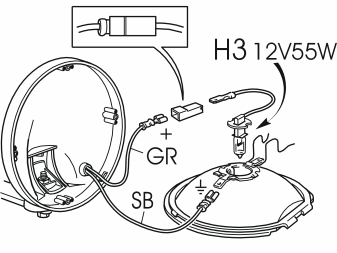
- Connect the grey (GR) cable to the lamp cable via a socket housing
- Connect the black (SB) cable to ground on the lamp insert.
H3 bulbs must be purchased separately.
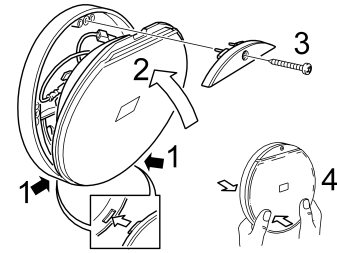
- Assemble the auxiliary lamp.
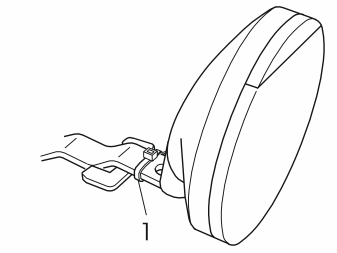
- Secure the wiring using a tie strap (1) on the auxiliary lamp bracket.
Illustration A applies to left-hand drive cars
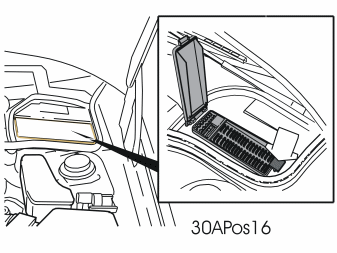
Illustration B applies to right-hand drive cars
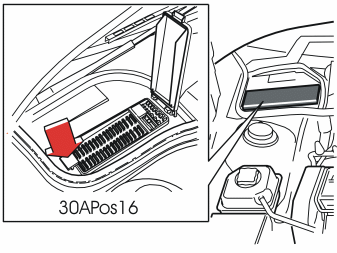
- Check that there is a 30 A fuse in terminal 16 in the fusebox.
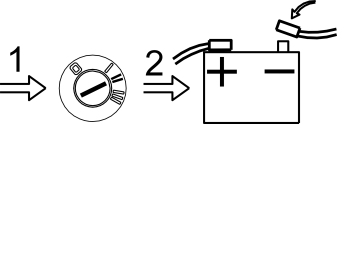
- Reinstall the air cleaner (ACL) housing and connections
- Reinstall the battery
- Connect the battery positive lead
- Turn the ignition key to position II
- Connect the battery negative lead
- Enter the anti-theft radio code
-
Check the function according to the relevant statutory requirements. Applies to Sweden: Auxiliary lamps may only be used together with high beam.
-
Adjust the distribution of light by slackening off the screws/nuts slightly as the auxiliary lamps are secured to the mounting. See illustration point en-GB0900c8af81e3dea6#KC08716566.
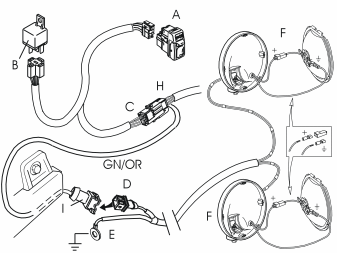
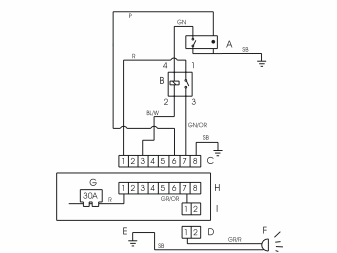
Wiring diagram
- A - Auxiliary lamp switch
- B - Relay
- C - Connector
- D - Cable harness
- E - Ground lead
- F - Auxiliary lamps
- G - Fuse 30 A
- H - Connector, existing yellow
- I - Connector, from the kit.
Обсуждение и оценка
0Пока нет комментариев. Будьте первым.