Примечание: The upholstery for the driver's seat head restraint (tailored for handsfree) must be purchased separately for cars with leather upholstery.
Примечание: Install the aerial according to the separate instructions.
Preparations
- Turn the ignition key to position 0
- Make a note of the radio code if applicable.
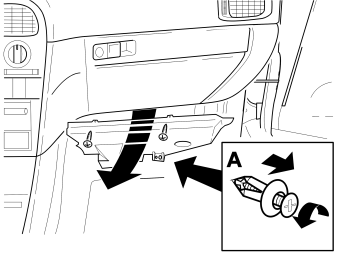
- Remove the screws and clips (A)
- Remove the soundproofing panel on the passenger side.
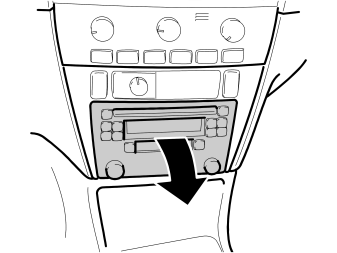
- Detach the radio by fully pressing in and releasing the latch handles
- Pull out the latch handles. Pull out the radio
- Disconnect the connectors. Remove the radio
- Where applicable: Remove the storage compartment from the centre console.
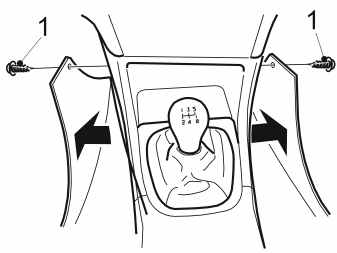
- Remove the screws (1)
- Remove the side panels from the right and left-hand sides of the centre console.
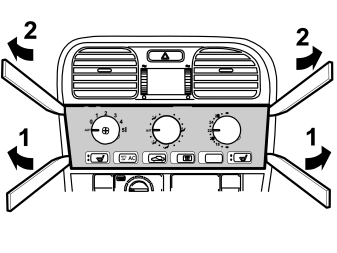
- Carefully insert the special tool (P/N 9814071) between the dashboard and the lower edges of the heater control panel. Pull the lower section of the heater control panel towards you (1)
- Press the entire panel upwards slightly. Carefully pull the top edge of the panel towards you (2). Remove the panel.
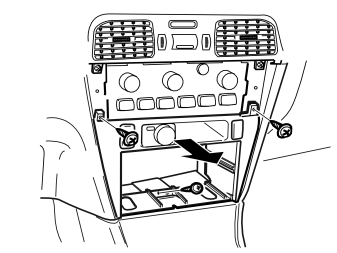
- Remove the three retaining screws for the radio tray
- Where applicable: Disconnect the connectors
- Remove the radio tray.
Illustration A applies to the Ericsson 628 and 688
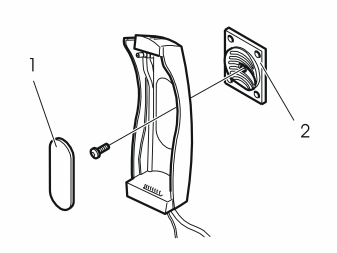
- Remove the cover (1) from the carphone holder. Unscrew the mounting (2).
Illustration B applies to the Ericsson T28
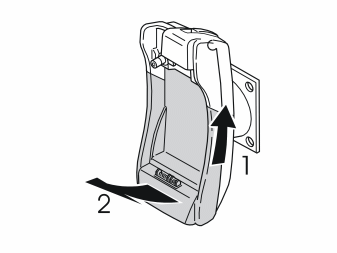
- Remove the lower section of the carphone holder by first pressing upwards and then outwards. See the arrows in the illustration.
Illustration C applies to the Ericsson T28
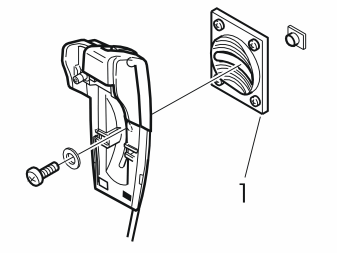
- Remove the screw and mounting (1) from the carphone holder.
Illustration D applies to the Ericsson T20
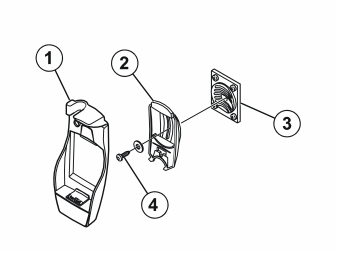
- Remove the carphone holder (1) from the mounting (2) by snapping up the catches on the reverse. Pull the carphone holder from the mounting
- Remove the mounting from the mounting plate (3) by removing the screw (4) and the washer.
Installing the bracket
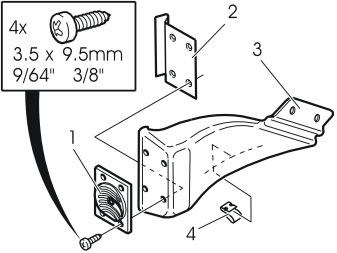
- Install the mounting plate (1) and the metal bracket (2) on the plastic bracket (3)
- Secure the clip (4) on the underneath of the plastic bracket as illustrated
- Do not tighten the screws yet.
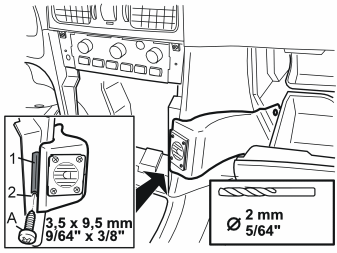
- Open the glove compartment
- Position the plastic bracket next to the centre console as illustrated
- Adjust the plastic bracket up or down so that it follows the shape of the centre console. Check that the glove compartment is not impeded
- Mark out the underside (2) of the metal bracket (1) as illustrated
- Remove the plastic bracket
- Drill a hole (2) using a 2 mm (5/64") diameter drill bit according to the marking
- Install the stop screw (A) in the drilled hole. Leave approximately 2 mm (5/64") of the threads visible.
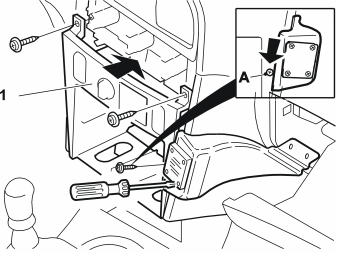
- Reinstall the radio tray (1). The metal bracket must be positioned on the reverse of the radio tray
- Screw the radio tray (1) into place. Press down the plastic holder towards the stop screw (A) behind the centre console to obtain the correct position
- Tighten the screws.
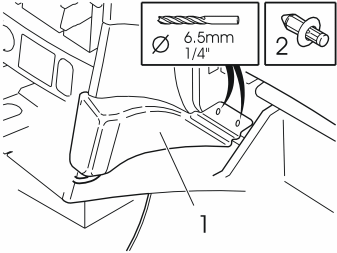
- Press the plastic bracket (1) towards the dashboard
- Drill two holes. Use a 7 mm (9/32") diameter drill bit as illustrated. Install the clip (2)
- Reinstall the panel for the rear heater control
- Check that the glove compartment can be closed.
Installing the carphone holder
Illustration A applies to the Ericsson 628 and 688
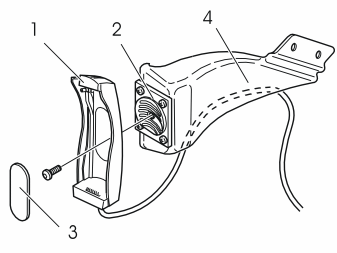
- Install the carphone holder (1) on the mounting (2). Install the cover (3)
- Route the wiring from the carphone holder under the plastic bracket to the centre console as illustrated
- Secure the wiring in the clip on the plastic bracket (4).
Illustration B applies to the Ericsson T28
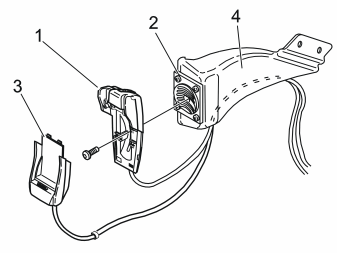
- Install the carphone holder (1) on the mounting (2)
- Reinstall the lower section (3) of the carphone holder
- Route the wiring from the carphone holder under the plastic bracket to the centre console as illustrated
- Secure the wiring in the clip on the plastic bracket (4).
Illustration C applies to the Ericsson T20
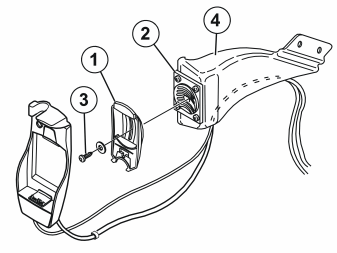
- Install the carphone holder mounting (1) on the mounting plate (2) using the screw (3)
- Press the carphone holder onto the mounting (1)
- Route the wiring from the carphone holder under the plastic bracket to the centre console as illustrated
- Secure the wiring in the clip on the plastic bracket (4).
Illustration D applies to the Nokia 6110
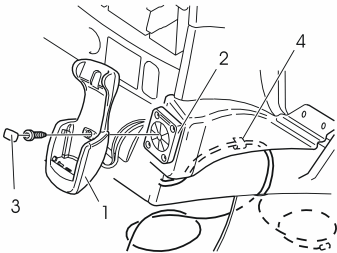
- Install the carphone holder (1) on the mounting (2). Install the cover (3)
- Route the wiring from the carphone holder under the plastic bracket to the centre console as illustrated
- Secure the wiring in the clip (4) on the plastic bracket.
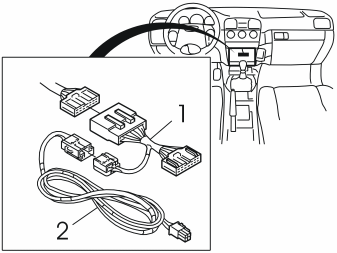
- Connect the cable harness (1) from the kit to the cable harness for the radio and the power supply cable (2).
Illustration A applies to left-hand drive cars, (LHD)
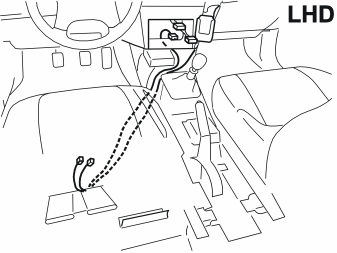
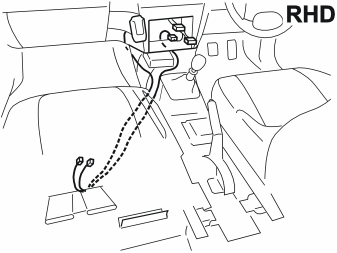
Illustration B applies to right-hand drive cars, (RHD)
- Remove the sill trim panel at the left front door
- Slide the driver's seat as far back as possible
- Push the carpet at the centre console to one side. Route the cable from the carphone holder and radio under the carpet and out by the air vent as illustrated.
Applies to kits with an extra 5 m single cable in the cable harness
- The long single cable will not be used. Cut off and insulate the end of the cable using a piece of foam tape.
Head restraint preparations
Illustration A (headrest upholstery with an extra side seam)
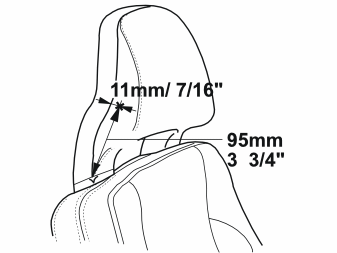
Illustration B
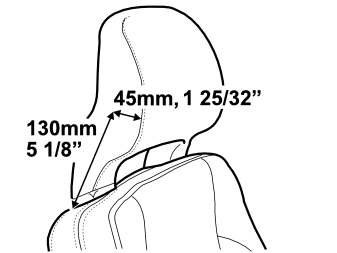
Illustration C applies to cars from model year 2003- (chassis number 920 000 - )
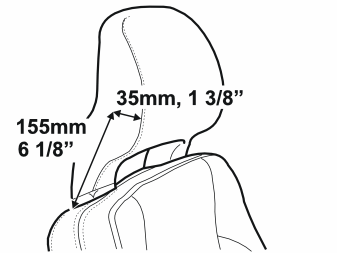
- Mark out for holes in the driver's seat head restraint. See illustration 15A, 15B or 15C (depending on the type of head restraint upholstery). Illustrations A and B display the older model years. Illustration C displays the 2003- model year.
Примечание: Special upholstery must be ordered for cars with leather upholstery. See the accessories catalogue.
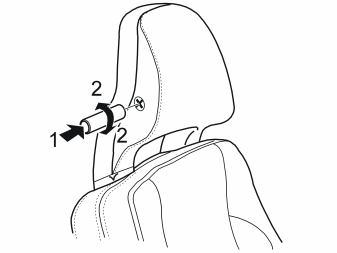
- Position the hole punch opposite the marking
- Press and turn the hole punch to make holes in the head restraint upholstery.
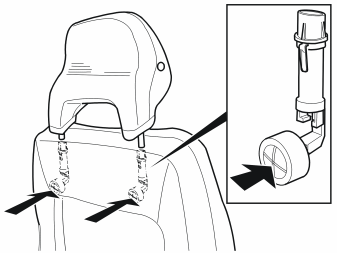
- Remove the driver's seat head restraint by first pressing it down slightly. Then press in both the catches. Pull up the head restraint.
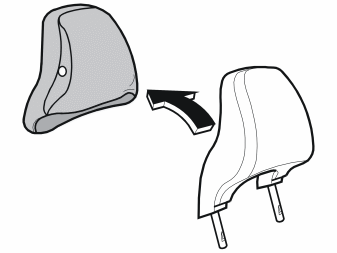
- Unzip the zip fastener. Remove the head restraint upholstery.
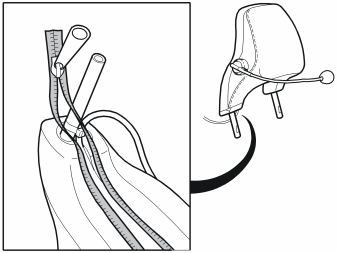
- Carefully thread the upholstery over the microphone and the new head restraint
- Close the zip fastener. Push the ends of the zip fastener inside the upholstery.
Installing the head restraint
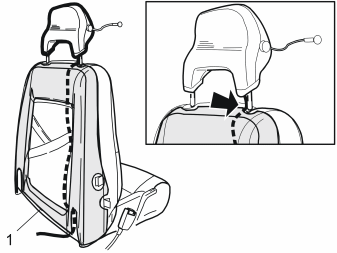
- Open the zip fastener (1) on the under side of the backrest
- Insert a curtain wire from the top and down the reverse of the backrest between the upholstery and the padding
- Tape the microphone cable to the curtain wire. Pull the cable down through the backrest
- Install the head restraint
- Zip the zip fastener closed for the backrest.
Illustration A applies to Ericsson, left-hand drive cars, (LHD)
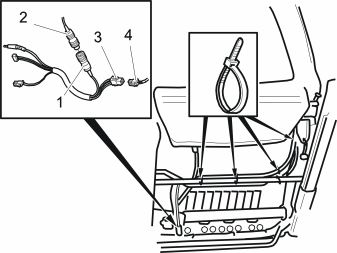
- Connect the cable (1) from the kit to the cable (2) from the head restraint. Connect the cable (3) to the cable (4) for the radio
- Secure the cable under the seat using tie straps as illustrated. Check that the driver's seat can be adjusted.
Illustration B applies to Nokia, left-hand drive cars, (LHD)
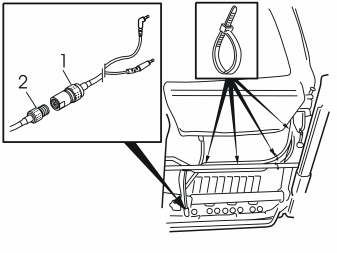
- Connect the cable (1) from the kit to the cable (2) from the head restraint
- Secure the cable under the seat using tie straps as illustrated. Check that the driver's seat can be adjusted.
Installing the hands free box
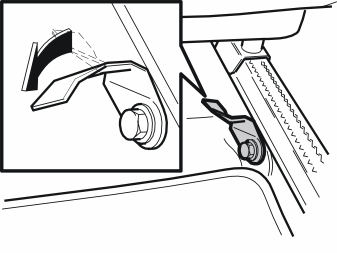
- Slide the driver's seat forwards
- Bend the bracket 90°.
Illustration A applies to Ericsson
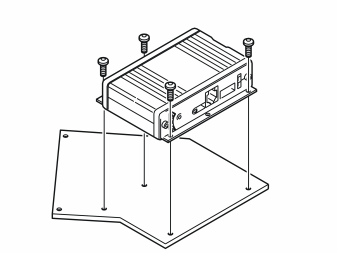
- Install the handsfree box on the bracket as illustrated.
Illustration B applies to Nokia
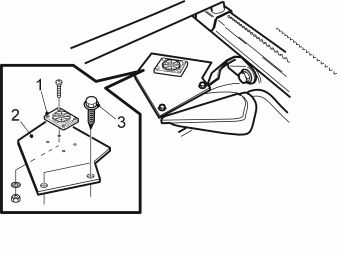
- Install the mounting (1) on the bracket (2) for the handsfree box
- Push the floor carpet to one side
- Screw the bracket into the existing holes under the floor carpet using the screw (3).
Illustration A applies to Ericsson
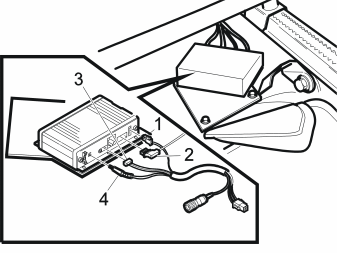
- Connect the wiring to the handsfree box as illustrated. Connect the 2-pin connector from the power supply cable (1) to the 4 pin connector, the 12-pin connector (2) for the carphone holder and the 5-pin (3) and 1 pin (4) connectors from the head restraint
- Screw the bracket with the handsfree box into the existing holes under the floor carpet.
Illustration B applies to Nokia
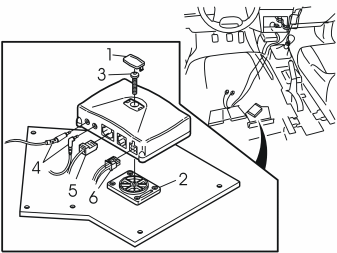
- Connect the wiring to the handsfree box as illustrated, from the head restraint (4), the carphone holder (5) and the radio (6)
- Remove the cover (1). Secure the hands free box on the mounting (2). Use the screw (3). Reinstall the cover (1).
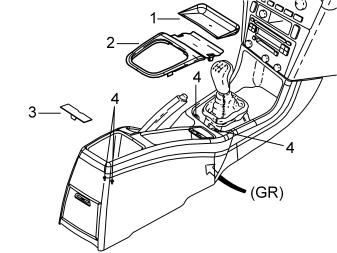
Applies to right-hand drive cars, (RHD)
- Remove the rubber mat (1)
- Remove the gear selector lever lock (2) by pressing in the centre of the catches. Applies to manual gearboxes: Press in the clips. Remove the boot
- Apply the handbrake
- Remove the cover (3) and the four screws (4)
- Disconnect the grey (GR) connector. Pull up the rear section of the centre console at the front edge
- Remove the rear section of the centre console completely.
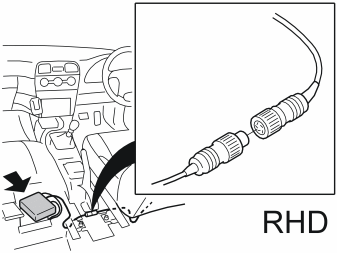
Applies to right-hand drive cars, (RHD)
- Route the cable from the driver's seat head restraint over the bracket. Connect the connector from the handsfree box
- Clamp the cable so that it is not trapped. Check that the driver's seat can be adjusted
- Reinstall the rear section of the centre console and the centre console locker.
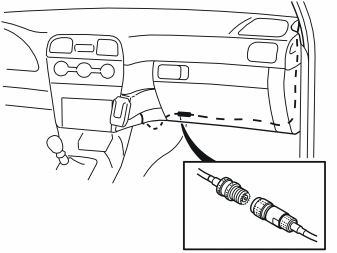
- Connect the antenna cable from the carphone holder to the antenna. Secure the cable using a tie strap.
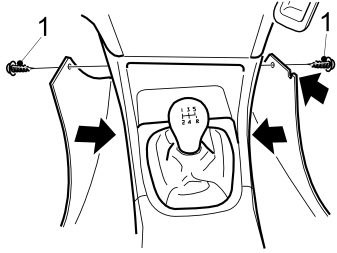
- File a cut-out in the side panel to a size suitable for the lead-in for the carphone cable as illustrated
- Reinstall the side panels on the centre console (passenger side and driver's side)
- Install and tighten the screw (1).
- Reinstall the passenger side soundproofing panel, centre console locker and radio
- Where applicable: Reinstall the radio and the centre console locker
- Where applicable: Reset the anti-theft radio code
- Check the function of the radio and the carphone.
Примечание: It must be possible to adjust the seat without stretching or breaking the cables.
Reducing noise and echoing
The Ericsson Handsfree GSM 628 and 688 contains a device which reduces buzzing and echoing which can interfere with carphone calls. To reduce buzzing and echoes, adjustments must be carried out until the required acoustics of the car are obtained. The adjustment occurs automatically during the test call and takes approximately 4 minutes. During this time buzzing and echoing can occur.
Примечание: The procedure to reduce buzzing and echoes must be carried out every time the power supply has been broken.