Примечание: The aerial is purchased and installed separately.
- Switch off the ignition
- Make a note of the radio code if applicable.
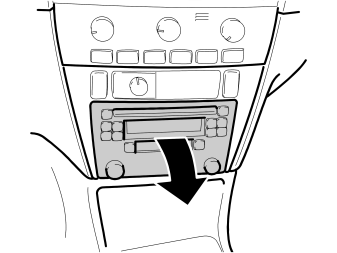
- Detach the radio by fully pressing in and releasing the latch handles
- Pull out the latch handles. Pull out the radio
- Disconnect the connectors. Remove the radio
- Where applicable: remove the storage compartment from the centre console.
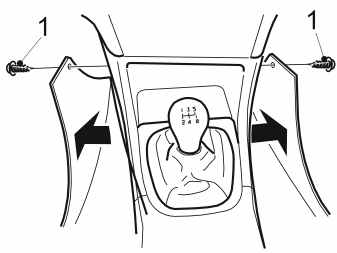
- Remove the screws (1)
- Remove the side panels from the centre console on the right and left-hand sides.
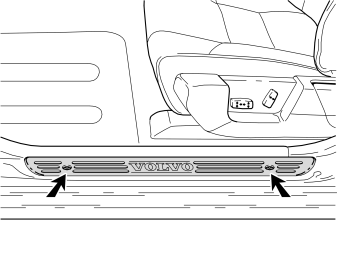
- Remove the rear sill trim panel for the left front door by removing the two screws and then pulling the panel upwards to detach it.
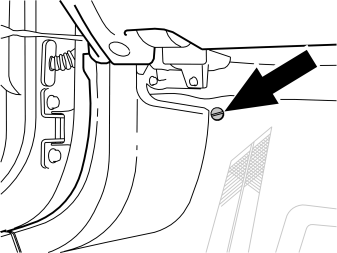
- Remove the front sill trim panel for the left front door by first unscrewing the clip at the front edge/inside and then pulling the rear edge upwards.
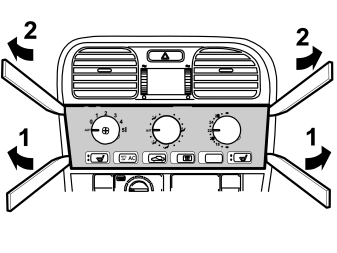
- Carefully insert the special tool (P/N 9814071) between the dashboard and the lower edges of the heater control panel. Pull the lower section of the heater control panel towards you
- Press the entire panel upwards slightly. Carefully pull the top edge of the panel towards you. Remove the panel.
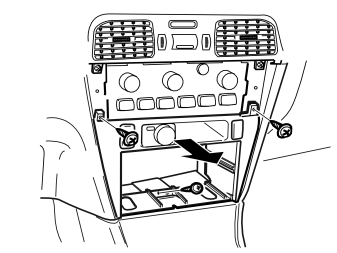
- Remove the three retaining screws for the radio tray
- Where applicable: disconnect the connectors
- Remove the radio tray.
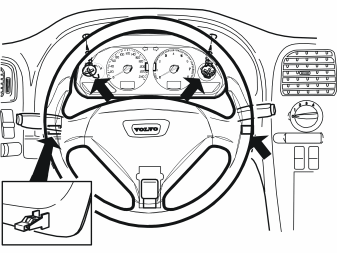
- Fully lower the steering wheel
- Remove the two screws at the top edge of the surround for the combined instrument panel
- Pull off the surround and place it to one side. It is secured by a clip on each side of the lower edge.
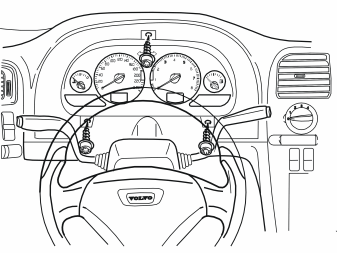
- Remove the three screws for the combined instrument panel Push the combined instrument panel to one side so that the hole at the rear right edge is accessible. Do not scratch the glass on the combined instrument panel.
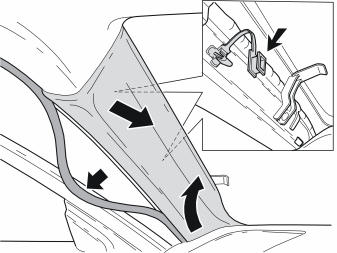
- Remove the weatherstrip for the door at the A-post
- Remove the panel from the A-post
- Unhook two clips from the panel
- Remove the panel.
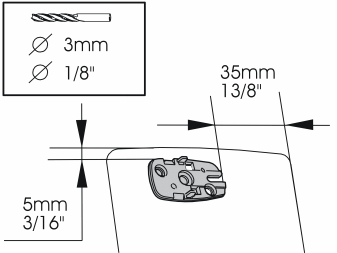
- Take the mounting plate from the kit. Position the mounting plate on the top end of the A-post panel. See the illustration. If the microphone is already installed in the mounting plate, remove it. It is secured by two hooks on the long sides
- Mark out and drill the holes for the mounting plate. Use a 3 mm (1/8”) diameter drill bit
- Remove any swarf.
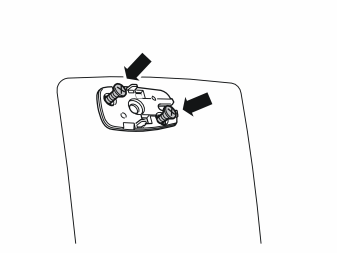
- Install the mounting plate on the A-post panel using two screws from the kit.
Осторожно: The inflatable curtain (IC) is located inside the A-post panel. It is important to file off the screws securing the mounting plate if necessary, so that they just fit through the panel.
- Check how much of the screws protrudes on the reverse. Unscrew the screws. File off the screws to the correct length
- Reinstall the screws.
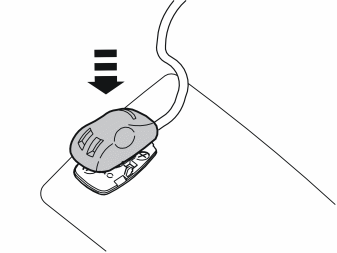
- Press the microphone from the kit into place on the mounting plate.
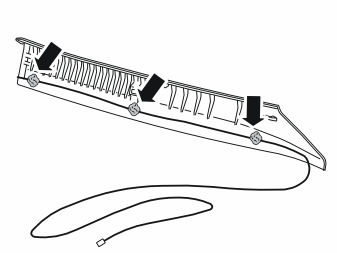
- Route the microphone cable on the inside of the A-post panel. Secure the cable using pieces of butyl tape.
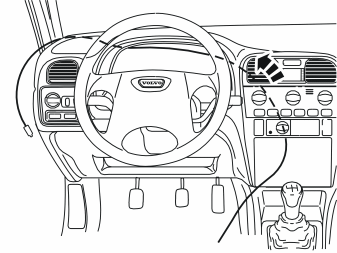
- Insert a wire coil in the dashboard, from the centre console and out at the A-post.
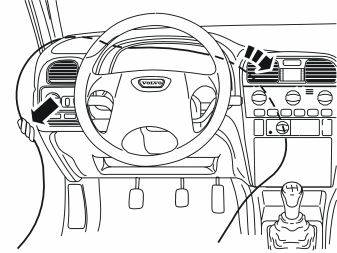
- Tape the microphone cable connector to the wire coil. Route the whole cable to the centre console
- Disconnect the connector from the wire coil.
Примечание: Ensure that the microphone cable is positioned so that there is no risk of it catching or rubbing.
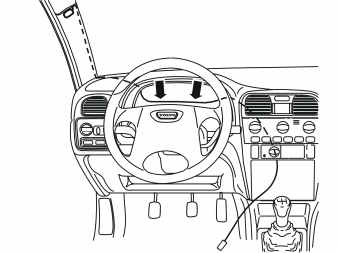
- Tape the microphone cable into place on top of the combined instrument panel. Use pieces of butyl tape
- Reinstall the A-post panel. Ensure that the microphone cable is not trapped
- Press the rubber strip into the door opening
- Reinstall the combined instrument panel
- Reinstall the combined instrument panel surround.
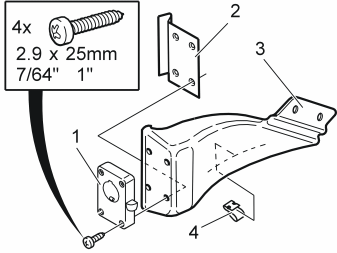
- Install the mounting plate (1) and the metal bracket (2) on the plastic bracket (3)
- Secure the clip (4) on the underneath of the plastic bracket. Do not tighten the screws.
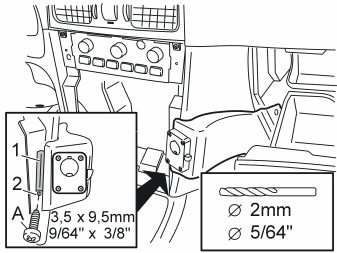
- Open the glove compartment
- Position the plastic bracket next to the centre console
- Adjust the height of the plastic bracket so that it follows the shape of the centre console. Check that the glove compartment does not catch
- Mark out the underside (2) of the metal bracket (1)
- Remove the plastic bracket
- Drill using a 2 mm (5/64”) drill bit as marked
- Install the stop screw (A) in the drilled hole. Leave approximately 2 mm (5/64”) of the threads visible.
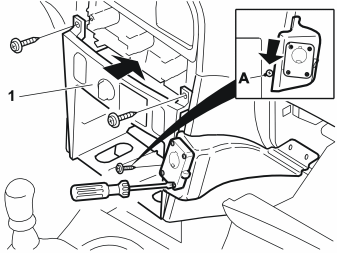
- Reinstall the radio tray (1)
- Hook the plastic bracket into place at the radio tray (1) so that the metal bracket is on the reverse of the radio tray
- Screw the radio tray (1) into place. Press down the plastic holder towards the stop screw (A) behind the centre console to obtain the correct position
- Tighten the screws for the mounting.
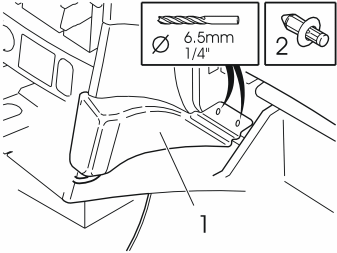
- Press the plastic bracket (1) towards the dashboard
- Drill a hole using a 6.5 mm (1/4”) diameter drill bit. See the illustration. Install the two clips (2)
- Reinstall the panel for the rear heater control
- Check that the glove compartment can be closed.
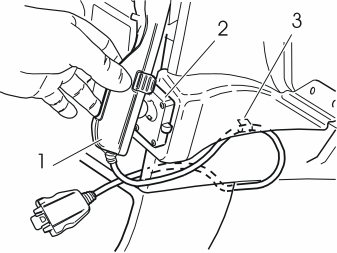
- Press the carphone holder (1) onto the mounting plate (2)
- Route the cable from the carphone holder under the plastic bracket to the centre console as illustrated. Secure the cable in the clip (3) on the plastic bracket.
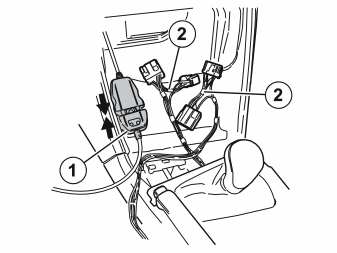
- Take the black joint cable (1) for the handset cradle from the kit. Connect the cable from the handset cradle which was routed earlier
- Take the large cable harness from the kit. Position the grey (2) and the green (2) connectors in the space for the radio.
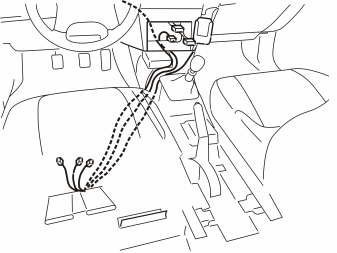
- Move the left front seat to the rearmost position
- Push the carpet to one side at the centre console and pull it away from the floor
- Pull down the cable for the microphone, the cable for the handset holder and the cable harness for the radio, along the inside of the left of the centre console. Continue down under the floor carpet and out at the air vent as illustrated.
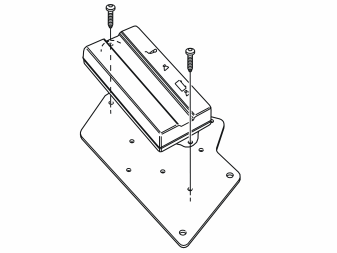
- Take the hands free box, the bracket and the screws from the kit. Tighten the hands free box at the bracket in the position illustrated.
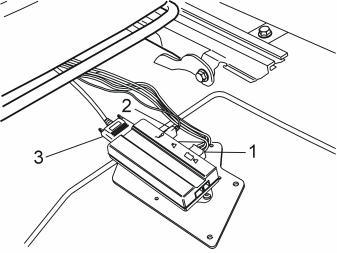
- Slide the driver's seat as far forward as possible
- Connect the cables routed from the centre console to the hands free box as follows:
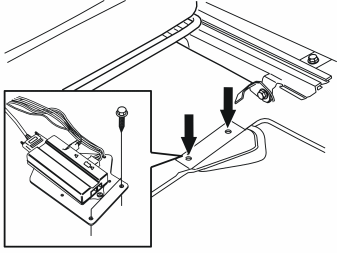
- Push the cut carpet to one side behind the driver's seat. Tighten the bracket and the hands free box in the existing holes in the member. Use two screws from the kit
- Fold the carpet back into position at the rear edge. Hide the cable excess under the carpet at the front.
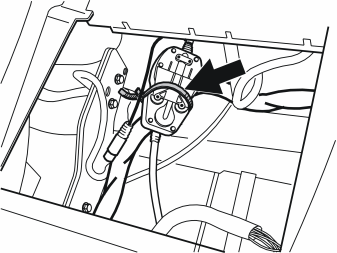
- Use a tie strap from the kit. Position the joining connectors along the thick cable harness as far forwards and to the upper left of the centre console as possible to prevent radio interference
- Secure the joining connectors using the tie strap so that they will not rattle.
Illustration A
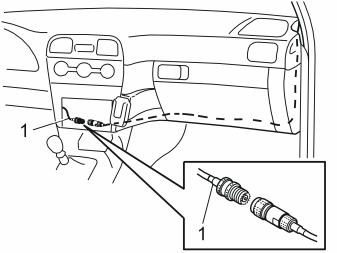
- Connect the connector (1) from the extension cable for the handset cradle to the car aerial. The aerial is installed according to the separate instructions.
Illustration B
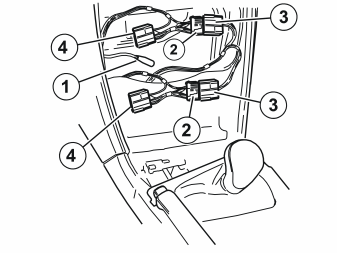
- Connect the connectors (2) for the new large cable harness to the corresponding connectors (3) that were disconnected from the radio
- Connect the connectors (4) to the radio
- Connect any other connectors removed from the radio. Reinstall the radio.
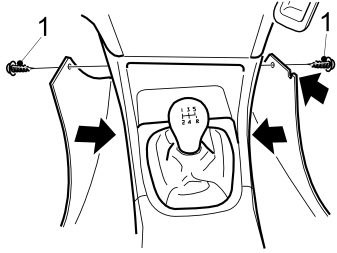
- File a cut-out in the side panel to a size suitable for the lead-in for the carphone cable as illustrated
- Reinstall the side panels for the centre console on the right and left-hand sides. Install and tighten the screws (1)
- Reinstall the sill trim panels in the front door
- Where applicable: Reinstall the centre console locker
- Where applicable: Reset the anti-theft radio code
- Check the function of the radio and the carphone.
Обсуждение и оценка
0Пока нет комментариев. Будьте первым.