Применимость
| Модель | Двигатель | Год |
|---|---|---|
| XC90 | B6294T | 2003–2006 |
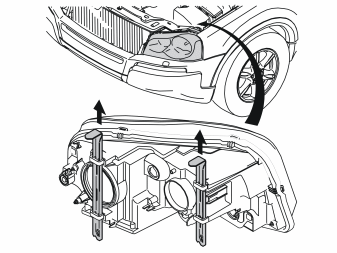
- Remove the left-hand headlamp by pulling up the two cotter pins and then carefully pulling the headlamp forwards.
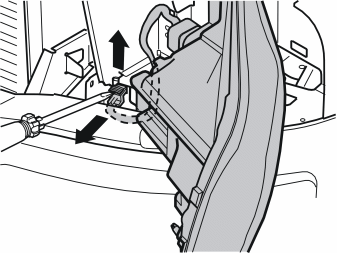
- Carefully pry up the catch on the connector for the headlamp using a screwdriver
- Pull up the catch completely, disconnect the connector. Place the headlamp to one side.
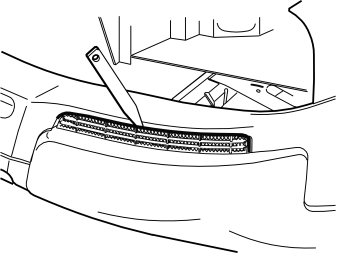
- Carefully pry up the left-hand grille on the bumper up using a weatherstrip tool. Remove the grille.
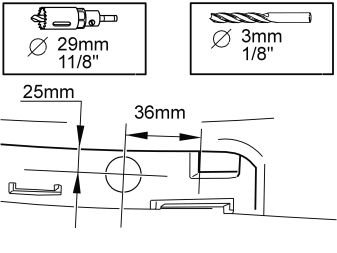
- Measure for drilling out the hole for the front engine block heater socket as illustrated
- Pre-drill the hole using a 3 mm (1/8”) diameter drill bit
- Drill out the hole. Use a 29 mm (1 1/8”) diameter hole saw
- Remove any swarf.
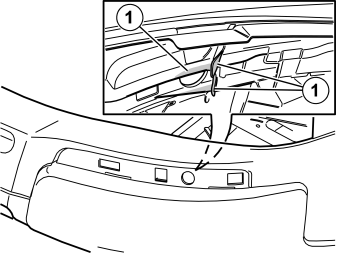
- Cut the tabs (1) using a utility knife so that they are the same height. This ensures a flat surface to tighten the plastic nut for the front engine block heater socket against.
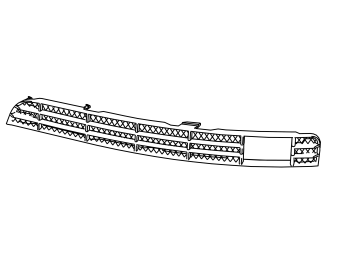
- Make a cut out for the connector for the front engine block heater socket in the second hole from the left in the left-hand bumper grille
- Smooth off the edges
- Press the grille into the bumper.
Illustration A
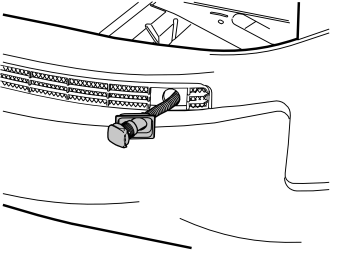
- Take the front engine block heater socket, protective cover and plastic nut from the kit
- Install the protective cover on the front engine block heater socket connector. Turn the connector so that the cover opens on the left-hand side of the car as illustrated.
Illustration B
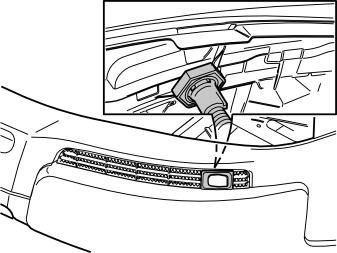
- Install the plastic nut
- Tighten the plastic nut properly. Connect the cable to the front engine block heater socket to use as a counterhold when tightening the plastic nut
- Insert the front engine block heater socket ground lead on the left-hand side of the left-hand side member.
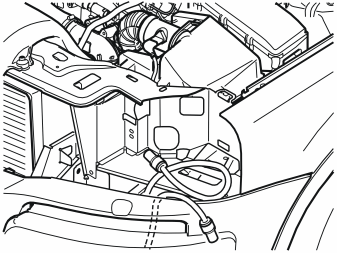
- Insert the extension cable (1) (from the kit) on the left-hand side of the left-hand side member as illustrated
- Remove the cover on the expansion tank for the radiator.
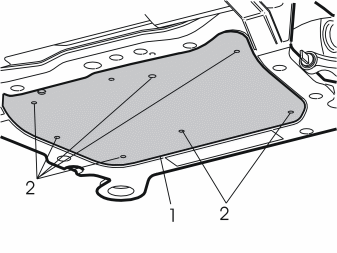
- Remove the engine splash guard (1) by first removing the screws (2).
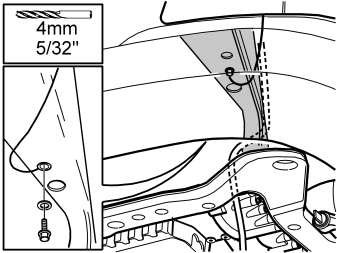
- Drill a hole at the front edge/lower edge of the side member using a 4 mm (5/32") diameter drill bit
- Rust-proof and secure the ground lead using the included 4.8 mm (3/16") diameter flanged screw and toothed washer (under the screw head).
Примечание: Connect the ground lead to the side member, not to the sub-frame.
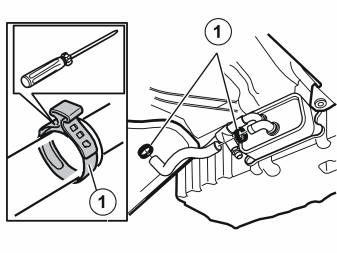
- Remove the draining nipple on the hose to the left of the oil cooler. Drain the coolant
- Remove the clamps (1) on the lower hose on the oil cooler. Remove the hose. Place the hose to one side. It will not reused.
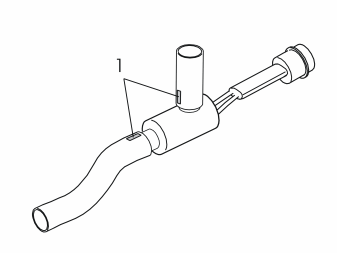
- Install the hoses (from the kit) on the heater. Align the white markings (1) with each other as illustrated.
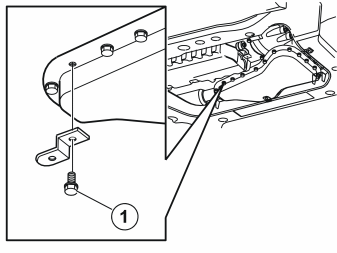
- Remove the screw (1) in the bottom cover on the right front corner of the gearbox
- Tighten the small bracket (from the kit) using the screw to the gearbox as illustrated. Tighten the screws. Tighten to 10 Nm (7 lbf. ft.).
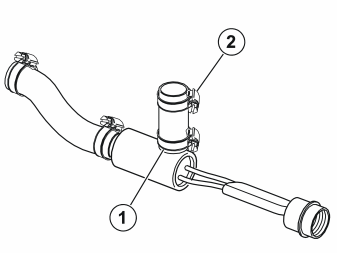
- Position the four hose clamps (from the kit) on the hoses and heater
- Tighten the hose clamp (1). Position the hose clamp (2) as illustrated. Tighten the hose to the oil cooler.
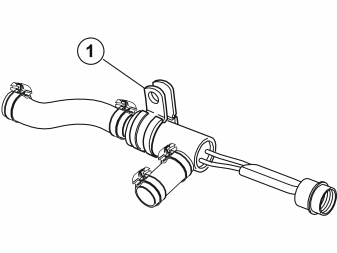
- Position the rubber coated clamp (1) (from the kit ) on the heater as illustrated.
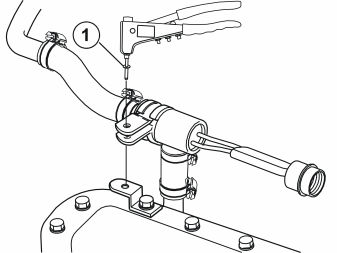
- Install the heater with the hoses to the oil cooler pipe
- Take a blind rivet (1) from the kit. Blind rivet the rubber coated clamp with the heater to the bracket in the bottom cover of the gearbox
- Tighten the remaining hose clamps to the heater and oil cooler pipe.
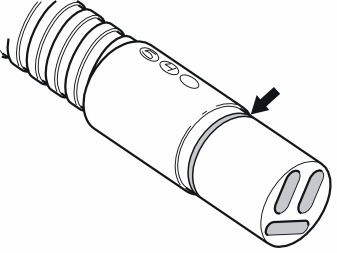
- Route the previously routed extension cable inside the front left corner. Grease the O-ring on the switch using low temperature grease, (P/N 1161417-9).
Примечание: Do not get any grease on the contact surfaces of the connector.
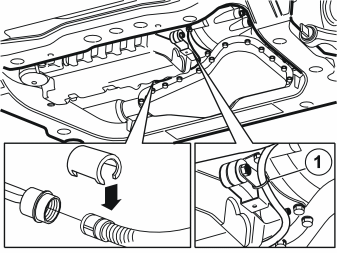
- Connect the extension cable to the engine block heater
- Press a locking sleeve (from the kit) over the cable splice
- Tighten the cable as illustrated. Secure the cable using a tie strap from the kit at position (1) as illustrated.
- Grease the O-ring on the switch for the front engine block heater socket using low temperature grease, (P/N 1161417).
Примечание: Do not get any grease on the contact surfaces of the connector.
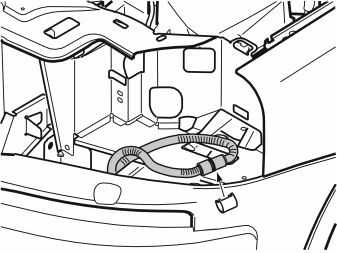
Applies to cars where only a single engine block heater is to be installed
- Connect the front engine block heater socket cable to the extension cable (routed earlier)
- Press a locking sleeve (from the kit) over the cable splice.
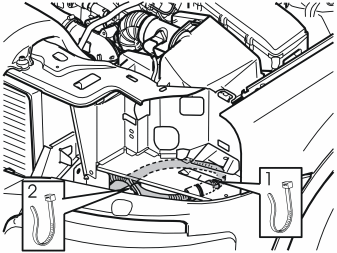
Applies to cars where only a single engine block heater is to be installed
- Position the cable terminal on the underneath of the plate under the headlamp. Secure at points (1) and (2). Secure the ground lead at point (2) using tie straps from the kit.
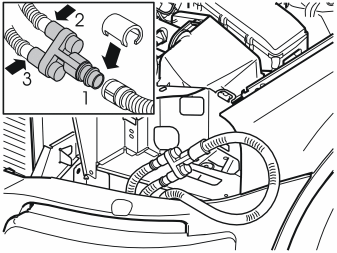
Applies to cars where the engine block heater and passenger compartment connector socket must be mounted at the same time
- Grease the O-rings on the cable for the front engine block heater socket and connections on the junction connector. Use low temperature grease, (P/N 1161417-9) as before.
Примечание: Do not get any grease on the contact surfaces of the connector.
- Connect the front engine block heater socket cable to socket (1) on the junction connector
- Connect the wiring for the engine block heater and passenger compartment connector socket to either socket (2) or (3) on the junction cable
- Press the three locking sleeves (from the kit) over the cable splices.
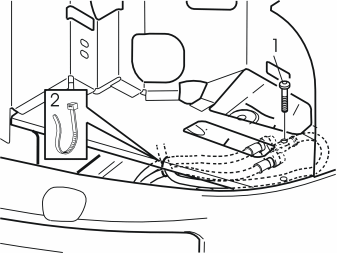
Applies to cars where the engine block heater and passenger compartment connector socket must be mounted at the same time
- Position the junction connector with the wiring on the underneath of the plate under the headlamp, with the two sockets pointing forward and the cable from the front engine block heater socket pointing backward
- Take the screw and the nut from the kit. Tighten the junction connector in the hole in the plate (1)
- Take a tie strap from the kit and secure the wiring at point (2).
- Connect the connector to the headlamp and reinstall the headlamp
- Fill with coolant. Test drive the engine. Bleed the system. Check for leakage
- Reinstall the engine splash guard. Tighten the screws for engine splash guard. Tighten to 25 Nm (19 lbf. ft.).
Обсуждение и оценка
0Пока нет комментариев. Будьте первым.