Применимость
| Модель | Двигатель | Год |
|---|---|---|
| C70 (06-) | — | 2006–2008 |
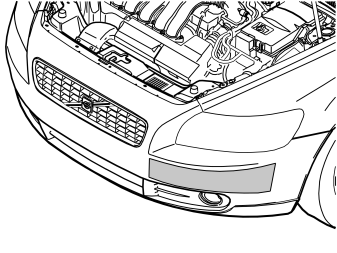
- Install the protective film along the outside of the bumper's left-hand corner.
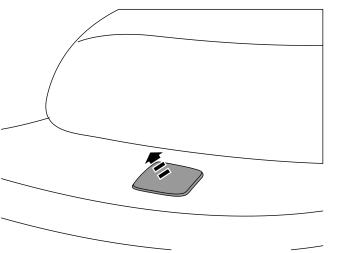
- Remove the covers for the nozzles for the headlamp washers on the right and left-hand sides. Carefully grip the cover. Pull the cover out until the catch becomes accessible.
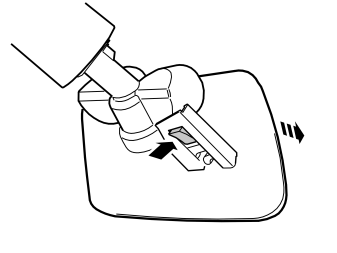
- Press the catch up. Remove the cover. Do not damage the painted surfaces or the washer nozzles.
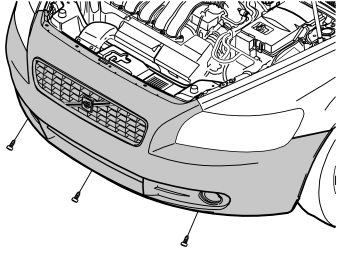
- Remove the screws to the air baffle.
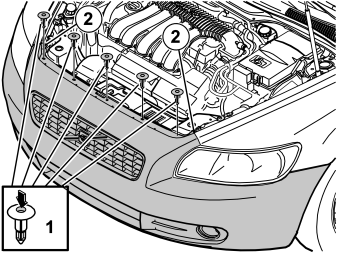
- Press in the centre of the clips (1) and remove them. Remove the screws (2).
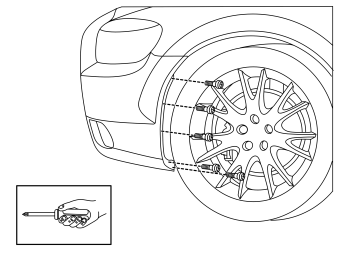
- Remove the left and right-hand front wheels.
- Remove the five screws holding the bumper cover in the wing liner on the left and right-hand sides.
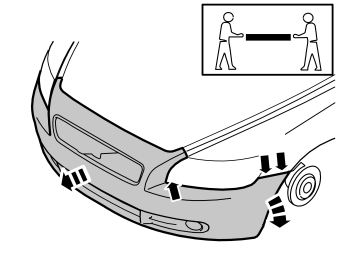
- Detach the right and left-hand ends of the bumper.
- Grip the bumper from the inside and pull it forward in order to detach the two holders under the headlamps.
- Remove the bumper, unplug the connectors for the fog lamps and place the bumper on a surface that does not damage the paintwork.
Подсказка: Removal of the bumper is facilitated if carried out by 2 people.
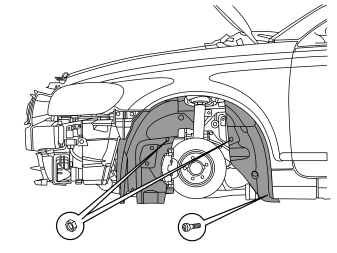
- Unscrew and remove the bolt and nuts securing the wing liner.
- Remove the wing liner.
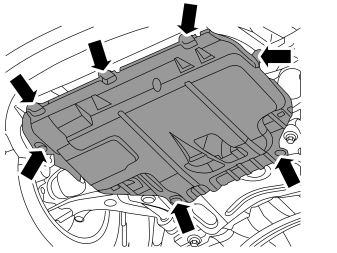
- Remove the screws holding the engine splash guard and remove the guard.
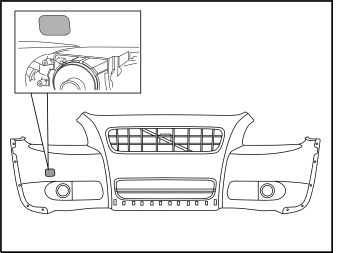
- Locate the pre-marking on the inside of the bumper cover on the left-hand side of the car.
- Drill using a Ø 10mm (3/8") diameter drill bit inside the 4 corners of the pre-marking.
- Take a sharp knife and carefully cut out the pre-marked area in the bumper cover on the left-hand side of the car.
Примечание: Cut carefully. It is easy to slip with the knife and move outside the markings.
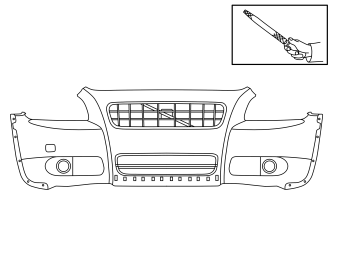
- Remove swarf and smaller irregularities with a file. Do not damage the paintwork and follow the pre-marking accurately.
- Install the box for the front engine block heater socket from the kit. Check that it aligns. Adjust the hole using a knife or file as necessary.
- File down the edges of the holes.
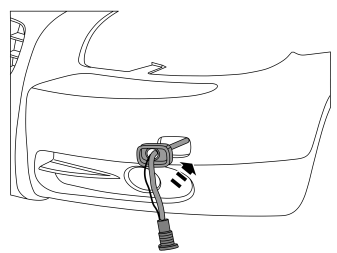
- Take the cable harness with front socket and box from the kit.
- Route the cable through the box and fit the connector.
- Pull in the cable and align the box in the hole made in the bumper.
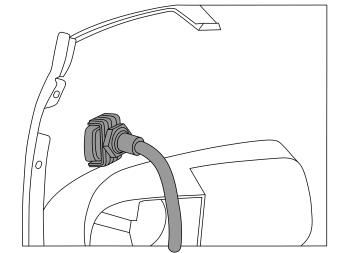
- Take the bracket and the large plastic nut from the kit and thread the cable harness through them.
- Pull forward the bracket to the inside of the bumper and tighten the box with the large plastic nut. Plug the electrical connector into the front socket as a counterhold for when the latter is tightened.
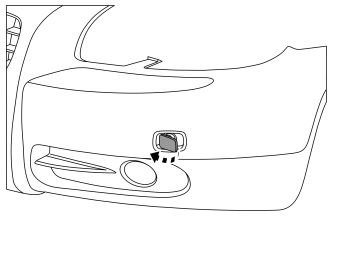
- Check that the connector cover works as intended.
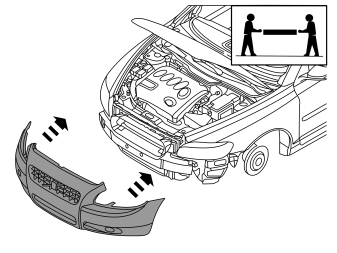
- Reinstall the bumper cover. Use the five clips and the two screws at the top edge. Ensure that the air baffle is correctly positioned in its mounting.
- Press in so that the clips under the headlamps fasten.
- Reinstall the connectors for the fog lamps if fitted.
- Press the ends of the bumper cover into place on the body.
Подсказка: Installation of the bumper is facilitated if carried out by 2 people.
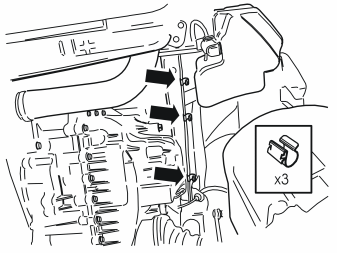
- Install three clips on the panel edge on the underside of the left-hand front member.
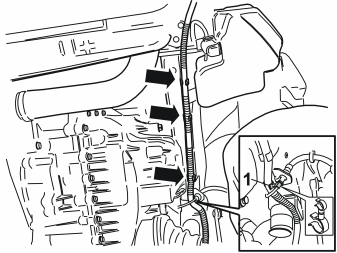
- Route the cable for the front socket from the front edge of the washing fluid reservoir, on along the lower edge of the front member and up over the drive shaft. Guide the cable up slightly in the engine compartment.
- Press the cable into the previously installed clips.
- Clamp the cable into the brake pipe with a double clamp (1).
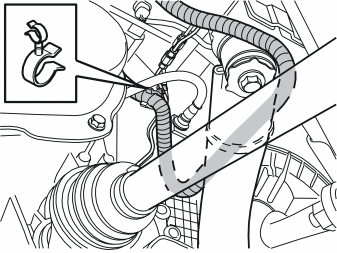
- Clamp the electrical cable into the lower of the two horizontal brake pipes at the top edge of the cowl panel using a double clamp.
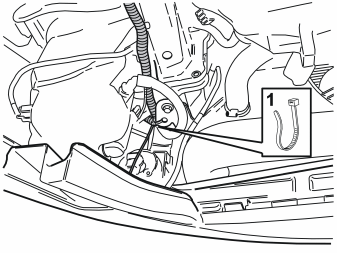
- Clamp the electrical cable into the hole in the bracket for the radiator's left-hand lower mounting using a tie strap (1).
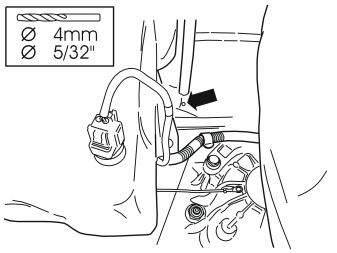
- Drill a hole for the mounting of the ground lead on the outside of the left-hand front member.
- Treat the edges of the holes using a rust-proofing agent.
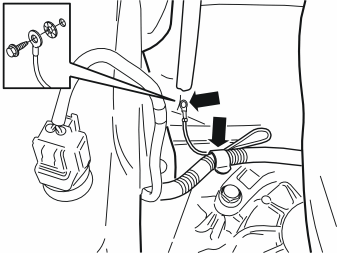
- Install the ground lead in the drilled hole using a screw and toothed washer.
- Affix the excess length of ground lead at the existing clips.
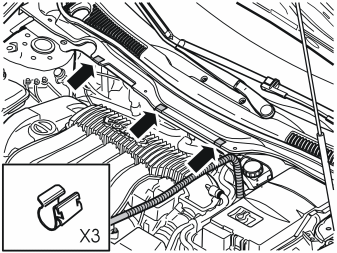
- Install three clips on the front edge of the panel above the windscreen wiper motor.
- Guide the cable up to the top of the engine compartment to the position illustrated.
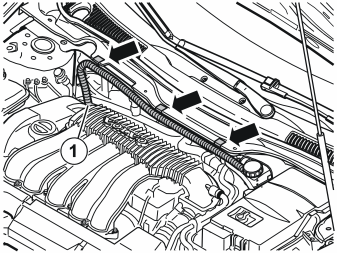
- Press the cable into the clips.
- Guide the cable down to point (1) and route it down through the engine compartment (behind the AC pipes), down to the stay in the right-hand link arm mounting.
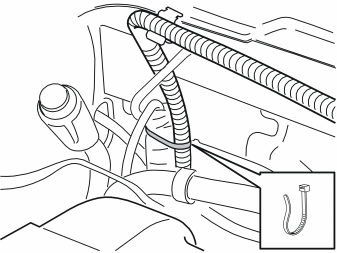
- Clamp in the cable, from the top of the engine compartment and down, using a tie strap at existing cables and pipes.
Примечание: The cable must not be clamped in so that it is in direct contact with AC, fuel or brake pipes.
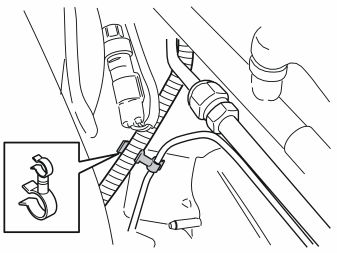
- Clamp the cable in using a double clamp as illustrated.
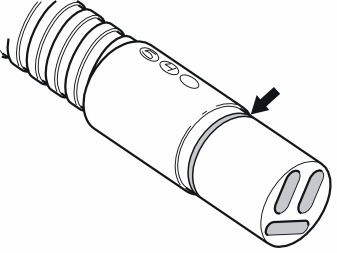
- Grease the O-rings on all of the engine block heater's cables, and if the car shall be equipped with a passenger compartment connector socket, all of the O-rings on its cables. Use low temperature grease (P/N 1161417-9).
Примечание: Do not get any grease on the surfaces of the connector.
Applies to cars where the engine block heater and passenger compartment connector socket are installed at the same time.
- Follow the installation instructions for the passenger compartment connector socket.
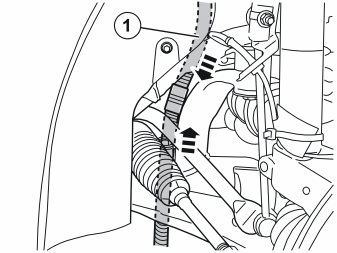
- Take the short cable from the kit and connect it to the routed cable (1) from the front socket.
- Firmly press the cable junction together.
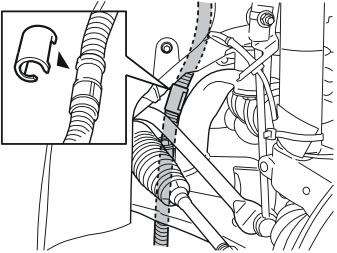
- Press in a locking sleeve over the cable splice.
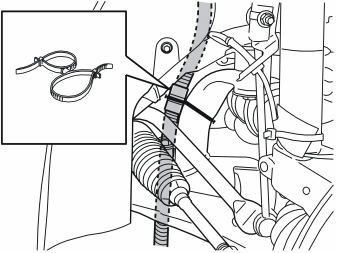
- Install a double tie strap around the subframe's bracket and cable splice. Make sure that the cable splice is secured in the centre of the bracket and tighten the double clamp thoroughly.
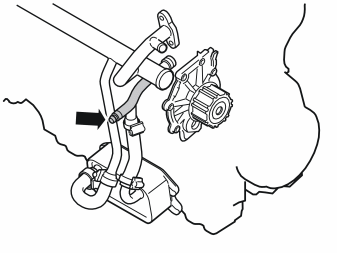
- Install a hose on the engine block drain nipple for coolant, open the nipple and drain the coolant into a collection container. Close the nipple and remove the hose.
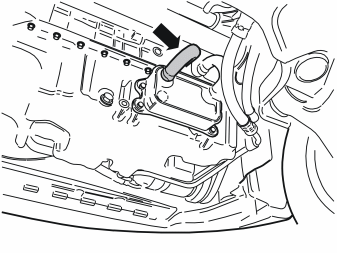
- Remove the clamps and cooler hose from the oil cooler and radiator pipe. Place these to one side, they shall not be used again.
Illustration A
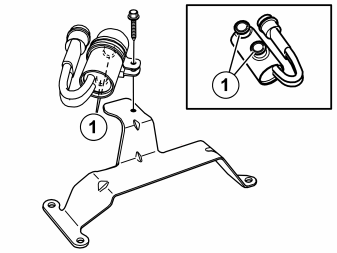
- Take the engine block heater, rubber coated clamp and bolt from the kit and install the engine block heater on the bracket in the position illustrated. Do not tighten the bolt yet.
Illustration B
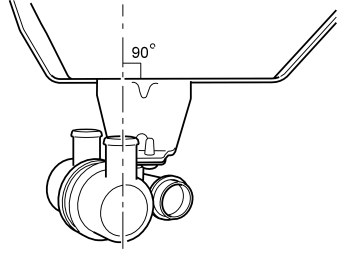
- The engine block heater's short pipes must be at right-angles to the long side of the bracket.
Illustration C
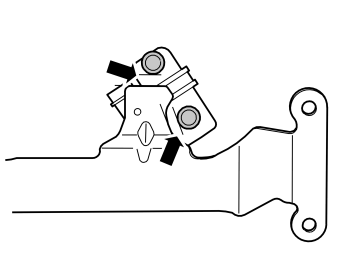
- Make sure that the distances between the short pipes and the bracket are equal.
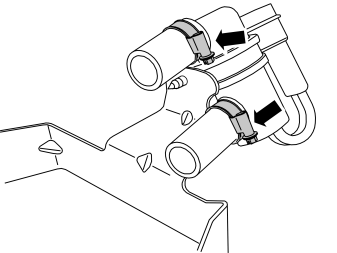
- Take two short heater hoses and four hose clamps from the kit.
- Install the two hoses to the engine block heater with the shortest hose on top.
- Tighten the hoses to the engine block heater using the hose clamps located as illustrated.
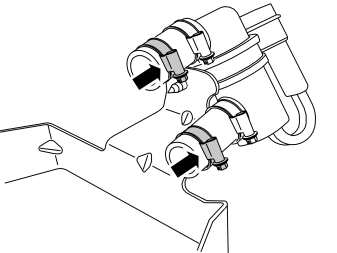
- Fit the two remaining hose clamps onto the engine block heater hoses as illustrated.
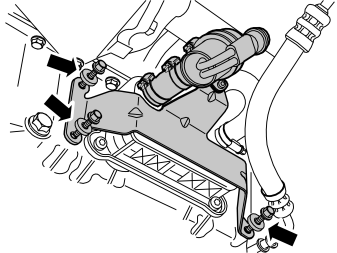
- Guide the engine block heater up into position behind the oil cooler and install the engine block heater hoses onto the outlet to the oil cooler and the pipe to the oil cooler.
- Take the three self-tapping screws and the three spacer washers from the kit and tighten the console with the engine block heater to the rear edge of the oil sump.
Примечание: The screws are self-tapping so it may be slow inserting them. Make sure that the screws are centred straight into the holes, so that the screw heads are flat against the bracket.
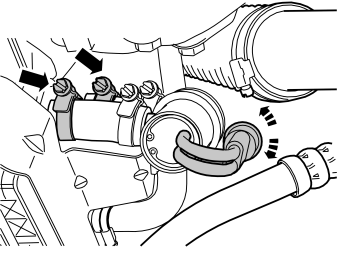
- Tighten the two loose hose clamps and adjust the position of the engine block heater connector so that it does not make contact with the servo hose or charge air hose.
- Tighten the engine block heater firmly to the bracket.
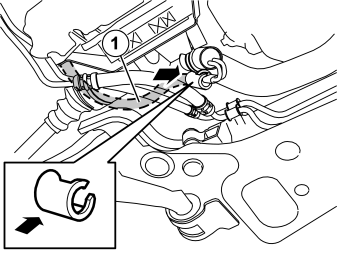
- Connect the short electrical cable (1) that was routed earlier, to the engine block heater. Press it firmly into the engine block heater connection.
- Press in a locking sleeve from the kit over the cable splice.
Illustration A
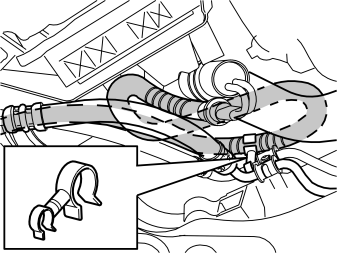
Illustration B
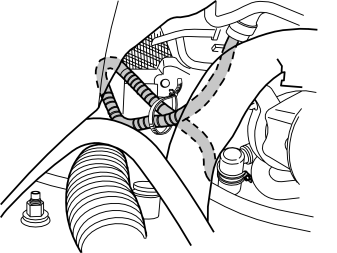
- The cable between the engine block heater and the cable splice on the stay to the subframe has a certain excess and must be clamped together: take a double clamp and tie strap from the kit and clamp up the excess cable as shown in illustrations A and B.
- Reinstall the left-hand wing liner and tighten it in.
- Tighten the two wing liners to the bumper cover on the right and left-hand sides.
- Refill the drained coolant, run the engine to operating temperature, bleed the cooling system and check that there is no leakage.
- Reinstall the engine splash guard.
- Refit the front wheels. Tighten the wheel nuts alternately. Tighten to 90 Nm (66 lbf.ft.).
Обсуждение и оценка
0Пока нет комментариев. Будьте первым.