Points 1-4 apply to the S80
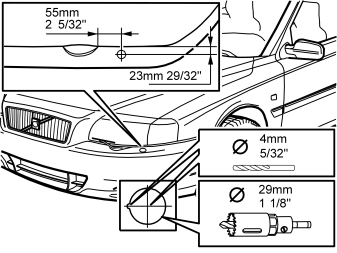
- Secure the template sticker. Use the template to mark up the bumper for holes
- Drill a hole using a4 mm (5/32")diameter drill bit
- Drill a hole at right-angles to the surface. Use a29 mm (1 1/8")diameter hole saw
- Adjust the guide hole using a round file
- Also adjust the lead-in hole if necessary.
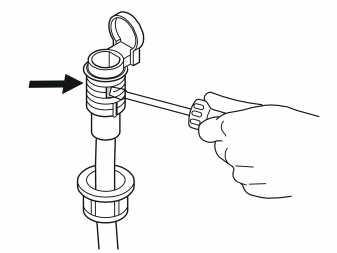
- Open the drain holes on both sides. Use a screwdriver and press in by hand at the markings.
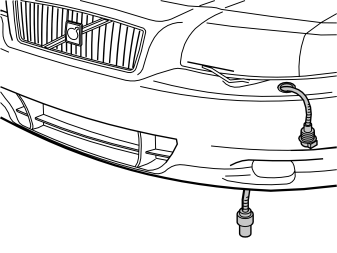
- Install the expander nut in the hole, with the locating pin in the guide hole
- Route the cable, including the ground lead, from the front socket from above and downwards. Let the cables hang down to the ground.
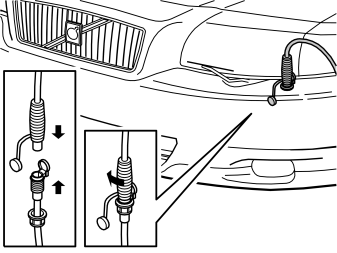
- Connect the cable to the front engine block heater socket
- Press downwards and turn the cable clockwise so that the expander nut expands
- Align the cable from the front socket so that the hinge is pointing towards the headlamp
- Remove the connection cable.
Points 5-9 apply to V70 XC
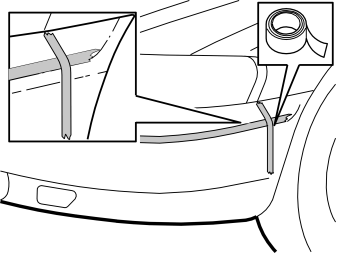
- Clean the bumper cover where the two pieces of tape will be secured
- Install the two pieces of tape to mark up the holes for the engine block heater connector (use thin tape). Secure one piece of tape at the rear edge, under the corner of the indicator lamp, vertically down. Position the underside of the second piece of tape along the upper radius of the bumper cover as illustrated.
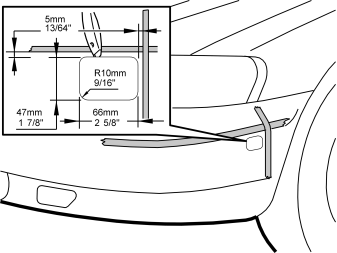
- Mark up a rectangle on the inside of the corner where the two pieces of tape intersect. See the measurements in the illustration. The distance from the edges of the tape must be 5 mm (13/64")
- Apply tape to the surface of the bumper which is to be cut. This is to protect the bumper skin
- Carefully cut out the bumper cover. Follow the markings. Use a utility knife or similar
- Even off the edges.
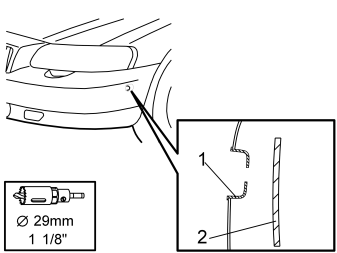
- Remove the pieces of tape
- Take the protective cover (1) for the front engine block heater socket from the kit. Press the protective cover into the cut-out. Ensure that the section of the cover where the hole is nearest the edge is pointing forwards
- Mark out the hole in the bracket (2) inside the bumper cover. Use a29 mm (1 1/8")diameter hole saw without the central drill bit
- Remove the protective cover. Drill out the hole using a29 mm (1 1/8")diameter hole saw
- Remove any swarf.
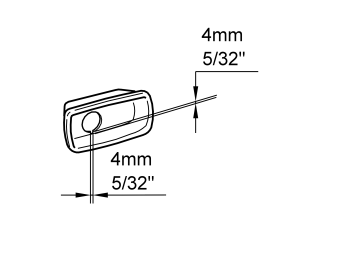
- File out a small 4 x 4 mm (5/32" x 5/32") cut out in the lower edge of the hole in the protective cover. The hole is intended for the lug on the expander nut. This is used to secure the front engine block heater socket
- Reinstall the protective cover.
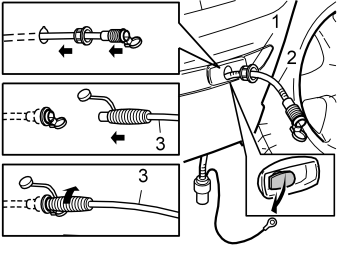
- Install the expander nut (1) in the hole
- Thread the cable supplied (2), including the ground lead, through the hole
- Take the connection cable (3) from the kit. Assemble it using the cable at the expander nut. Screw clockwise so that the expander nut expands
- Remove the connection cable.
Примечание: Ensure that the drainage hole for the front engine block heater socket is open.
Applies to all models and engine variants, except diesel (TDI)
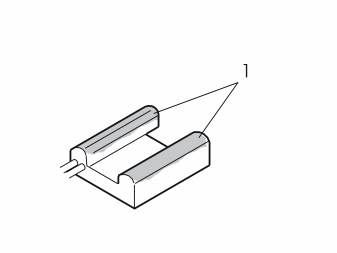
- Apply heat conducting paste (P/N 9499205) to the surfaces (1) of the heater body which are in contact with the cylinder block.
Points 11-13 apply to all models
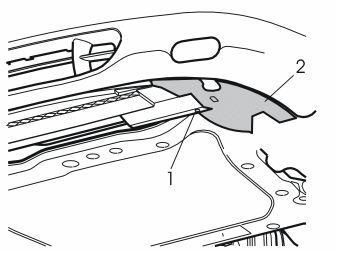
- Raise the car
- Remove the screw (1) from the left air baffle (2) for the front brake
- Pull the left air baffle backwards. Remove the left air baffle
- Remove the right air baffle in the same way.
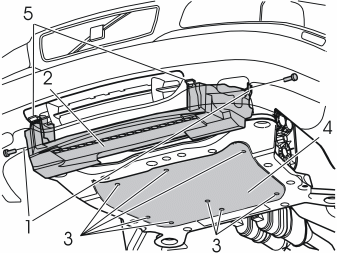
- Remove the screws (1). Remove the air baffle (2)
- Remove the screws (3). Remove the splash guard (4).
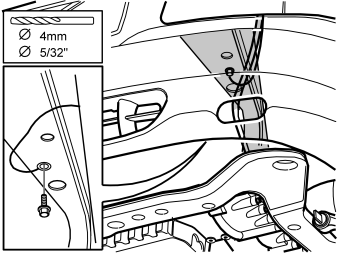
Ground terminal for the cable under the member
- Drill a hole using a4 mm (5/32")diameter drill bit
- Rust-proof and secure the ground lead using the4.8 mm (3/16")diameter flanged screw and toothed washer included.
Примечание: Connect the ground lead to the side member, not to the sub-frame.
- Secure any excess ground lead using new tie straps.
Points 14-15 apply to cars with five cylinder engines and a stay for the turbocharger (TC)
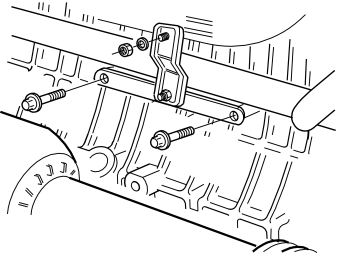
- Remove the stay.
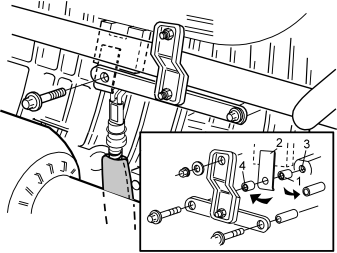
- Clean the area where the heater will be installed. This ensures optimal heat conduction to the cylinder block. Also clean the internal thread
- Thread the radiated heat shield over the cable for the heater
- Take the locking sleeve and the cable for the heater from the kit. Connect the cable to the heater. Install the locking sleeve over the joint on the cable
- Install the heater on the cylinder block. See the illustration
- Install the spacer washer (1), t=10 mm / 25/64", between the tensioner (2) and the mounting (3) in the cylinder block
- Install the outer spacer washer (4), t=32 mm / 1 1/4", between the stay and the tensioner (2)
- Screw the heater into place. Use the screw from the kit. Tighten to16 Nm (12 lbf.ft.).
Points 16-18 only apply to TDI engines and immersion heaters
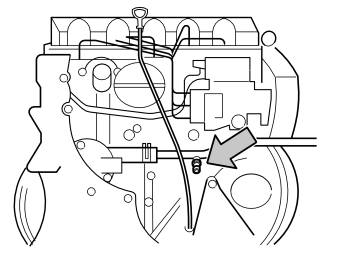
- Open the cover for the radiator expansion tank
- Position a container under the engine. Open the coolant drain cock
- Drain the coolant. Close the drain cock.
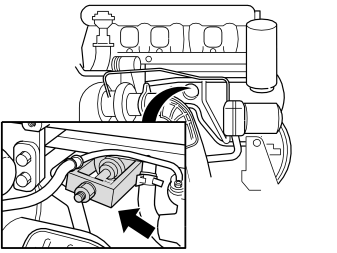
- Pull out the core plug located in the middle of the cylinder block. Use an extractor.
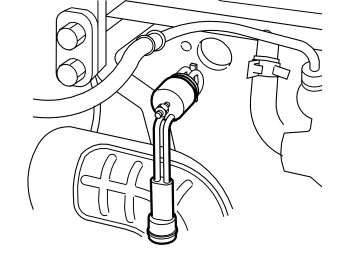
- Thread the O-ring on to the heater
- Lubricate the O-ring using low temperature grease, (P/N 1161427)
- Screw the immersion heater into the cylinder block. Tighten to3.5 Nm (2.6 lbf.ft.)
- Take the locking sleeve and the cable for the heater from the kit. Connect the cable to the heater. Install the locking sleeve over the joint on the cable
- Secure the cable to the pipe on the right-hand side at the rear edge of the sub-frame. Use a tie strap from the kit.
Примечание: Wiring must not be secured to the drive shaft, air conditioning (A/C) pipes, fuel pipes or brake pipes. Ensure that the secured wiring is not rubbing against any sharp edges and that it is not too close to the turbocharger (TC) or exhaust pipe (to prevent damage from radiant heat).
Applies to cars with five cylinder engines without a stay for the turbocharger (TC)
Illustration A
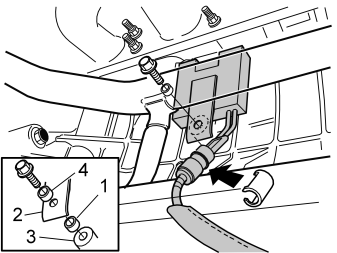
- Clean the area where the heater will be installed. This ensures optimal heat conduction to the cylinder block. Also clean the internal thread
- Thread the radiated heat shield over the cable for the heater
- Take the locking sleeve and the cable for the heater from the kit. Connect the cable to the heater. Install the locking sleeve over the joint on the cable
- Install the heater on the cylinder block. See the illustration
- Install the spacer washer (1), t=10 mm / 25/64", between the tensioner (2) and the mounting (3) in the cylinder block
- Install the outer spacer washer (4), t=32 mm / 1 1/4", outside the tensioner (2)
- Screw the heater into place. Use the screw from the kit. Tighten to16 Nm (12 lbf.ft.).
Illustration B
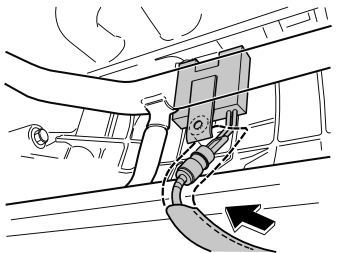
- Pull the radiated heat shield all the way up to the engine block heater so that the cable splice and the plastic surround are completely covered.
Примечание: It is important that the radiated heat shield covers the entire joint cable to the engine.
- Secure the radiated heat shield around the cable to the engine block heater. Use a grey, heat resistant tie strap and clamp the bottom edge of the radiated heat shield.
Applies to the S80 with six cylinders and automatic gearbox
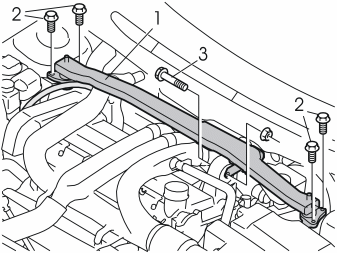
- Detach the engine stabiliser brace (1) by slackening off the screws (2) at each end, and the nut and screw (3) in the engine mounting
- Remove the clamp for the servo hose on the right-hand side
- Remove the engine stabiliser brace.
Applies to the S80 with turbocharger (TC)
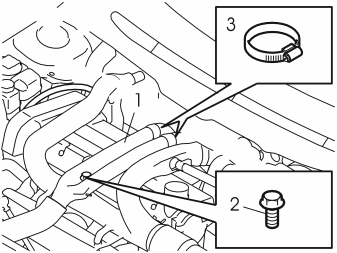
- Detach the charge air pipe (1) by slackening off the screw (2) and the hose clamps (3) at the rear edge
- Remove the pipe by pulling it forwards.
Applies to the S80 with six cylinders, turbocharger (TC) and automatic gearbox
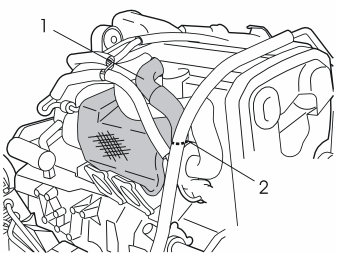
- Disconnect the pipe (1) for the right-hand turbocharger (TC)
- Remove the screw and clamp (2) at the turbocharger (TC).
Applies to the S80 with six cylinders, turbocharger (TC), automatic gearbox and heated oxygen sensors (HO2S) mounted by the turbochargers (TC)
Illustration A
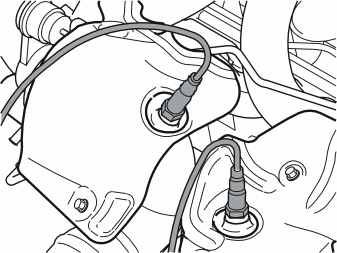
- Disconnect the cables for the heated oxygen sensors (HO2S) from the clamp on the pipe to the turbocharger (TC)
- Remove the two heated oxygen sensors (HO2S) by the turbocharger (TC).
Примечание: Twist the cables together when unscrewing the heated oxygen sensors (HO2S). Ensure that the cables are twisted along as great a length as possible to minimise the risk of damage. Keep them twisted.
- Mark up the heated oxygen sensors (HO2S) so that they come back in the right position and are not mixed up.
Illustration B
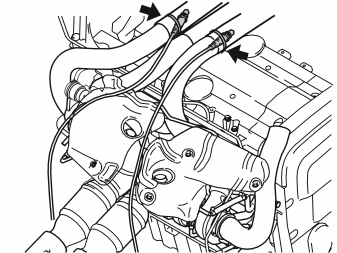
- Clamp the heated oxygen sensors (HO2S) with the twisted cables by the intake manifolds so that the cables resume their normal position when installing the heated oxygen sensors (HO2S). Use tie straps.
Points 24-26 apply to the S80 with six cylinders, turbocharger (TC) and automatic gearbox
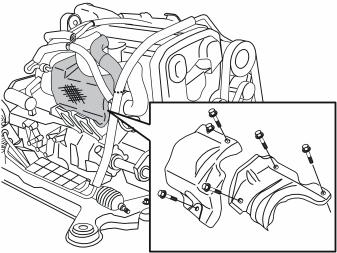
- Slacken off the screws for the heat shields and remove them
- Remove the heat shields.
Illustration A
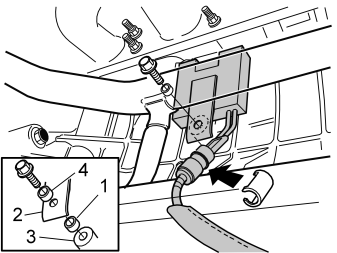
- Clean the area where the heater will be installed. This ensures optimal heat conduction to the cylinder block. Also clean the internal thread
- Install the heater on the cylinder block from the top.
Подсказка: First secure the tensioner (2) to the engine block heater. Use a small piece of butyl tape. Then secure the inner spacer washer (1), t =10 mm / 25/64", to the reverse of the tensioner. Use butyl tape.
- Insert the engine block heater into the cylinder block. Take the outer spacer washer (4), t=32 mm / 1 1/4", and the screw. Insert the screw through the outer spacer washer, into the hole in the tensioner and through the inner spacer washer
- Carefully move the engine block heater into position using the screw in the tensioner until the threaded cast protrusion (3) in the cylinder block is found
- Finger tighten the screw
- Take the extension cable and the radiated heat shield from the kit. Thread the radiated heat shield onto the extension cable
- Lubricate the O-ring on the extension cable using low temperature grease, (P/N 1161417-9).
Illustration B
- Take a locking sleeve from the kit. Connect the extension lead to the engine block heater. Press the locking sleeve into place over the joint
- Pull the radiated heat shield all the way up to the engine block heater so that the cable splice and the plastic surround are completely covered.
Примечание: Ensure that the radiated heat shield covers the entire joint towards the engine.
- Secure the radiated heat shield around the cable to the engine block heater. Use a grey, heat resistant tie strap and clamp the bottom edge of the radiated heat shield
- Tighten the engine block heater. Tighten to16 Nm (12 lbf.ft.).
- Reinstall the heat shields.
Applies to the S80 with six cylinders, turbocharger (TC), automatic gearbox and heated oxygen sensors (HO2S) mounted by the turbochargers (TC)
Примечание: Do not mix up the heated oxygen sensors (HO2S).
- Lubricate the threads on the heated oxygen sensors (HO2S) using paste (P/N 1161408)
- Reinstall the heated oxygen sensors (HO2S). Tighten the heated oxygen sensors (HO2S). Tighten to45 Nm (34 lbf.ft.)
- Press the wiring for the heated oxygen sensors (HO2S) into place in the clamp on the intake manifold on the turbocharger (TC).
Only applies to cars with turbochargers (TC)
- Reinstall the pipe for the right-hand turbocharger (TC). See point 22
- Reinstall the charge air pipe. See point 21.
Applies to all models
- Reinstall the engine stabiliser brace across the engine. See point 20
- Tighten the screws. Tighten to80 Nm (60 lbf.ft.). Tighten the screw and the nut. Tighten to60 Nm (43 lbf.ft.).
Points 29-33 apply to cars with six cylinders, naturally aspirated engines and automatic gearboxes
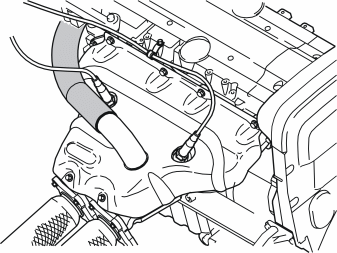
- Disconnect the hose for preheating the intake air.
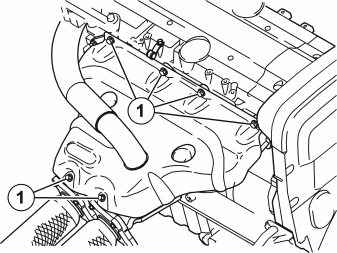
- Remove the screws (1) for the preheating plate over the manifolds.
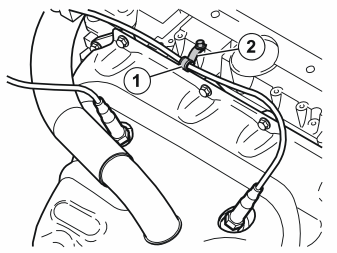
- Disconnect the cable to the right-hand heated oxygen sensor (HO2S) and the clamp (1) from the bracket (2)
- Remove the bracket.
Illustration A
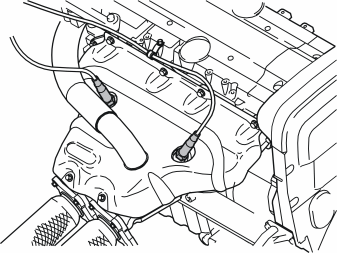
- Remove the two heated oxygen sensors (HO2S) from the manifolds.
Примечание: Twist the cables together when unscrewing the heated oxygen sensors (HO2S). Ensure that the cables are twisted along as great a length as possible to minimise the risk of damage. Keep them twisted.
- Mark up the heated oxygen sensors (HO2S) so that they come back in the right position and are not mixed up.
Illustration B
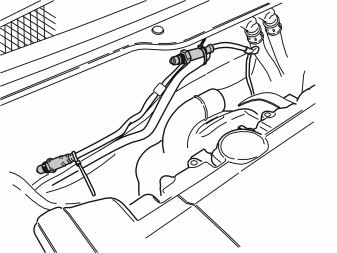
- Clamp the heated oxygen sensors (HO2S) with the twisted cables by the pipe for the air conditioning (A/C) system so that the cables resume their normal position when installing the heated oxygen sensors (HO2S). Use tie straps.
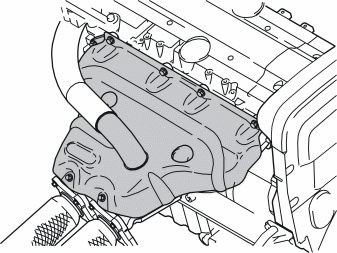
- Remove the preheating plate over the manifolds.
Points 34-37 apply to cars with six cylinders, naturally aspirated engines and automatic gearboxes, manufactured after week 35, 2001
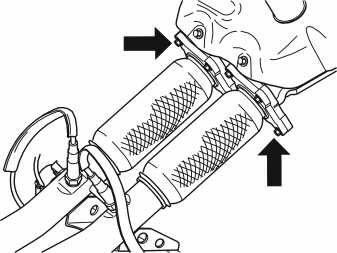
- Remove the nuts in the flange at the joint between the manifolds and the exhaust pipes.
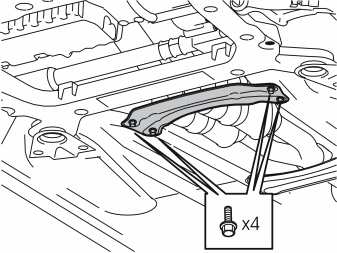
- Remove the screws for the front side impact protection member.
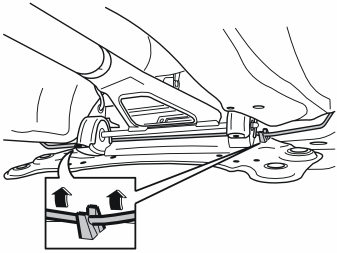
- Remove the brake pipe from the clamps in the side impact protection member
- Remove the clamp holding the cable to the left rear heated oxygen sensor (HO2S) from the side impact protection member
- Remove the side impact protection member
- Pull off the exhaust pipes from the manifolds. Allow them to rest on the rear side impact protection member.
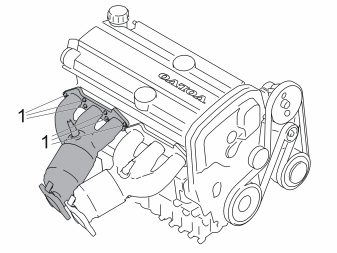
- Clean and spray rust solvent spray on the free ends of the studs for the left manifold
- Remove the nuts (1) for the left-hand manifold mounting on the engine
- Pull off the manifold from the exhaust pipe. Lift it up from the engine. Place the manifold to one side.
Applies to the S80 with six cylinders, naturally aspirated engines and automatic gearboxes
Illustration A
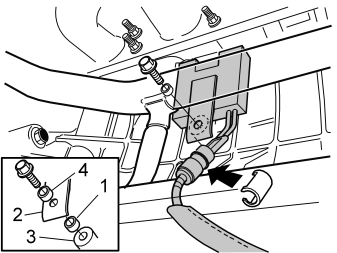
- Clean the area where the heater will be installed. This ensures optimal heat conduction to the cylinder block. Also clean the internal thread
- Install the heater on the cylinder block from the top.
Подсказка: First secure the tensioner (2) to the engine block heater. Use a small piece of butyl tape. Then secure the inner spacer washer (1), t =10 mm / 25/64", to the reverse of the tensioner. Use butyl tape.
- Insert the engine block heater into the cylinder block. Take the outer spacer washer (4), t=32 mm / 1 1/4", and the screw. Insert the screw in through the outer spacer washer, into the hole in the tensioner and through the inner spacer washer
- Carefully move the engine block heater into position using the screw in the tensioner until the threaded cast protrusion (3) in the cylinder block is found
- Finger tighten the screw
- Take the extension cable and the radiated heat shield from the kit. Thread the radiated heat shield onto the extension cable
- Lubricate the O-ring on the extension cable using low temperature grease, (P/N 1161417-9).
Illustration B
- Take a locking sleeve from the kit. Connect the extension lead to the engine block heater. Press the locking sleeve into place over the joint
- Pull the radiated heat shield all the way up to the engine block heater so that the cable splice and the plastic surround are completely covered.
Примечание: Ensure that the radiated heat shield covers the entire joint towards the engine.
- Secure the radiated heat shield around the cable to the engine block heater. Use a grey, heat resistant tie strap and clamp the bottom edge of the radiated heat shield
- Tighten the engine block heater. Tighten to16 Nm (12 lbf.ft.).
Applies to the S80 with six cylinders, naturally aspirated engines and automatic gearboxes, manufactured after week 35, 2001
- Remove the old gaskets between the manifold and engine
- Clean the gasket faces carefully. Use a razor blade or gasket scraper
- Install new gaskets between the manifold and engine (P/N 271734)
- Lubricate the threads on the studs using paste (P/N 1161408)
- Install the manifold. Use new nuts (P/N 948645). Tighten the nuts. Tighten to25 Nm (19 lbf.ft.)
- Install the heat deflector plate. Do not tighten yet
- Lubricate the threads on the heated oxygen sensors (HO2S) using paste (P/N 1161408).
Примечание: Do not mix up the heated oxygen sensors (HO2S).
- Install the heated oxygen sensors (HO2S). Tighten the heated oxygen sensors (HO2S). Tighten to45 Nm (34 lbf.ft.)
- Tighten the heat deflector plate
- Remove the old gaskets on the flanges to the manifolds
- Install the new gaskets (P/N 8627203) on the flanges to the manifolds
- Connect the exhaust pipes to the manifolds. Lubricate the threads. Use new nuts (P/N 945408)
- Tighten the nuts. Tighten to25 Nm (19 lbf.ft.)
- Move the side impact protection member into place. Press the brake pipe into place in its clip. Press the cable to the left rear heated oxygen sensor (HO2S) into place in the side impact protection member
- Tighten the screws for the side impact protection member. Tighten to25 Nm (19 lbf.ft.).
Applies only when installing the engine block heater
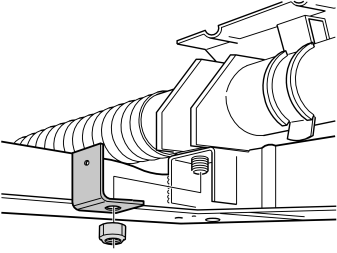
- Remove the existing nut from the steering gear
- Install the mounting bracket for the junction switch and cables
- Install the lock nut from the kit. Tighten to48 Nm (36 lbf.ft.)
- Secure the first tie strap on the power steering pipe. If there is no servo coolant pipe; drill out the first hole to a diameter of6.5 mm (1/4""). Secure the tie strap as normal.
Примечание: Wiring must not be secured to the drive shaft, air conditioning (A/C) pipes, fuel pipes or brake pipes. Ensure that the secured wiring is not rubbing against any sharp edges and that it is not too close to the turbocharger (TC) or exhaust pipe to prevent damage from radiant heat.
Applies when installing the engine block heater and passenger compartment socket together
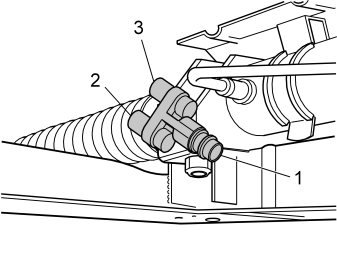
- Install the Y connector on the bracket. Use the screw and the nut from the kit
- Lubricate the O-rings using low temperature grease, (P/N 1161427)
- Connect the wiring from the front engine block heater socket (1), the passenger compartment socket (3) and the engine block heater (2) to the Y-connector
- Tighten the Y connector and the bracket on the steering gear. Tighten to48 Nm (36 lbf.ft).
Points 42-44 apply to all models
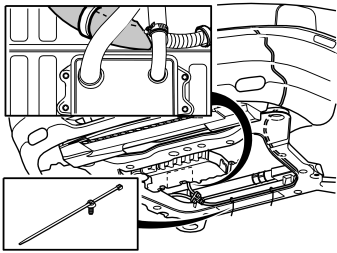
- Route the cable from the bumper to the cable from the engine block heater. See the illustration
- Clamp the cable using tie straps in the existing holes and to the oil cooler pipe
- Connect the cable from the bumper to the cable from the engine block heater. Alternatively connect the cable from the bumper to the Y connector.
Примечание: Wiring must not be secured to the drive shaft, air conditioning (A/C) pipes, fuel pipes or brake pipes. Ensure that the secured wiring is not rubbing against any sharp edges and that it is not too close to the turbocharger (TC) or exhaust pipe to prevent damage from radiant heat.
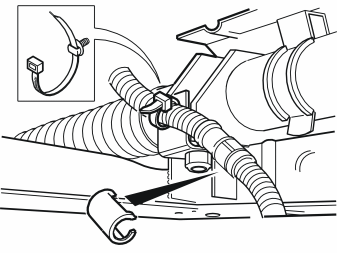
- Install the locking sleeves over all the connectors and cable splices on the wiring. Ensure that these are correctly installed.
- Reinstall the air baffles and the splash guard. See points 11 and 12
- Tighten the screws for splash guard. Tighten to25 Nm (19 lbf.ft)
- Clamp the engine heater cable in the mounting on the left-hand side of the air baffle.
Applies to cars with six cylinder, naturally aspirated engines
- Reinstall the hose for the air preheating
- Reinstall the bracket and cable for the right-hand heated oxygen sensor (HO2S).
Applies to cars with six cylinder engines
- Reinstall the engine stabiliser brace across the engine. See point 20
- Tighten the screws. Tighten to80 Nm (60 lbf.ft.). Tighten the screw and the nut. Tighten to60 Nm (43 lbf.ft.)
- Secure the servo hose at the engine stabiliser brace using a tie strap from the kit.
Applies to cars with TDI engines and immersion heaters
- Top up the coolant. Test run the engine. Check for any leakage.
Applies to cars with six cylinder naturally aspirated engines, manufactured after week 35, 2001
- Test run the engine and check for exhaust leaks.
Обсуждение и оценка
0Пока нет комментариев. Будьте первым.