Примечание: This accessory requires software unique to the car.
Applies to cars with RTI (road traffic information)
- For cars with RTI, the required cable harnesses are already routed except for a DIN cable which must be connected between the CD changer and the DVD reader or the TV receiver.The DIN cable must be purchased separately
- Only read the following points: 12, 21, 22, 26, 27, 29.
Applies to cars with power seats
- Move the left front seat to its rearmost position.

- Turn the ignition key to position 0
- Remove the key from the ignition switch (does not apply to cars with automatic gearboxes)
- Disconnect the battery negative lead.
Примечание: Wait at least five minutes before disassembling the connectors or removing other electrical equipment.
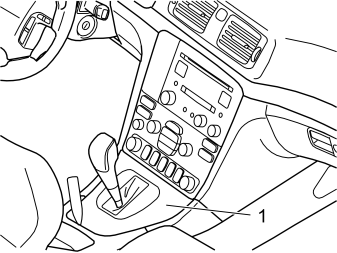
- Detach the panel (1) and the gear selector lever boot using a weatherstrip tool.
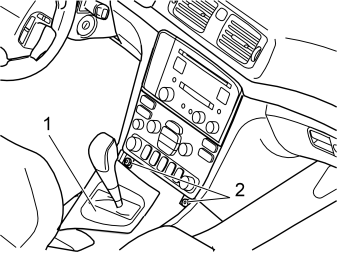
- Move the gear selector lever to its rearmost position
- Pull the panel (1) and the boot backwards. Turn the panel as illustrated
- Remove the screws (2) from the dashboard environment panel.
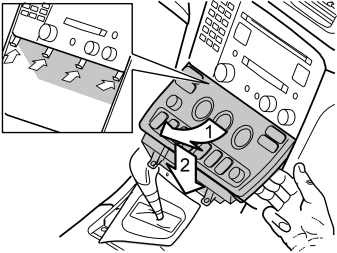
- Angle the dashboard environment panel outwards so that it is possible to insert a couple of fingers between the centre console and the reverse of the panel
- Remove the dashboard environment panel by pulling it downward, maintaining the same angle. Some force is required because the panel is tightly installed
- Disconnect the connectors on the reverse of the dashboard environment panel. Place the dashboard environment panel to one side.
Примечание: If any of the outer hooks break off, these must be repaired. The method for this can be found in the Workshop Manual in the section about the dashboard.
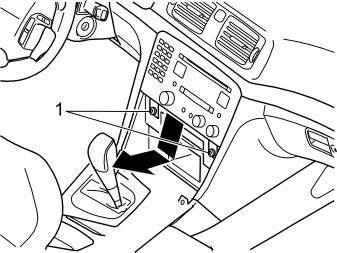
- Remove the screws (1) from the radio bracket
- Pull out the bracket with the radio. Pull the lower corner while pressing downwards
- Disconnect the connectors on the radio. Place the bracket and the radio to one side.
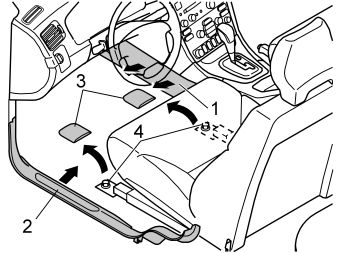
- Move the left front seat to its rearmost position.
Remove:
- the left-hand side panel (1) from the centre console. First turn the clip. Pull the panel outwards and backwards
- the sill trim panel (2) at the left front door
- the cover (3) and the screws (4) for the front mountings in the left-hand front seat.
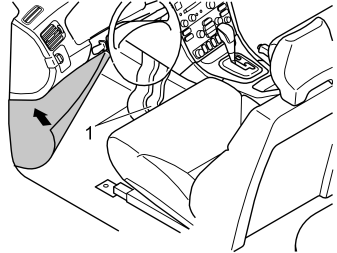
- Tip the left-hand front seat backwards
- Push the floor carpet to one side so that the air ducts (1) are accessible.
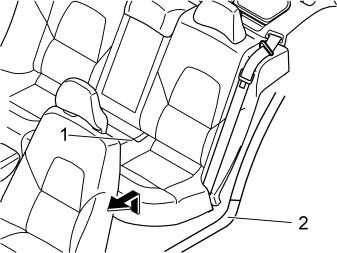
- Remove the seat cushion from the left-hand rear seat.(1) by lifting the front edge of the cushion and then pulling forwards
- Remove the sill trim panel (2) at the left-hand rear door.
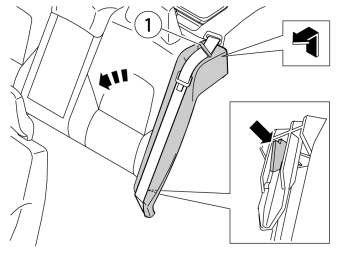
- Remove the seat belts from the guide (1) on the left-hand side cushion
- Insert a hand down the side of the lower section of the left side cushion. Release the catches while lifting the side cushion. Place the cushion to one side
- Fold the backrest forward.
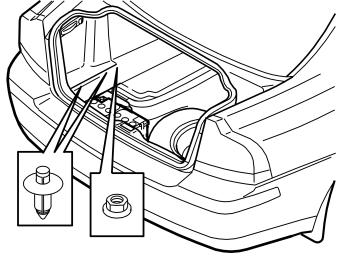
- Lift out the cargo compartment carpet
- Press the centres of the clips at the bottom of the folding side panel on the left-hand side. Press the clips until a click is heard
- Remove the two clips
- Remove the plastic nut at the front edge of the side panel.
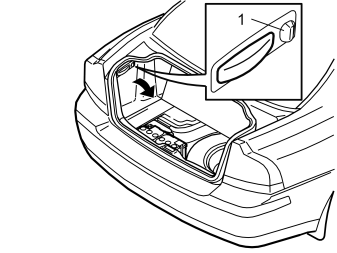
Applies to all cars
- Turn the handle (1) on the left-hand side a quarter turn
- Fold down the side panel.
Only applies to cars without RTI (road traffic information)
- Lift out and place the side panel to one side. A new panel is in the kit.
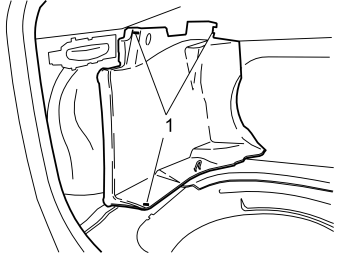
- Remove the clips (1) and the plastic nut in the left front side panel in the cargo compartment. It is easiest to access the front upper clip from the side of the rear seat
- Remove the front side panel.
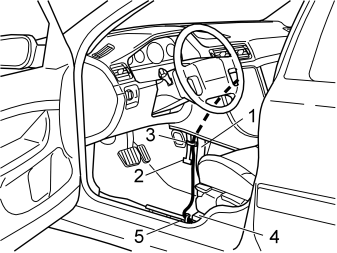
- Route the DIN cable for the CD changer up between the front air duct (1) and the bulkhead stay (2)
- Route the cable through the radio compartment
- Clamp the cable to the stay. Use the tie strap (3) from the kit
- Route the cable above and along the front air duct to the seat mounting member (4)
- Clamp the wiring to the existing cable harness (5).
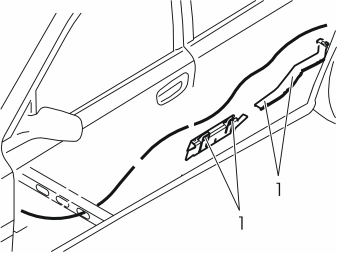
- Continue to route the DIN cable under the carpet along the door sills to the rear seat
- Install protective caps on the lugs (1) for the cable ducts.
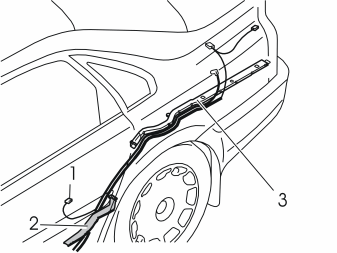
- Take the power supply cable for the CD-changer from the kit. Connect the ground lead to the front ground terminal (1) in the rear seat
- Route the power supply cable and the DIN cable on the right-hand side of the air duct (2) and under the wiring. Continue out through the hole in the car body behind the left-hand backrest and along the left-hand side of the cable duct (3).
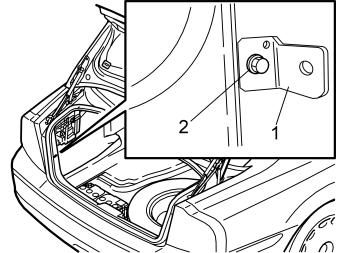
- Install the small bracket (1) (for the CD changer bracket) onto the rear crossmember under the left-hand tail lamp. Use the screw (2) from the kit.
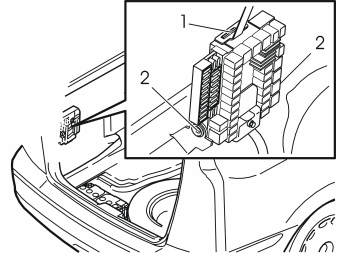
- Remove the rear electronic module. First open the catch (1) on the top of the module. Fold the module forward. Lift the module from the mountings (2).
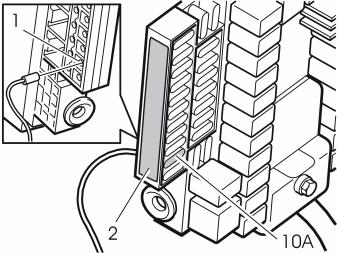
- Connect the new routed red and white cable to the outer terminal (1) on the reverse of fuse socket number 10 on the fuse holder. Remove the decal (2). Carefully pry up the red secondary locking on the face in the end nearest terminal 10. At the same time press the cable into position.
Подсказка: If there is a problem inserting the cable the fuses on the outer side must be removed in order to open the red secondary locking further.
- Reinstall the decal
- Install a 10A fuse in fuse socket 10 on the fuse holder.
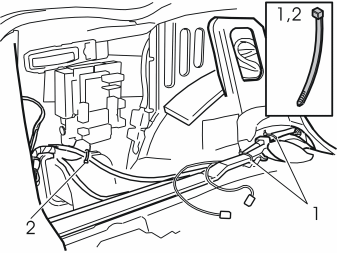
- Secure the cable harness at the cable duct. Use two tie straps (1)
- Secure the cable (which was connected to the fuse holder) at the cable harness for the fuse holder using a tie strap (2).
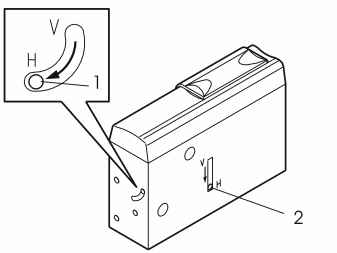
- Move the switches (1,2) to the point marked H.
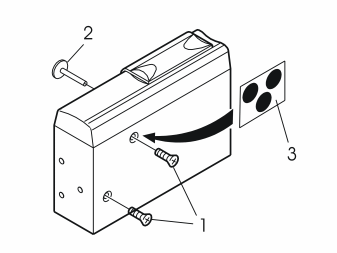
- Remove the transport screws (1, 2)
- Install the dust cover (3) over the holes for the transport screws.
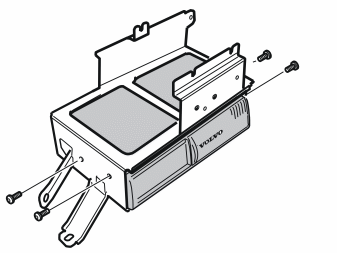
- Take four screws, the bracket and the CD changer from the kit. Tighten the CD changer at the bracket.
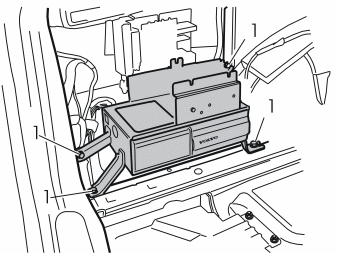
- Install the bracket with the CD changer behind the wheel arch. Use four screws (1) from the kit. See the illustration. Tighten the screws.
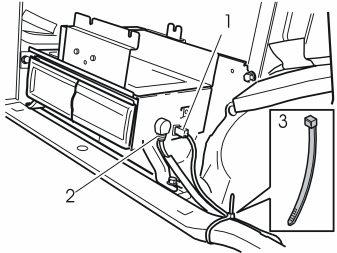
Connect:
- the power supply cable (1)
- the cable (2) for the radio
- Secure the cable harness at the cable duct. Use a tie strap (3) as illustrated.
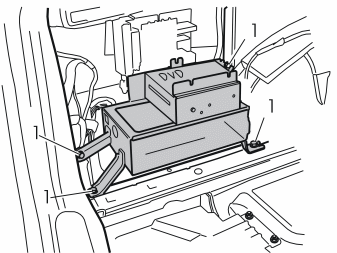
Applies to cars with RTI (road traffic information)
- Remove the four screws (1) holding the bracket with the DVD reader and TV receiver (if applicable)
- Pull out the bracket. Place the bracket to one side.
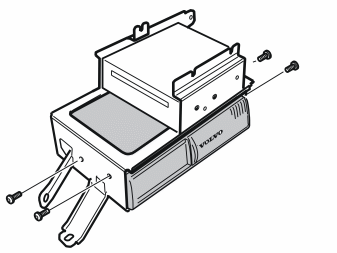
Applies to cars with RTI (road traffic information)
- Take the new CD changer from the kit. Prepare the CD changer according to points en-GB0900c8af827f11e0#KC01705478 and en-GB0900c8af827f11e0#KC01705479
- Slide the CD changer into the bracket. Secure the CD changer using the screws from the kit as illustrated
- Connect the blue pre-routed connector for power supply to the CD changer. The connector is taped at the left-hand tail lamp
- Connect the new short DIN cable according to the installation instructions supplied with the DIN cable
- Position the pre-routed cable under the bracket. Screw the bracket into position using the four screws
- Fold the side panel back into position.
Applies to cars without RTI (road traffic information)
- Connect the new routed DIN cable to the radio
- Connect the other connectors removed from the radio
- Reinstall the radio
- Connect the connectors to the dashboard environment panel. Reinstall the panel
- Reinstall the panel and gear selector lever boot around the gear selector lever
- Fold the carpet at the left-hand front seat back into position
- Reinstall the side panel on the centre console
- Reinstall the sill trim panel in the left-hand front and rear doors
- Fold the left-hand front seat back into position
- Tighten the screws in the front edge of the seat. Use new screws from the kit. Tighten to 40 Nm (30 lbf ft). Reinstall the covers over the screws
- Reinstall the left-hand front side panel in the cargo compartment
- Install the new left-hand side folding panel from the kit
- Reinstall the side cushion
- Fold the backrest back into place
- Reinstall the seat cushion.
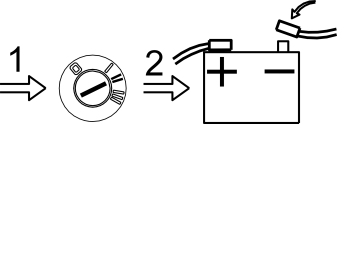
- Turn the ignition key to position II
- Reconnect the battery negative lead
- Reinstall the carpet in the cargo compartment
- Program the software according to the service information in VIDA.
Обсуждение и оценка
0Пока нет комментариев. Будьте первым.