Применимость
| Модель | Двигатель | Год |
|---|---|---|
| S60 (-09) | — | 2005–2009 |
| V70 (00-08) | — | 2005–2008 |
Примечание: This user handbook only applies to countries within the EU (European Union).
Внимание: - For safety reasons Volvo recommend that all maintenance and repair work is carried out by a qualified Volvo mechanic
- Inhalation of brake dust is a health hazard. Under no circumstances must compressed air be used to remove brake dust from the brakes
- Contamination of the brake friction surfaces by grease or oil based fluids can lead to brake failure. All contaminated components must be replaced
- Do not use any sharp objects. These could cause personal injury or damage the brake system
- Springs / clips holding the brake pads in position may be under tension. Relieve the load on the spring / clip gradually. Hold the spring / clip in place by covering the brake caliper cover
- All damage to the brake system must be rectified before the vehicle can be used again
- To prevent personal injury: Ensure that the vehicle is correctly supported and that the work area is safe before removing the wheels
- Brake fluid can cause damage to paintwork. If brake fluid is spilled, wash the affected area immediately using generous amounts of cold water. Harmful if swallowed. Avoid contact with eyes. If handled incorrectly brake fluid can cause serious personal injury.
Примечание: As the illustrations in this service information are used for different model years and / or models, some variation may occur. However, the essential information in the illustrations is always correct.
Important! The brake pads on the front wheels must all be changed at the same time
Примечание: Replace the brake pads when they have worn to a minimum thickness of 3 mm.
The brake calipers are painted. Do not scratch the brake calipers.
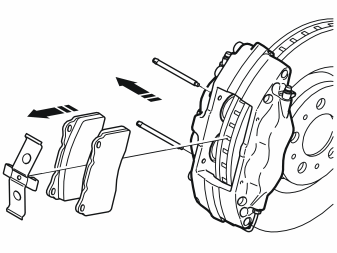
Preparations
- Place paper around and under the master cylinder filler cap to avoid brake fluid spillage.
- Raise the vehicle. Check that the vehicle is stable. Remove the wheel.
Removing the brake pads
- Remove the locking pins
- Remove the damper spring
- Remove the brake pad from the brake caliper.
Примечание: Do not depress the brake pedal while the brake pads are removed.
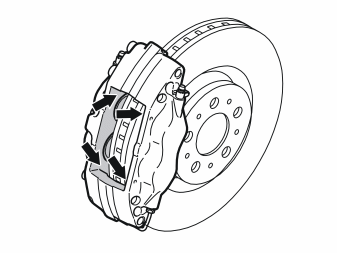
- Clean and check the brake pad mating surfaces. See the arrows in the brake caliper and caliper holder.
- Check the brake caliper and the piston's dust boot. Replace the dust boot if it is damaged.
Примечание: If the dust boot is damaged, dirt may have penetrated the cylinder and the brake caliper must be overhauled or replaced.
- Check the friction surfaces of the brake disc.
- Check the brake disc. If the brake disc displays signs of out-of-true, check the lateral run out (Must be carried out by an authorized workshop).
Illustration A shows the front brake
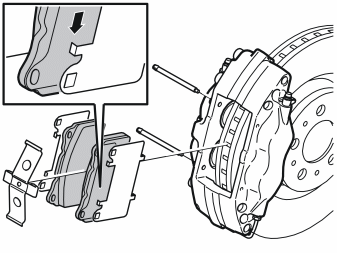
Installing the front brake pads
- Press the pistons back into the brake caliper using a heavy duty screwdriver.
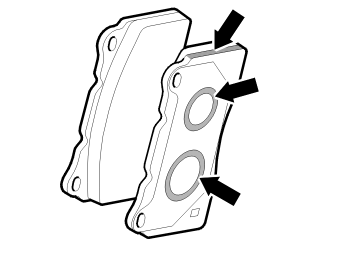
- Lubricate the brake pad mating surfaces to the caliper (see illustration C) with Volvo Silicone grease (part no. 116 1325-4).
Примечание: The brake pads are marked with an arrow on their reverse side which must point in the direction of rotation when driving forward.
Install:
- shims on the reverse of the brake pads
- brake pads with shims in the brake caliper
Примечание: Window shims must not be fitted on vehicles with vibration dampers or on vehicles from and including Vehicle Identification Number V70 500817-, S60 466813-.
- the damper spring
- the lock pins
- Reinstall the wheel
- Repeat the work on the other side of the vehicle.
- Lower the car.
Illustration B shows the rear brake
Installing rear brake pads
- Press the pistons back into the brake caliper using a heavy duty screwdriver.
- Lubricate the brake pad mating surfaces to the caliper (see illustration C) with Volvo Silicone grease (part no. 116 1325-4).
Install:
- the brake pads
- the damper spring
- the lock pins
- Reinstall the wheel
- Repeat the work on the other side of the vehicle.
- Lower the car.
Illustration C
Check the brake fluid level
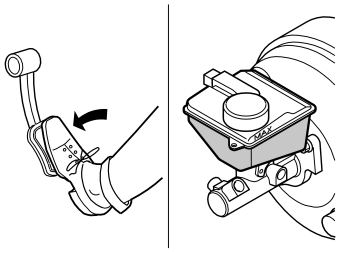
- Depress the brake pedal repeatedly.
- Check the fluid level in the brake fluid reservoir. Top up if necessary.
- Remove the paper around the master cylinder.
Примечание: To ensure that the brake pads are correctly seated apply the brakes several times when the car is on the ground. Repeat the process until the pedal travel has stabilized at approximately one third of its total distance.