Применимость
| Модель | Двигатель | Год |
|---|---|---|
| C30 | — | 2007–2011A |
Removal
Rear bumper cover
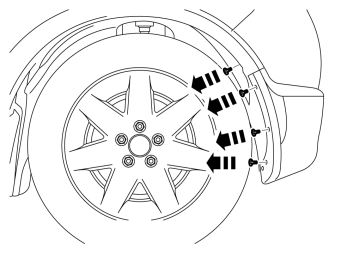
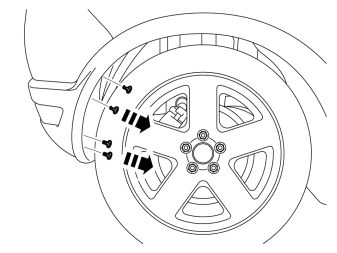
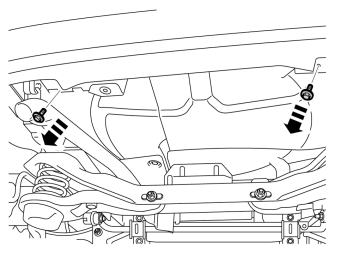
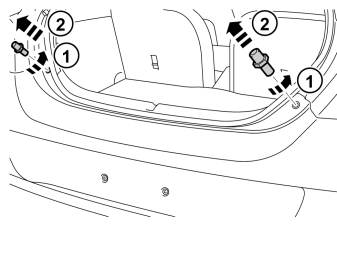
Illustration A
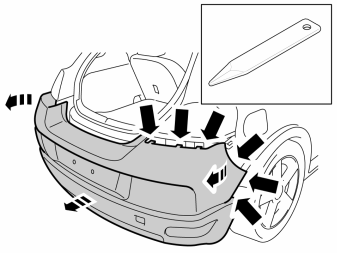
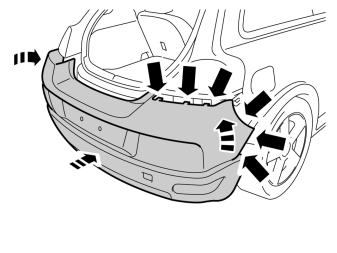
- Remove the bumper cover from the body by carefully prying off the ends using a weatherstrip tool. Pull off the cover under the tail lamp and from the rear edge of the wing on each side. It is secured by four clips at the tail lamp and four in the rear edge of the rear wing. Pull the bumper cover straight back.
Illustration B
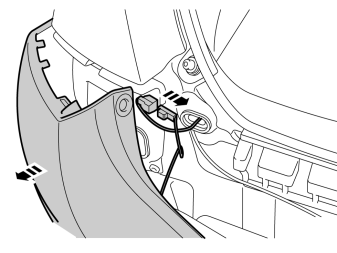
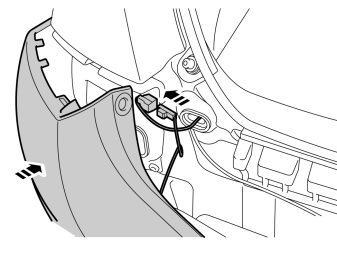
- Unplug the connector for the licence plate lighting on the left side. If the car is equipped with reverse warning, then unplug the connector for this on the right side.
Wheel housing edges
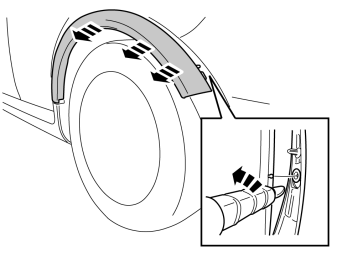
- Carefully bend loose the rear fender's panel starting at the trailing edge and then forward. Bend with the weatherstrip tool right at the side of the clips. The panel is fastened with a catch at the trailing edge and five clips all the way around. The panel shall not be used again.
Примечание: Do not damage the paint work.
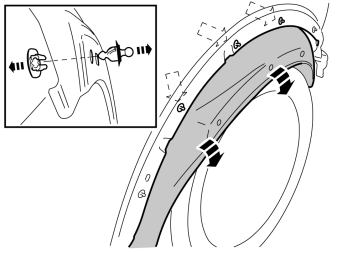
- Loosen the fender liner with the three clips from the panel's clips by first pressing it in until the three clips release, and then folding it down.
- Remove the three clips in the fender liner's upper edge and all clips in the fender edge. New clips are included in the kit.
- Clean the fender edge.
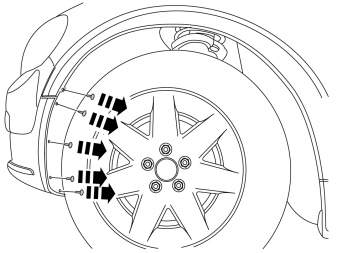
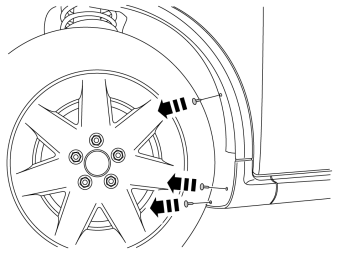
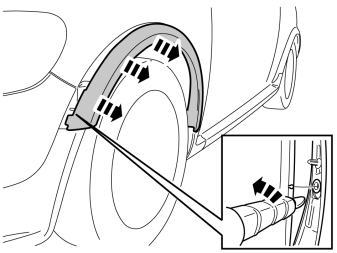
- Carefully bend loose the front fender's panel starting at the leading edge and then backward. Bend with the weatherstrip tool right at the side of the clips. The panel is fastened with a catch at the leading edge and seven clips all the way around. The panel shall not be used again.
Примечание: Do not damage the paint work.
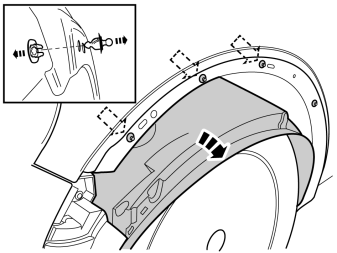
- Loosen the fender liner with the three clips from the panel's clips by first pressing it in until the three clips release, and then folding it down.
- Remove the three clips in the fender liner's upper edge and all clips in the fender edge. New clips are included in the kit.
- Clean the fender edge.
- Repeat steps 6 - 11 for the other side.
Front bumper cover
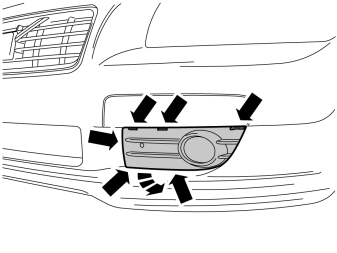
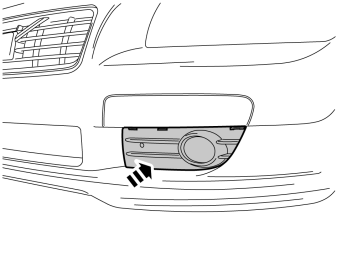
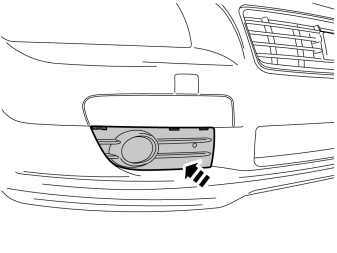
- Remove the panel to the left and right fog light by carefully pressing in the catches in the panel's upper edge with a weatherstrip tool and pull it loose. The panel is fastened with six catches.
Steps 13 - 19 apply to cars with 4-cylinder engine where electric engine heater is installed
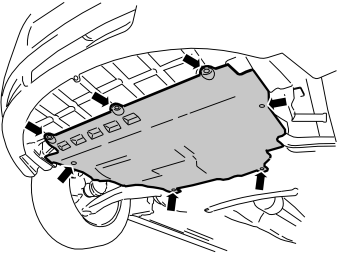
- Remove the seven screws from the engine splash guard.
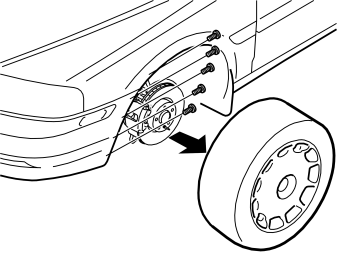
- Remove the left front wheel.
- Remove the five screws holding the bumper cover in the wing liner on the left and right-hand sides.
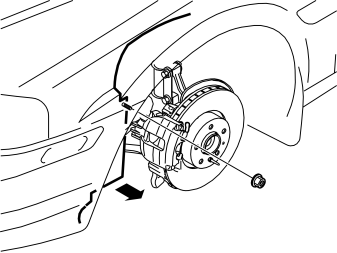
- Remove the nut holding the left-hand wing liner to the front member.
- Bend the front edge of the left-hand wing liner up over the brake calliper.
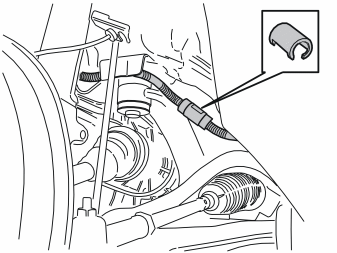
- Remove the lock sleeve over the joint to the engine heater's cable on the left side by the stay on the sub-frame.
- Unplug the connectors.
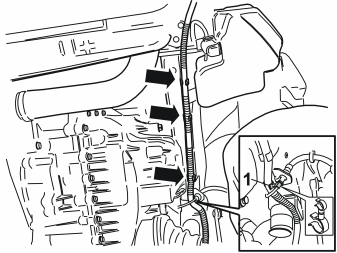
- Loosen the cable from the double clamp (1) at the brake pipe and from clamps along the side member's underside.
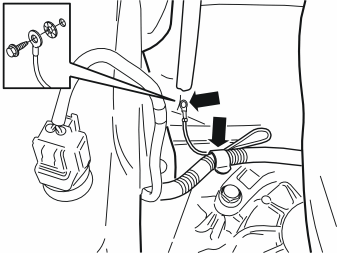
- Loosen the ground cable from the leading edge of the side member's outside.
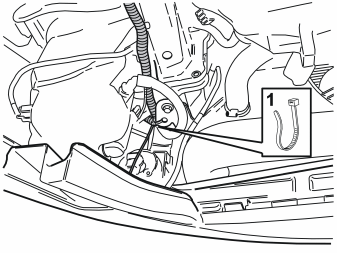
- Cut off the cable tie (1) that holds the cable to the left radiator bracket.
Steps 20 - 30 apply to cars with 5-cylinder engine where electric engine heater is installed
- Remove the seven screws from the engine splash guard.
- Remove the left and right-hand front wheels.
- Remove the five screws holding the bumper cover in the wing liner on the left and right-hand sides.
- Remove the nut holding the left-hand wing liner to the front member.
- Bend the front edge of the left-hand wing liner up over the brake calliper.
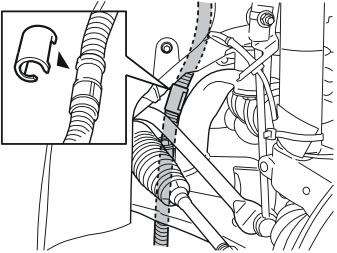
- Remove the lock sleeve over the joint to the engine heater's cable on the right side by the stay on the sub-frame.
- Unplug the connectors.
Applies to cars for USA
- For cars to the USA there is no splice (joint) on the cable. Then this is loosened instead by the engine heater.
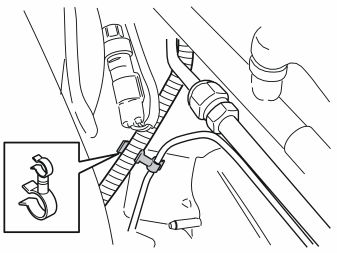
- Loosen the cable from the double clamp on the brake pipe on the right side in the engine compartment.
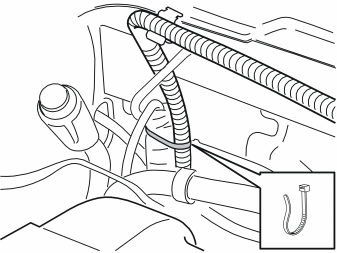
- Remove the cable tie that holds the cable to the cable harness at the top in the engine compartment.
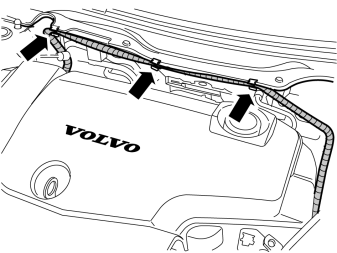
- Loosen the cable from the clips along the metal edge in the trailing edge of the engine compartment.
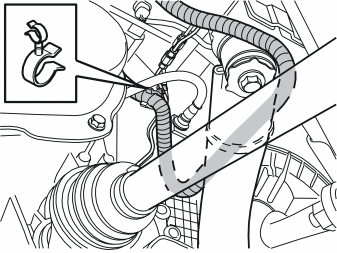
- Loosen the cable from the double clamp by the brake pipe in the top edge of the bulkhead on the left side.
- Loosen the cable from the double clamp (1) at the brake pipe and from clamps along the side member's underside.
Does not apply to cars for USA.
- Loosen the ground cable from the leading edge of the side member's outside.
- Cut off the cable tie (1) that holds the cable to the left radiator bracket.
Applies to all models
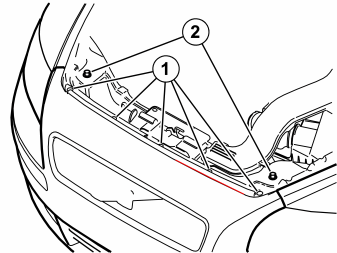
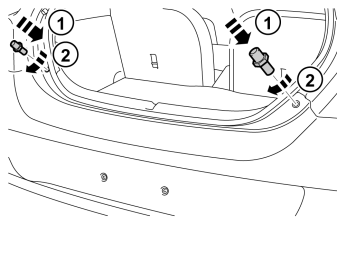
- Push in the centre of the five clips (1). Remove the clips.
- Remove the two screws (2).
Illustration A
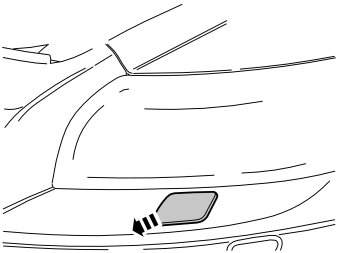
- Remove the covers for the nozzles for the headlamp washers on the right and left-hand sides. Carefully grip the cover. Pull the cover out until the catch becomes accessible.
Illustration B
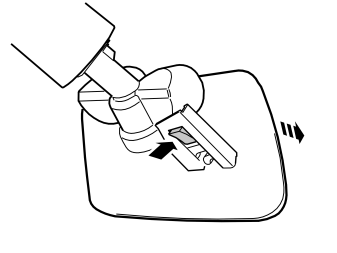
- Press the catch up and remove the cover. Do not damage the painted surfaces or the high-pressure washer nozzles.
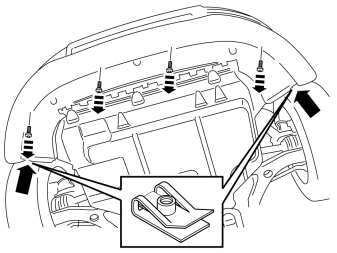
- Remove the four screws that hold the bumper's lower part in the baffle.
- Remove the spring nuts that hold the baffle in the bumper casing's lower part on both sides.
Illustration A
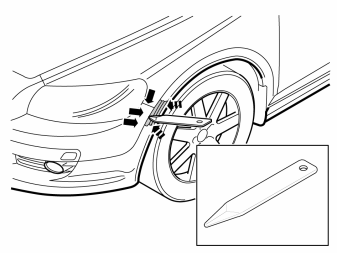
- Carefully pry off the corner of the bumper cover using a weatherstrip tool until the three hooks on the inside release.
Illustration B
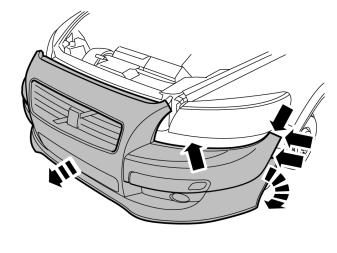
- Remove the bumper cover with air baffle by grasping the ends and pulling forwards until the remaining hooks under the lamps release.
Примечание: Get help from a colleague for this procedure.
- Disconnect the connectors for the fog lamps or parking assistance if applicable.
Door sill panel
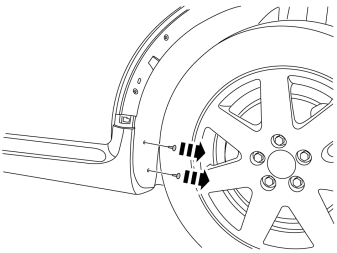
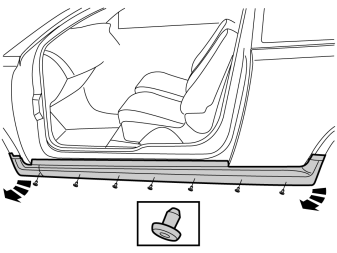
- Drive out the centre pin in the clips on the underside of the bottom sill's panel. On the two front clips, the centre pins may have to be drilled out to be able to remove the clips.
- Turn loose the panel from the bottom sill's underside so that the clips come loose.
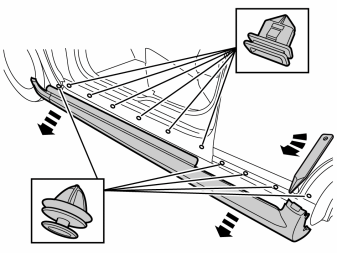
- Remove the bottom sill's panel by carefully bending it loose directly opposite the clips along its entire length.
Примечание: Do not damage the paint work.
- Remove the rubber strip from the panel. Lay away the panel but the rubber strip is to be used again.
- Repeat steps 35 - 37 for the other side.
Installation
Rear spoiler
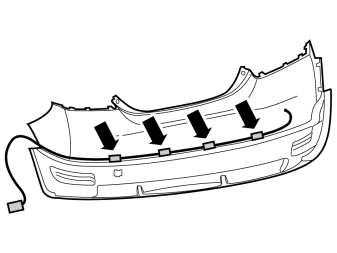
Applies to cars with reverse warning
- Loosen the clips for the cable harness for the reverse warning's sensors from the lower part's catches.
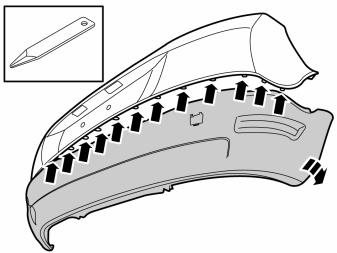
Get help from a colleague for this procedure.
- Place the bumper casing on a surface that will not damage the painted surface.
- Carefully bend and pull loose the bumper's lower part from the upper part. It is fastened with catches all the way around. The lower part shall not be used again.
Примечание: Do not damage the painted surface on the upper part.
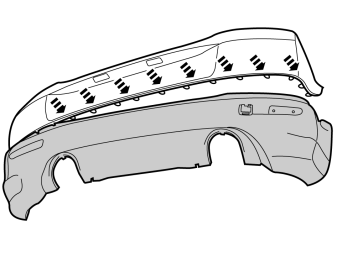
Get help from a colleague for this procedure.
- Take the rear spoiler from the kit and press the upper part into it.
- Make sure that all catches engage.
Примечание: Do not damage the painted surface on the upper part.
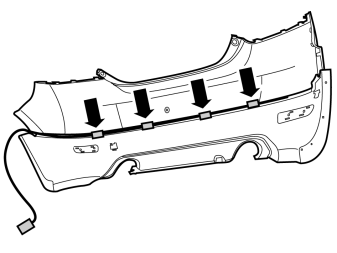
Applies to cars with reverse warning
- Press in the clips for the cable harness for the reverse warning in the spoiler's catches.
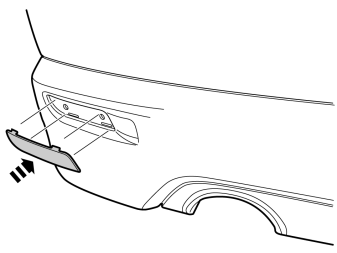
- Press on the reflectors from the kit on the spoiler's ends.
Applies to cars for USA market
- Paint the covers from the kit according to information in VIDA "Repair painting section 8 (80)".
- Press on the covers.
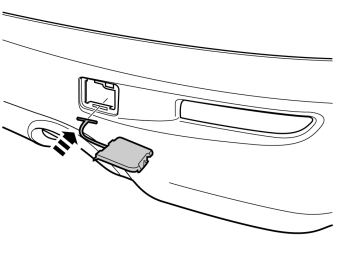
- Insert the plastic string for the towing eye's in the rectangular hole in the lower edge of the opening.
- Press in the panel in the opening.
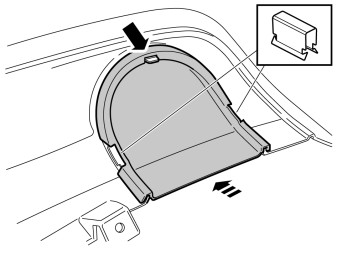
Applies to cars where the end-pipe is not to be visible.
- Press on the cover for the exhaust pipe opening so that the catch at the top edge engages.
- Press in the two clips in the slots on the cover.
Front spoiler
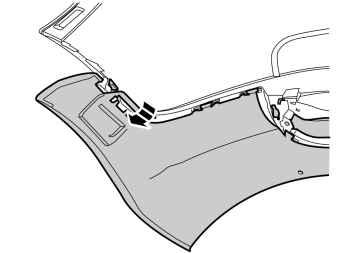
- Loosen the holder from the bumper casing's upper part on both sides.
Get help from a colleague for this procedure.
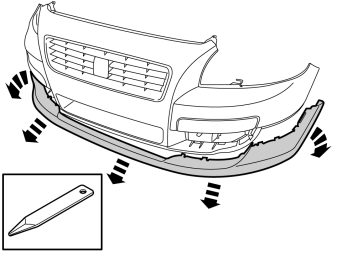
- Place the bumper casing on a surface that will not damage the painted surface.
- Carefully bend and pull loose the bumper's lower part from the upper part. It is fastened with catches all the way around. The lower part shall not be used again.
Примечание: Do not damage the painted surface on the upper part.
- Take the front spoiler from the kit.
Примечание: The unpainted spoiler must be painted first.
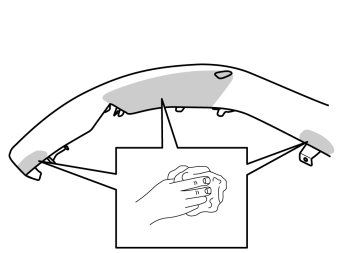
- Clean the marked areas underneath the spoiler where the anti-chafing protector is to be located. Use isopropanol. Wipe dry.
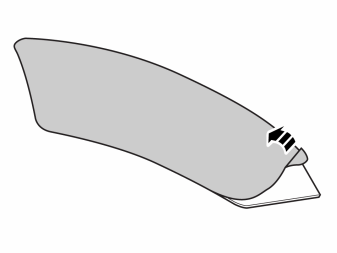
- Remove the protective tape from the anti-chafing protector.
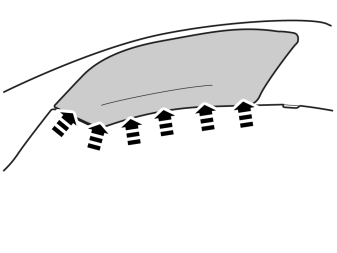
- Position and secure the anti-chafing protector along the edges of the spoiler at the rear edge.
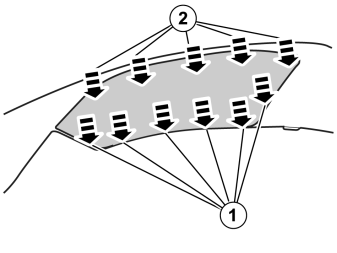
- Press the anti-chafing protector at the rear edge forwards.
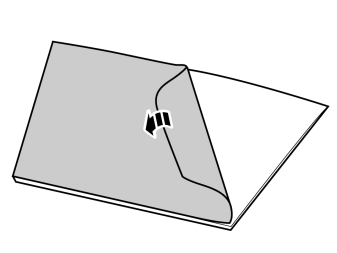
- Remove the protective tape from the anti-chafing protector.
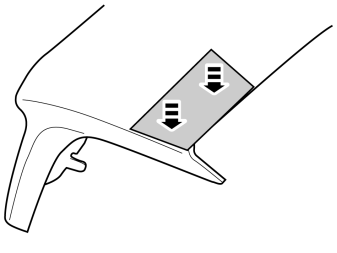
- Press the anti-chafing protector into place.
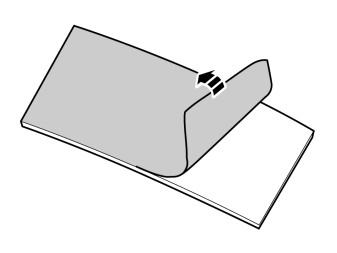
- Remove the protective tape from the anti-chafing protector.
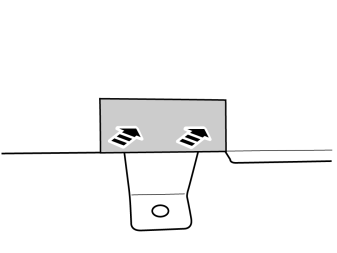
- Press the anti-chafing protector into place.
- Repeat steps 51 - 58 for the other side.
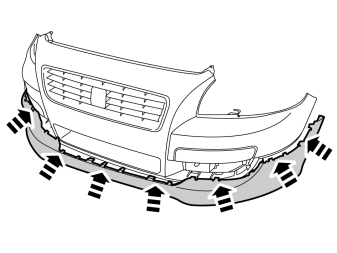
- Press the front spoiler into the upper section.
- Make sure that all catches engage.
Примечание: Do not damage the painted surface on the upper part.
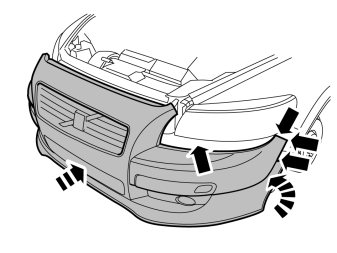
- Reinstall the bumper cover. Make sure that the spoiler fits in the leading edge on the baffle.
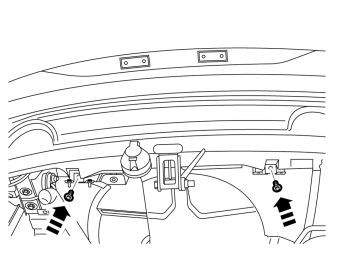
- Secure the bumper casing with the clips (1) and screws (2).
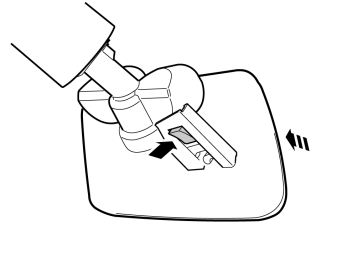
- Pull up the high-pressure nozzle from the bumper casing and install the covers on both sides.
- Connect the cable for the engine heater, if applicable. Route and clamp it in the same way as it was installed before. Replace cut cable ties with new ones.
Примечание: Do not clamp the cable directly to AC pipes, fuel lines, brake pipes or power steering hoses and pipes. Make sure the cable does not chafe against sharp edges or moving parts in the engine compartment.
- Remount the front wheel and tighten the wheel bolts to 90 Nm (66 lbf.ft.).
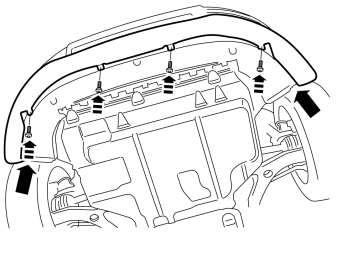
- Tighten the spoiler's brackets to the baffle.
- Tighten the baffle's outer screw on both sides.
Door sill panel
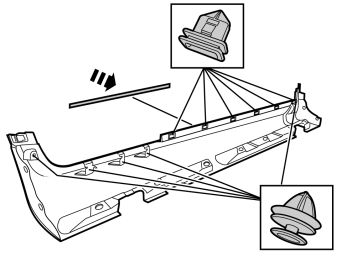
- Get a new bottom sill panel and new clips from the kit. Replace all clips.
- Install the rubber strip from the old panel on the new.
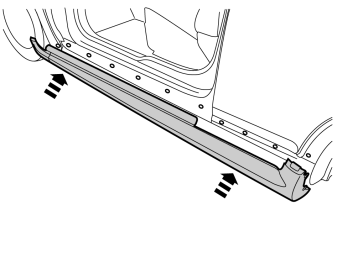
- Press in the new panel in the bottom sill. Make sure all catches engage.
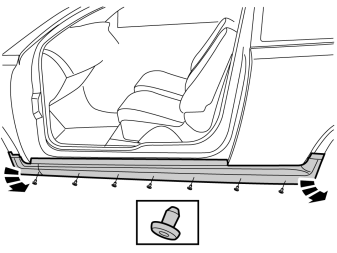
- Get new clips from the kit and secure the panel in the lower edge.
- Repeat steps 67 - 69 for the other side.
Wheel housing edges
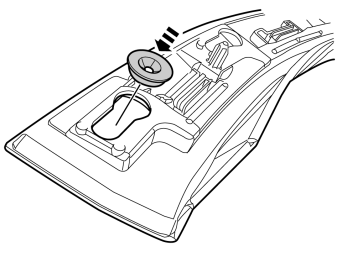
- Get the new panel and new clips for the fender edge from the kit.
- Install new clips in the panel.
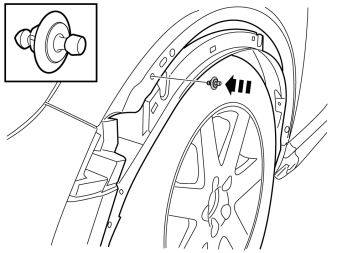
- Get new clips from the kit and install these around the fender edge.
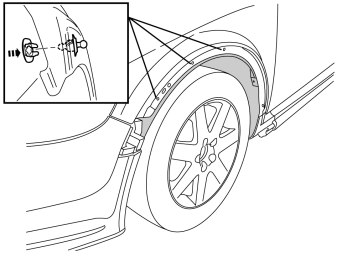
- Reinstall the fender liner.
- Get new clips from the kit and press in to the fender liner.
- Press in the fender liner with clips in the fender edge's clips. Make sure that the clips really snap into place.
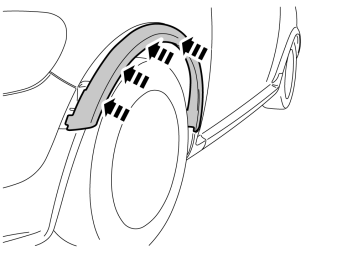
- Press in the new panel on the fender edge. Make sure all catches engage.
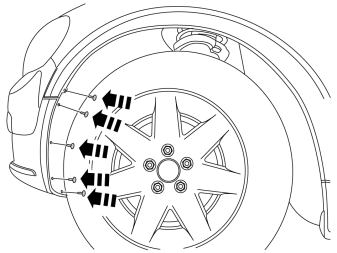
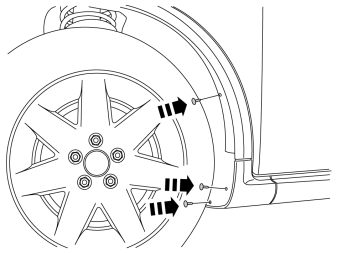
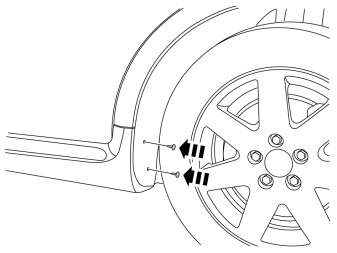
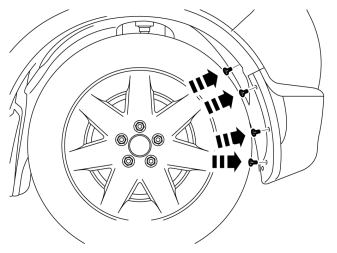
- Repeat steps 70-77 for all wheel housing edges.
Обсуждение и оценка
0Пока нет комментариев. Будьте первым.