Применимость
| Модель | Двигатель | Год |
|---|---|---|
| XC90 | — | 2003–2009 |
Примечание: These installation instructions apply to left-hand drive vehicles. When installing in a right-hand drive vehicle, the procedure is carried out on the opposite side and/or mirrored. Where the operations differ, right-hand versions are also displayed with text and images.
There may be components in the accessories kit that are not used for this installation.
Примечание: When installing Velcro fasteners/tape the underlying surface must be kept at a temperature of at least +20° C (68°F).
Place the manual for this accessory in a suitable place in the vehicle.

Applies to both right and left-hand drive vehicles
- Slide the right-hand seat all the way back and then completely upright at the front edge.
- Turn the ignition switch to position 0.
- Disconnect the battery negative lead.
Примечание: Wait at least three minutes before unplugging the connectors or removing other electrical equipment.
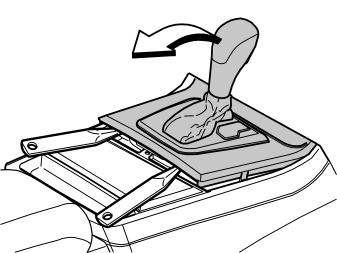
Applies to cars with automatic gearbox
- Turn the ignition key to position II.
Applies to all models
- Move the gear selector lever to its rearmost position.
- Use a weatherstrip and pry off the gear selector panel at the rear edge.
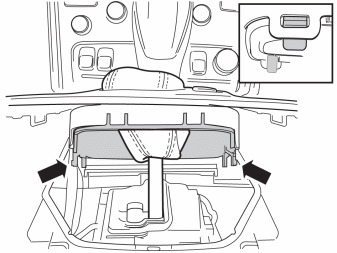
- Press in the catches and remove the panel.
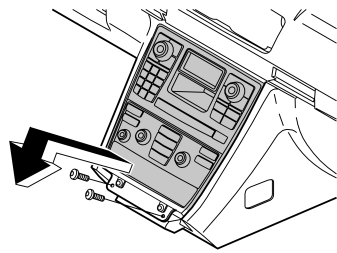
- Remove the two screws.
- Remove the bracket with the A/C panel and radio from the center console. Pull from the lower edge and then downwards until it releases from the mounting at the upper edge.
Примечание: Do not damage the removed components or the surrounding panels.
- Remove the connectors.
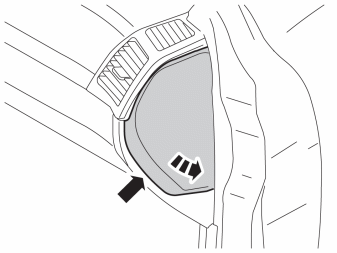
- Remove the end face panel from the dashboard.
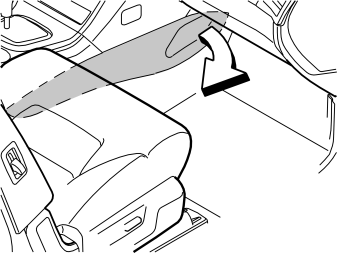
- Remove the center console's right-hand side panel by pulling it away starting at the front edge and then backwards until all the clips have released.
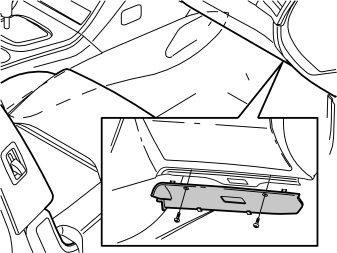
- Remove the screws and soundproofing panel.
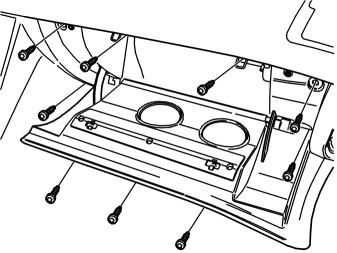
- Remove the 9 x screws, the glove box and disconnect the connector.
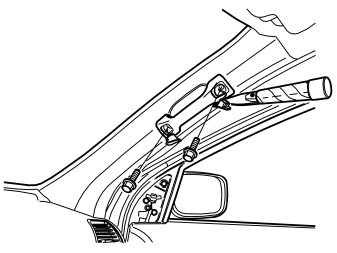
- Remove the covers and screws for the grab handle on the A-pillar.
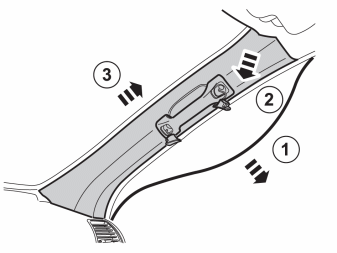
- Pull of the weatherstrip (1) for the door at the A-pillar.
- Pull off the A-pillar panel at the upper edge and then straight upwards to remove it.
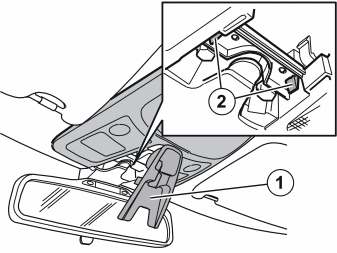
- Fold down the cover (1) by carefully pulling the front edge of the cover down.
- Press in the catches (2). At the same time pull the front edge of the panel downwards, and then unhook the rear edge.
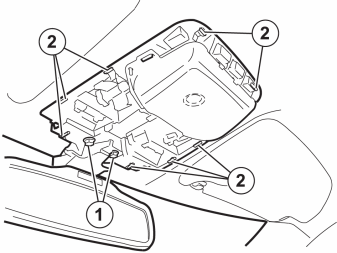
- Remove the screws (1).
- Press in the catches (2)
- Carefully pull the interior lighting downwards and allow to hang from their cables.
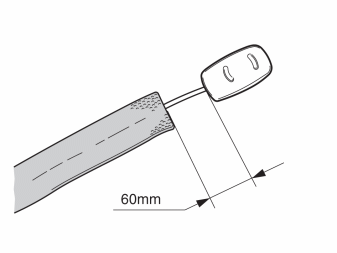
- Tape a 700 mm length piece of foam tape on the microphone cable starting 60 mm from the microphone.
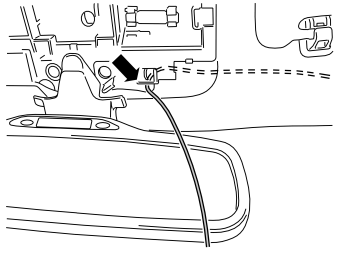
- Route the cable to the microphone by the black connector.
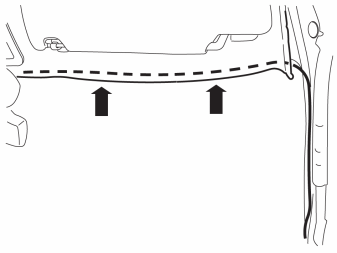
- Carefully pull down the headlining and route the cable above it, to the A-pillar.
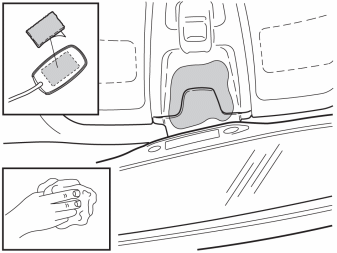
- Reinstall the ceiling panel and at the same time adjust the length of the cable.
- Clean the microphone and ceiling panel. Use isopropanol for example.
- Remove the protective film from one side of the Velcro strip and press onto the microphone.
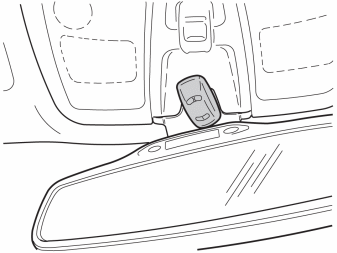
- Remove the remaining protective film from the Velcro strip. Press the microphone securely into place.
Примечание: Direct the microphone towards the driver. Make sure that it does not obstruct adjustment of the rear view mirror and insert the excess cable under the panel.
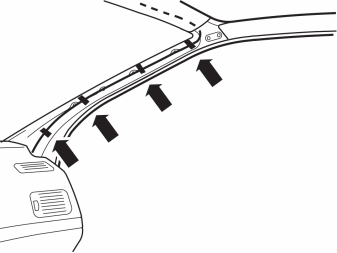
- Pull the cable down along the A-pillar to the dashboard.
- Cut off 2 x 100x50mm pieces of foam tape in the middle.
- Secure the cable to the A-pillar using foam tape.
Осторожно: The inflatable curtain (IC) is located inside the A-pillar panel, it is important that the cable is not positioned on it.
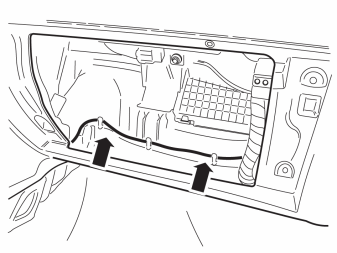
- Cut off one 100x50mm strip of foam tape in the middle.
- Secure the cable on the heater unit using the pieces of tape.
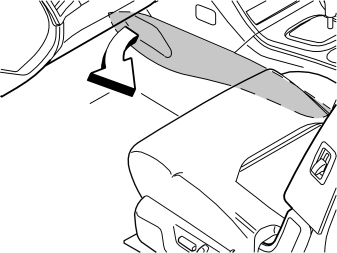
- Remove the center console's left-hand side panel by pulling it away starting at the front edge and then backwards until all the clips have released.
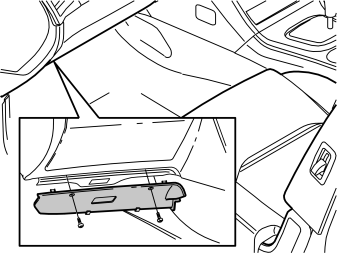
- Remove the sound proofing panel by first removing the two screws and then prying off the sound proofing panel at the top edge.
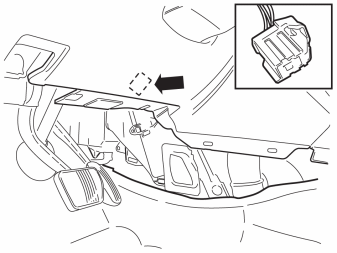
- Locate the 4 pin, gray, pre-routed connector for the power supply. It comes from the thick cable harness under the dashboard on the right-hand side of the steering wheel
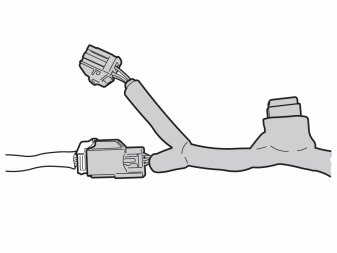
- Take the cable harness with the two gray connectors. Connect this to the existing connector. The pre-routed connector is already connected on certain versions.
- Disconnect this and connect both the connectors from the new cable harness.
- Cut a 700 mm piece of foam tape into three pieces of the same length. Tape one piece around the connectors on the car's existing cable harness.
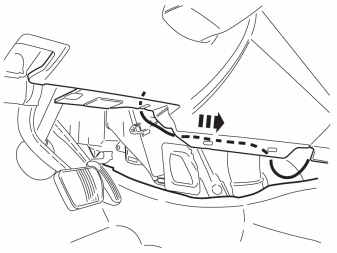
Does not apply to right-hand drive vehicles.
- Route the cable harness backwards and across through the center console.
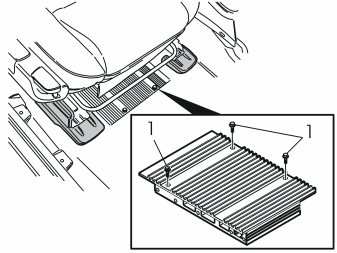
Applies to both right and left-hand drive vehicles
- Slacken off the amplifier screws (1) under the right-hand front seat.
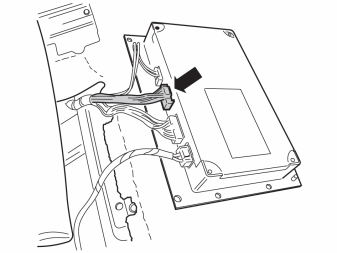
- Lift out the amplifier. Use a weatherstrip to raise it from its recessed position.
- Place it upside down as illustrated.
- Disconnect the connector.
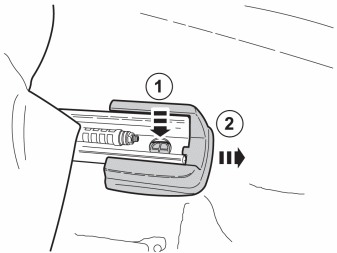
- Remove the left-hand seat piece.
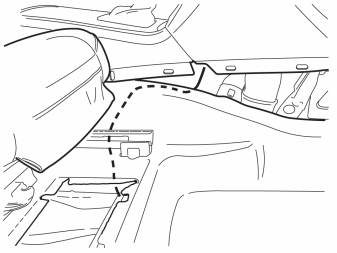
- Route the cable that was connected to the 4-pin connector from the center console to the amplifier under the carpet.
Applies to right-hand drive cars
- Route the cable that was connected to the 4-pin connector, on the right-hand side of the center console and then under the carpet to the amplifier.
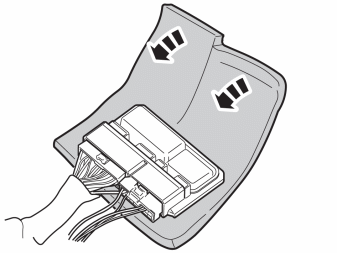
- Connect the pre-routed cable and T cable to the mute relay.
- Tape two thick pieces of foam tape around the mute relay.
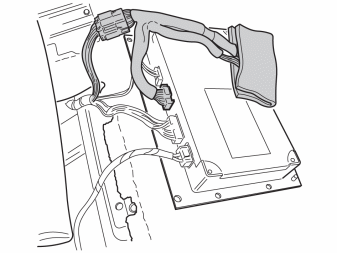
- Connect the connector that was disconnected from the amplifier to the connector from the mute relay.
- Tape one cut piece of foam tape around the connectors.
- Connect the other connector from the mute-relay to the amplifier.
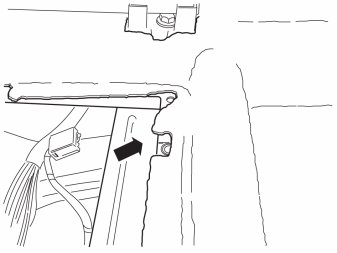
- Place the mute-relay under the front left corner in the recess.
- Reinstall the amplifier and tighten it with the screws.
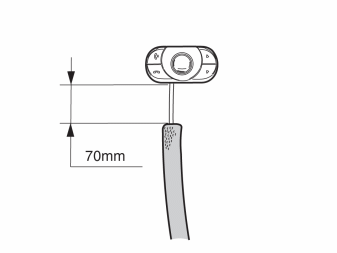
- Tape a 700 mm length piece of foam tape on the cable starting 70 mm from the control panel.
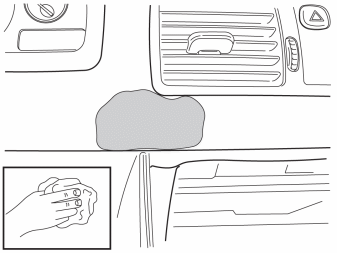
- Clean the area around the dashboard where the control panel is to be positioned. Use isopropanol for example.
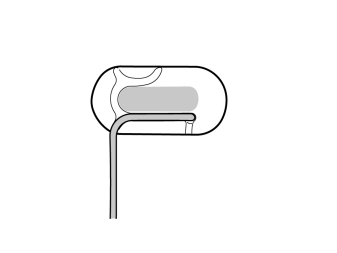
Only applies to right-hand drive vehicles
- Position the control panel cable in the groove as illustrated.
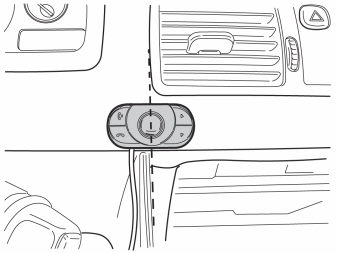
- Remove the protective film from the tape on the reverse of the control panel.
- Align and secure the control panel on the dashboard.
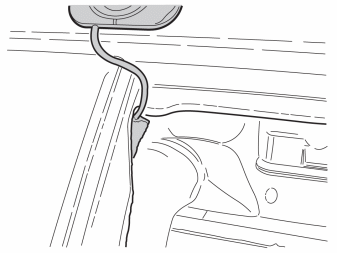
- Pull the cable down to the opening in the center console.
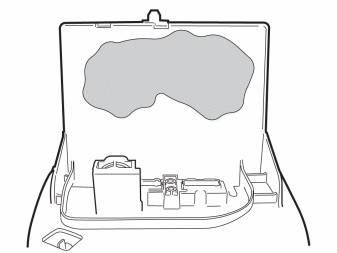
- Clean the surrounding areas, as illustrated, underneath the detached A/C unit/radio bracket with, for example, isopropanol.
Applies to right-hand drive cars
- steps 37-41 must not be mirrored.
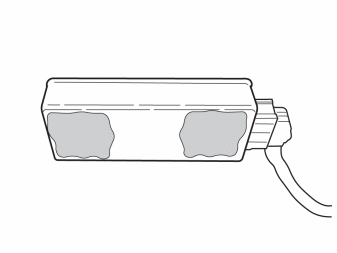
- Clean the control module at the points illustrated, using isopropanol for example.
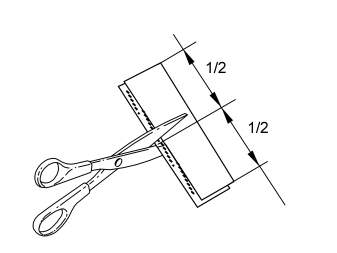
- Take a Velcro strip and cut off two pieces of the same length
- Press the pieces together.
- Cut off two pieces of the same length again at the center.
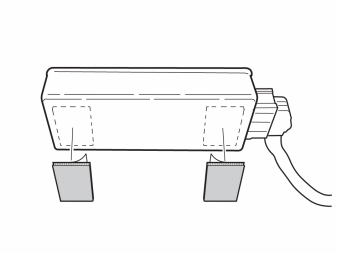
- Remove the protective film from one side of the Velcro strips which were pressed together.
- Apply the Velcro strips on the control module and press.
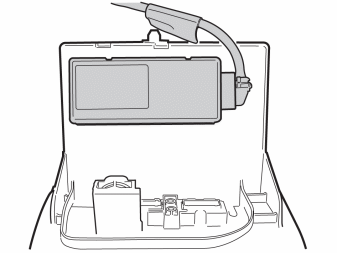
- Remove the remaining protective file on the Velcro strips, align and install the control module as illustrated. Press onto the control module so that the tape adheres.
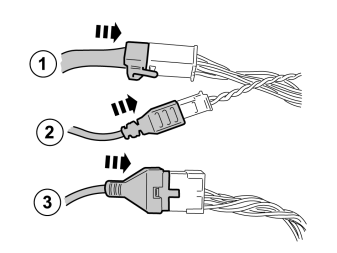
- Connect the connectors, see:
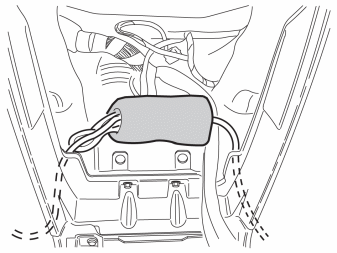
- Tape one cut piece of foam tape around the connectors.
- Place the connectors and excess cables in the bottom of the center console. Check that they do not rub against the bracket edges.
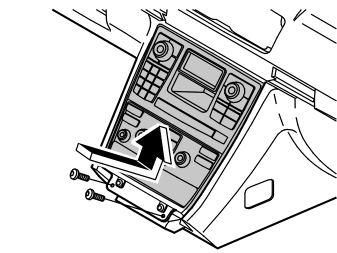
- Reinstall the center console by first hooking the upper edge into place. Then press upwards and angle in the lower section.
- At the same time check that the cable to the control panel is correctly positioned.
- Reinstall the screws.
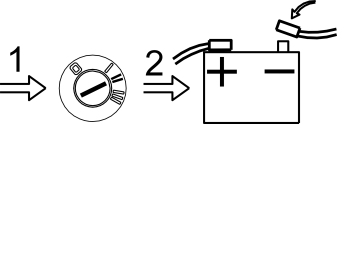
Reinstall:
- panel for gear selector.
- A-pillar panel and screws and cover for grab handle.
- the rubber strips in the door opening.
- the end face panel for the dashboard.
- glove box.
- sound proofing panels.
- seat piece.
- the side panels on the centre console.
Обсуждение и оценка
0Пока нет комментариев. Будьте первым.