Применимость
| Модель | Двигатель | Год |
|---|---|---|
| S60 (-09) | — | 2001–2009 |
| S80 (-06) | — | 1999–2006 |
| V70 (00-08) | — | 2000–2008 |
| V70 XC (01-) / XC70 (-07) | — | 2001–2007 |
Примечание: On certain models the electrical cable for the antenna amplifier may be pre-routed. Carry out point ru-RU0900c8af80ffd9c4#KC01244304 or ru-RU0900c8af80ffd9c4#KC01244306 first to see if the electrical cable has been pre-routed. Check if a black cable has been routed under the right-hand side tail lamp. Then carry out points ru-RU0900c8af80ffd9c4#KC01244287 -ru-RU0900c8af80ffd9c4#KC01244291. Check if there are two black electrical cables routed to the two-pin connector on the right-hand side of the rear edge on the radio.
- If there is no black electrical cable pre-routed under the right-hand side tail lamp, carry out points ru-RU0900c8af80ffd9c4#KC01244287 -ru-RU0900c8af80ffd9c4#KC01244317
- If a black electrical cable is pre-routed under the right-hand tail lamp and only one black electrical cable has been routed to the two-pin connector on the right-hand side of the rear edge on the radio, carry out points ru-RU0900c8af80ffd9c4#KC01244287 -ru-RU0900c8af80ffd9c4#KC01244317 and secure the old cable
- If there are two black electrical cables in the two-pin connector on the right-hand side of the rear edge on the radio but no black electrical cable is pre-routed under the right-hand tail lamp, carry out points ru-RU0900c8af80ffd9c4#KC01244287 -ru-RU0900c8af80ffd9c4#KC01244317. Remove the right-hand (looking towards the front of the car) of the two cables from the connector. Clamp this cable to secure it
- If there are two black electrical cables in the two-pin connector on the right-hand side of the rear edge on the radio and a black electrical cable is pre-routed under the right-hand tail lamp, carry out point ru-RU0900c8af80ffd9c4#KC01244313.
Interior preparations

- Move the right front seat to the rearmost position
- Turn the ignition key to position O
- Cars with manual gearboxes: Remove the ignition key.
Примечание: Wait at least five minutes before disassembling the connectors or removing other electrical equipment.
- Disconnect the battery negative lead.
Illustration A applies to the S60 and the V70
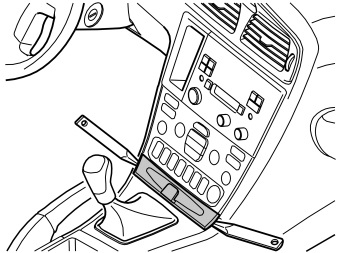
- Remove the panel in front of the gear selector lever. Pry off the panel using a weatherstrip tool
- Move the gear selector lever to its rearmost position.
Illustration B applies to the S80
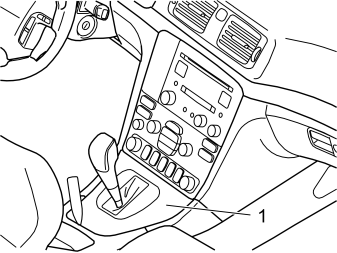
- Remove the panel (1) with the boot. Carefully pry the panel with a weatherstrip tool.
Illustration A applies to the S60 and the V70
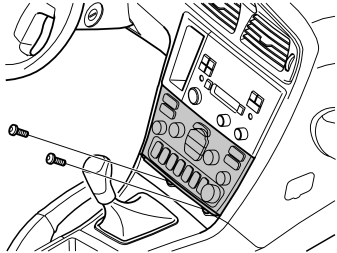
- Remove the two screws from the dashboard environment panel.
Illustration B applies to the S80
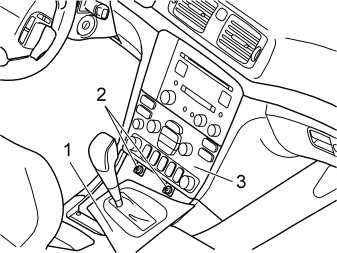
- Shift the gear selector lever into rearmost position
- Pull the panel (1) with the boot backward as far as possible
- Remove the screws (2) from the dashboard environment panel (3).
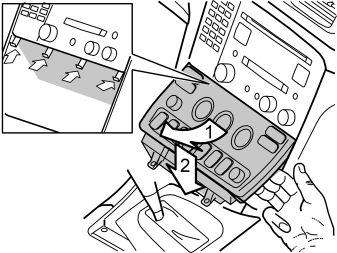
- Angle the dashboard environment panel outwards so that it is possible to insert a couple of fingers between the centre console and the side of the dashboard environment panel
- Pull the dashboard environment panel downwards while maintaining the same angle. Remove the dashboard environment panel. Some force is required because the panel is tightly installed
- Disconnect the connectors on the reverse of the dashboard environment panel. Put the dashboard environment panel to one side.
Примечание: If any of the outer hooks break off, these must be repaired. The method for this can be found in the Service Manual in the section covering the dashboard.
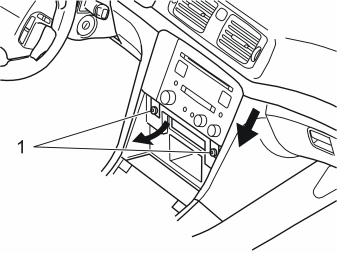
- Remove the screws (1) from the radio bracket
- Pull out the bracket with the radio (pull the lower corner while pressing downwards)
- Disconnect the radio connectors. Remove the bracket with the radio.
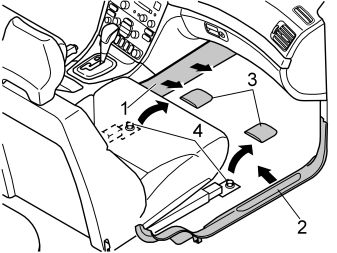
Remove:
- right side panel (1) by turning the screw clip at the rear edge of the panel half a turn. Pull the panel outwards and backwards
- the sill trim panel (2) at the right front door
- the covers (3) for the front seat mounting
- the two screws (4).
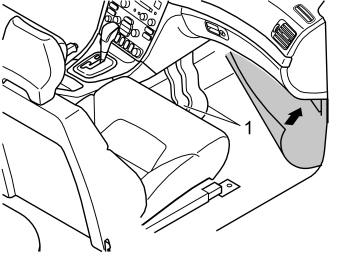
- Tip the seat back
- Fold the floor carpet forward to access the two air ducts (1).
Applies to S60 and S80
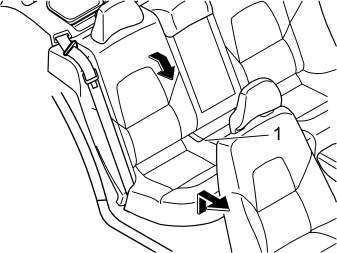
- Remove the seat cushion (1). First lift the front edge of the cushion and then pull forwards
- Fold the right rear backrest forward.
Applies to the V70
Illustration A
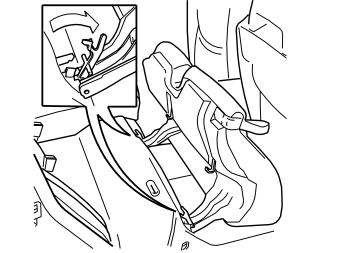
- Fold the right rear seat cushion forward.
Illustration B
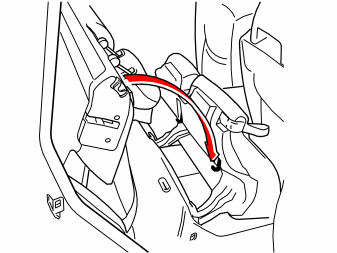
- Fold the right rear backrest forward.
Illustration C
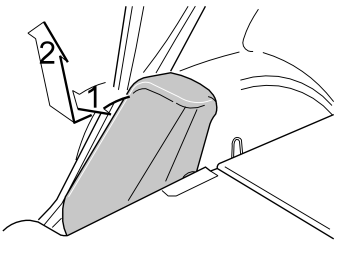
- Remove the right side cushion. First pull the upper edge of the cushion backwards. Then lift the cushion.
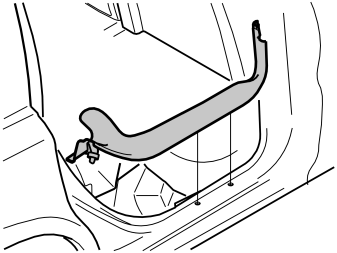
- Pull the door sill out of the right-hand rear door. Start at the rear edge
- Push the floor carpet and insulation panel to one side to access the connectors under the lower mountings.
Cargo compartment preparations (S60)
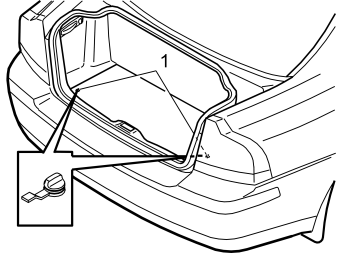
- Remove the cargo compartment carpet at the rear edge. First turn the two handles (1) 90°.
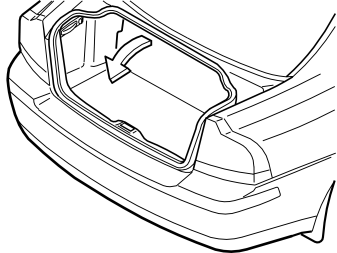
- Pull up the front of the cargo compartment carpet. Fold the front half back over the rear half of the cargo compartment carpet.
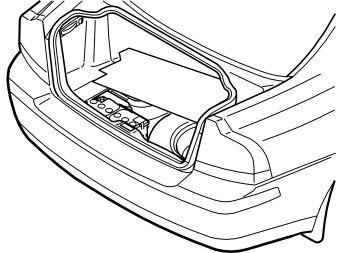
- Slide the entire cargo compartment carpet forward slightly. Twist slightly to remove the cargo compartment carpet through the tailgate opening.
Cargo compartment preparations (S60 and S80)
- Remove the cargo compartment carpet.
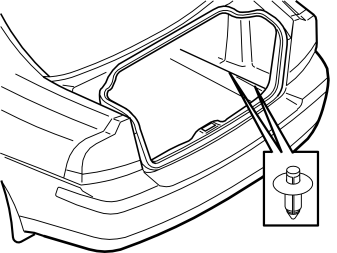
- Press the centres of the clips at the lower edge of the foldable side panel on the left-hand side until a click is heard.
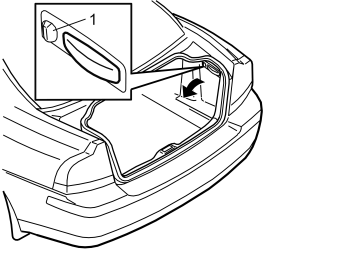
- Turn the handle (1) on the right-hand side through 90°
- Fold the side panel inwards. Lift the panel out.
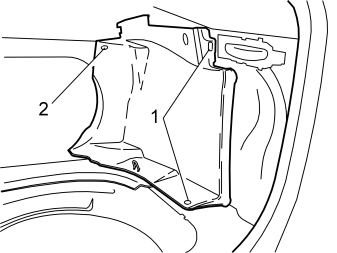
Remove:
- the clips (1) in the right front side panel in the cargo compartment
- the clips (2) at the top of the front edge on the side panel for the rear folding backrest
- the panel.
Cargo compartment preparations (V70)
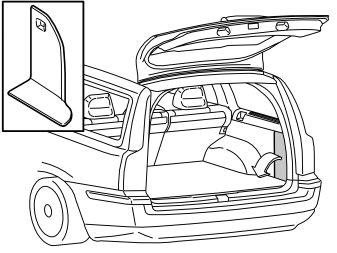
- Remove the right-hand folding panel in the cargo compartment.
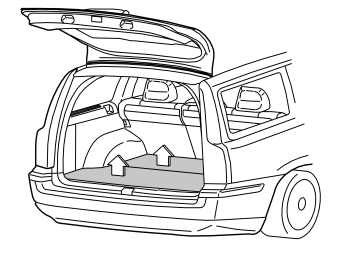
- Pull the rear edges of both floor hatches up. Pull the rear floor hatches backwards. Remove the rear floor hatches from the mountings.
Illustration B applies to the V70 with an auxiliary rear facing seat
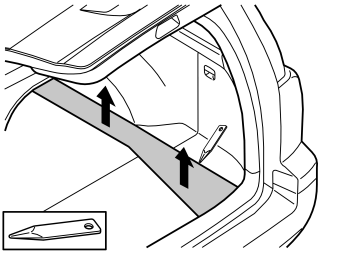
- Remove the right side floor hatch by prising up one end. Use a weatherstrip tool.
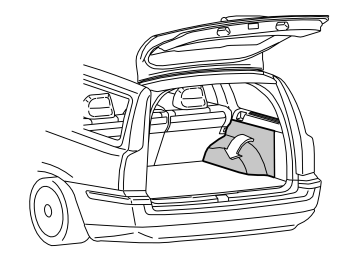
- Remove the right-hand side panel. First remove the cover and the screw at the front edge
- Pull the top edge of the panel out until the clips release
- Fold the panel inwards. Lift the panel out.
Illustration B applies to cars with an auxiliary rear facing seat
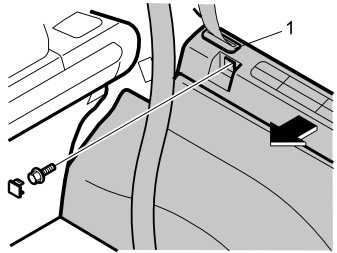
- Remove the right-hand side panel. First remove the cover and the screw from the front edge
- Pull the top edge of the panel out until the clips release
- Pull the seat belt out of the holder (1)
- Remove the safety cover. First bend out the hooks on the underside. Pull the cover straight up
- Fold the panel inwards. Lift the panel out.
Connection and finishing work
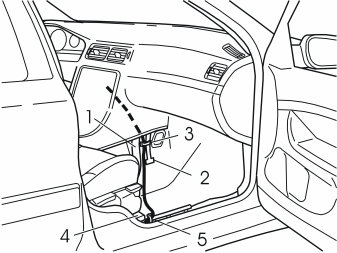
Примечание: Check that the correct end of the antenna cable is routed to the radio tray.
- Route the antenna cable up between the front air duct (1) and the firewall stay (2)
- Route the cable through the radio compartment
- Secure the cable in the stay (3). Use a tie strap from the kit
- Route the cable above and along the front air duct to the seat mounting member (4)
- Clamp the wiring to the existing cable harness (5). Use a tie strap from the kit.
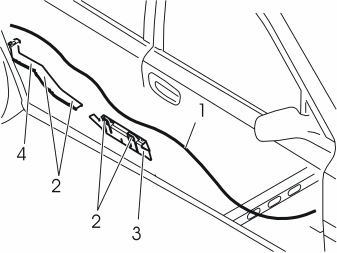
- Route the cable (1) under the carpet along the right side of the car to the rear door
- Install protective caps on the lugs (2) for the cable ducts
- Route the cable above and along the front cable duct (3). Continue along the left-hand side of the rear cable duct (4).
Illustration A applies to the S60 and the S80
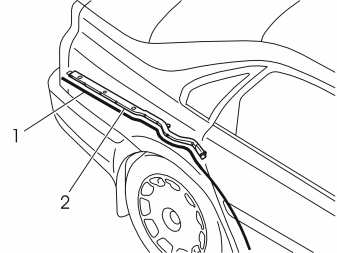
Illustration B applies to the V70
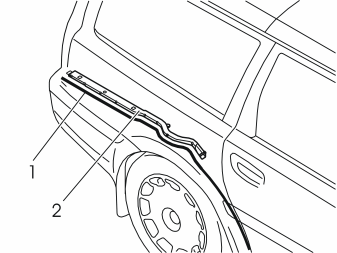
- Route the cable (1) out through the hole in the bodywork at the wheel arch and along the right-hand side of the rear cable duct (2) to the right tail lamp.
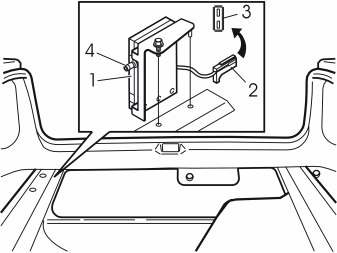
- Connect the cable (2) for the antenna amplifier (1) to the connector (3) for the antenna in the bumper
- Position the antenna amplifier on the edge of the panel in front of the right tail lamp as illustrated
- Tighten the antenna amplifier to the edge of the panel
- Connect the routed cable to the socket (4) on the antenna amplifier.
- Clamp the cable along the cable duct in the cargo compartment. Use tie straps from the kit (see operation ru-RU0900c8af80ffd9c4#KC01244312)
- Reinstall the panels in the cargo compartment
- Reinstall the sill trim panel in the right-hand rear door
- Fold the seat cushion back into place
- Fold the backrest back into place
- Fold the right front floor carpet back into place.
Reinstall:
- the sill trim panel in the right front door
- the seat. Tighten the seat using the two new screws from the kit. Tighten to 40 Nm (29.5 ft.lb)
- the two covers
- the right side panel for the centre console.
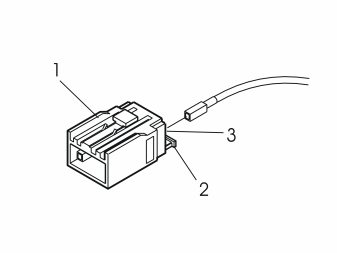
Примечание: If there are two black electrical cables in the connector, remove the right-hand (looking from the back of the connector) electrical cable. Secure the right-hand electrical cable. Install the new electrical cable.
- Connect the antenna cable to the two-pin connector (1), disconnected from the radio, to the spare terminal. Pry up the connector at the rear edge. Pull out the green plastic catch (2)
- Insert the cable in the free terminal (3). Lock the cable in place using the catch.
- Insert the radio in the radio tray. Connect the antenna cable and the connectors to the radio
- Reinstall the bracket with the radio. See point ru-RU0900c8af80ffd9c4#KC01244291
- Connect the connectors to the dashboard environment panel. Reinstall the dashboard environment panel, see procedure ru-RU0900c8af80ffd9c4#KC01244289 and ru-RU0900c8af80ffd9c4#KC01244290
- Reinstall the panel in front of the gear selector lever.
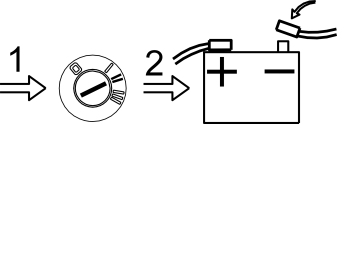
- Turn the ignition key to position II
- Reconnect the battery negative lead
- Re-position the cargo compartment carpet
- Fold the rear floor hatch back into position.
Обсуждение и оценка
0Пока нет комментариев. Будьте первым.