Применимость
| Модель | Двигатель | Год |
|---|---|---|
| S80 (-06) | — | 1999–2004 |
Примечание: This accessory is connected to the electrical system of the car. It requires software unique to the car.
Applies only to cars equipped with power seats
- Position the right front seat in the centre position. Raise it to its highest position
- Position the left front seat in the rear position.

- Turn the ignition key to position 0
- Disconnect the battery negative lead.
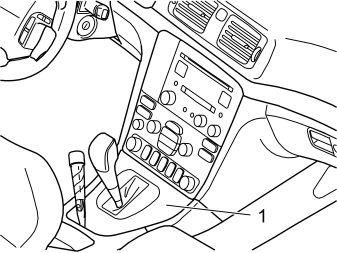
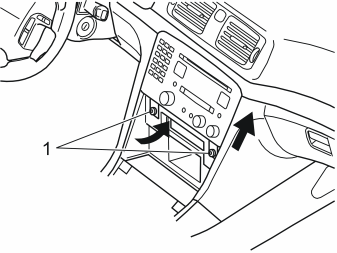
- Detach the panel (1). Detach the boot around the gear selector lever using a weatherstrip tool.
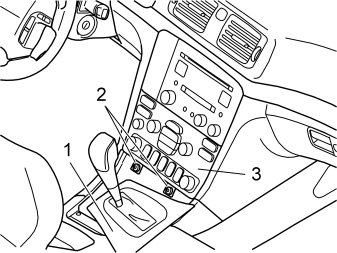
- Move the gear selector lever to the rearmost position
- Pull the panel (1) with the boot backwards as far as possible and turn it as illustrated
- Remove the screws (2) holding the dashboard environment panel (3).
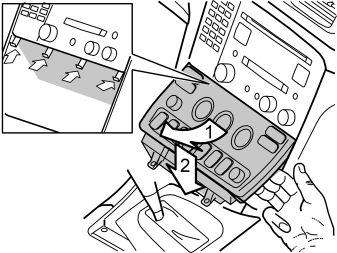
- Angle the dashboard environment panel outwards so that it is possible to insert a couple of fingers between the centre console and the side of the dashboard environment panel
- Pull the dashboard environment panel downwards while maintaining the same angle. Remove the dashboard environment panel. Some force is required because the panel is tightly installed
- Disconnect the connectors on the reverse of the dashboard environment panel. Put the dashboard environment panel to one side.
Примечание: If any of the outer hooks break off, these must be repaired. The method for this can be found in the Workshop Manual in the section about the dashboard.
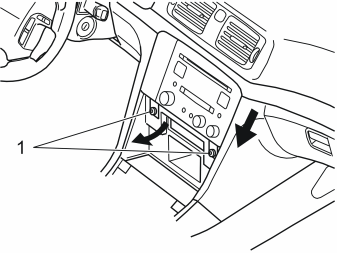
- Remove the screws (1) from the radio bracket
- Pull the bracket with the radio outwards at the lower edge. Press the whole unit downwards
- Disconnect the connectors from the radio
- Remove the radio.
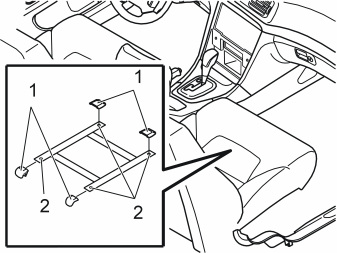
- Remove the covers (1) over the screws on the right seat
- Remove the screws (2) from the seat base
- Disconnect the connectors under the seat
- Tip the seat back.
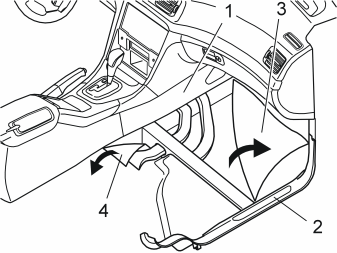
- Remove the panel (1) from the right-hand side of the centre console
- Remove the sill moulding (2) at the right front door
- Pull the carpet (3) at the front left mounting for the right-hand seat, forward and to the right
- Tie it up to the door stop using string
- Fold the rear mat (4) backwards at an angle.
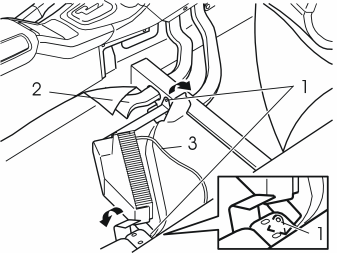
- Connect the thick cable harness (from the kit) to the amplifier sockets
- If there is a pre-routed power supply cable (3) under the right-hand seat, connect it and ignore points 11-14. If there is not, connect the cable to the amplifier
- Install the amplifier with the two screws supplied (1) and tighten
- Route the positive power supply lead alongside the cable harness to the radio compartment.
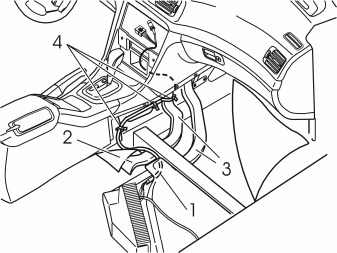
- Route the cable harness under the cut-out tab (1) in the carpet by the left front mounting for the right-hand seat
- Route the cable harness over the left-hand air duct (2), along the underside of the centre console, between the air ducts (3) and up to the cut-out for the dashboard environment panel. Then continue to the radio compartment
- Secure at the points (4).
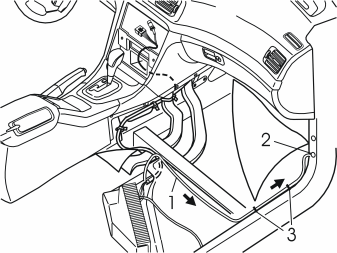
Примечание: The fuse holder is located on the right-hand side on right-hand drive cars. Route the positive power cable alongside the ground lead and up along the A-post to the fuse holder.
- Route the ground lead (1) for the power supply (brown) under the carpet at the rear edge of the member for the front seat mounting. Continue out to the right-hand side of the door sill
- Route the cable under the existing cable harness to the brown cable in the ground terminal at the front door post. Connect the cable to the ground terminal (2)
- Secure the cable to the cable harness by the seat mounting member (3) and by the front door post (3).
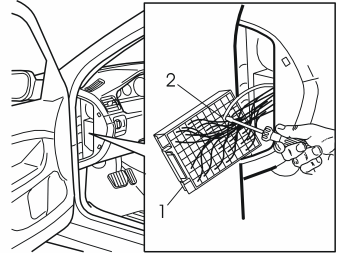
- Remove the fuse holder (1). First pry up the catch on the top. Then pull outwards
- Route the amplifier positive supply cable from the radio compartment behind the dashboard to the fuse holder
- Route the cable down to the cable harness under the steering column. Secure the cable and the wiring harness using a tie strap
- Route the cable to the left along the cable for the floor lighting. Secure these using a tie strap
- Route the cable up to the fuse holder
- Connect the cable to terminal 17 (2) on the rear of the fuse holder
- Reinstall the fuse holder
- Reinstall the cover.
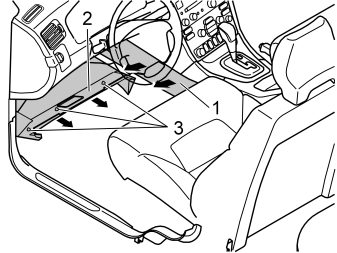
- Move the left front seat to its rearmost position
- Remove the left side panel (1) from the centre console. Turn the screw clips in rear edge of the panel. Pull the rear edge of the panel outwards and backwards
- Remove the soundproofing panel (2) by prying it down at the rear edge opposite the three clips (3) and pulling it backwards.
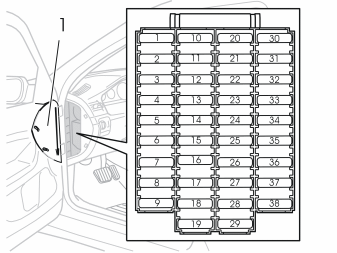
- Remove the cover (1) for the fuse holder on the left-hand side of dashboard
- Install a 30A fuse in terminal 17.
- Connect the loudspeaker, amplifier and antenna connectors to the radio.
When connecting the grey connector from the amplifier, disconnect the grey connector for the loudspeakers from the radio. The two connectors are connected to each other. The loudspeaker socket in the radio is not used.
- Insert the radio in its compartment
- Press the radio up so that the groove in the top of the bracket goes round the upper edge of the radio compartment. At the same time angle the radio down so that the lower mountings on the bracket press against the lower edge of the radio compartment
- Install the two screws (1) in the lower mountings. Tighten the screws.
- Reinstall the panel around the gear selector lever
- Connect the connectors. Reinstall the dashboard environment panel
- Reposition the carpets
- Connect the connectors to the seat and return the seat to its position
- Install the four new screws from the kit in the underside of the seat
- Tighten the screws. Tighten to 40 Nm (30 lbf. ft.)
- Reinstall the covers for the seat screws
- Reinstall the soundproofing panel
- Reinstall the centre console panel
- Reinstall the sill moulding.
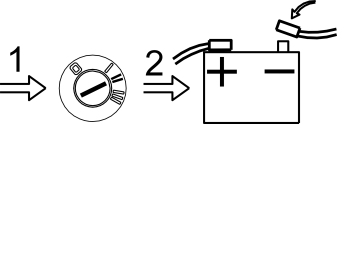
- Turn the ignition key to position II
- Reconnect the battery negative lead.
Program the software using VCT2000 according to the service information in VIDA.
Обсуждение и оценка
0Пока нет комментариев. Будьте первым.